wikiHow is a “wiki,” similar to Wikipedia, which means that many of our articles are co-written by multiple authors. To create this article, 161 people, some anonymous, worked to edit and improve it over time.
The wikiHow Video Team also followed the article's instructions and verified that they work.
This article has been viewed 2,395,260 times.
Learn more...
Having a piñata at your party is a great way to provide decoration and entertainment all in one. There's no need to go out and buy a pinata for your next party, though. With these simple steps you can build your own, and you might find that making pinatas can be just as fun as breaking them!
Steps
Starting Your Piñata
-
1Protect your work area. Making your pinata has the potential to get a little messy, so make sure you give yourself plenty of room to work. Cover your work area with layers of newspaper or a disposable plastic tablecloth. This will keep your tabletop clean, and make cleanup afterward a breeze. Keep yourself clean too by wearing an old shirt or apron as well as latex gloves.
-
2Make the paper mache paste. In a bowl, mix 2 cups (473 g) of flour, 2 cups (473 ml) of water, and a tablespoon of salt. Stir the mixture until it starts to thicken like a batter. Don't worry about breaking down all the lumps; you want the batter to be relatively smooth but it will likely still have chunks of flour in it.[1]Advertisement
-
3Prepare your paper mache strips. Tear some newspaper into strips that are about 1 to 2 inches (2.5 to 5.1 cm) wide and 6 to 8 inch (15.2 to 20.3 cm) long. This will make the newspaper lay nice and flat on the balloon. You will need to prepare many of these strips of paper so that you have enough to cover your balloon in several layers.[2]
-
4Choose a shape for your pinata. Make your pinata whatever you like! The easiest shape to make is an oblong sphere based on a balloon form, but you can create anything you want.[3]
- To create a more elaborate shape, tape or glue cardstock, and cardboard onto your balloon form.
- Traditional pinatas are made with a ceramic pot as the form, but these can be messy and dangerous. Stick with a pliable form made from paper products.


Forming the Piñata Base
-
1Inflate your balloon. This will form the body of your pinata, so make sure you make it nice and big. Round balloons are preferable because they will create a larger space for all of the candy. You may also use a box if you prefer a square shape for your pinata. Add any additional shapes to make legs, arms, tails, snouts, hats, etc, using cardboard, newspaper or construction paper. Tape these shapes on with masking tape or clear tape.[4]
-
2Apply the paper mache paste to your paper strips. Dip the strips into your paste and remove any excess paste by running the strips through your pinched fingers or dragging them along the edge of the bowl.
-
3Apply the paper mache to the balloon. Lay the strips down all over the balloon in a crisscross pattern until the entire balloon is covered. Leave the knot of the balloon uncovered to make removal of the balloon easier. Complete this step 3 to 4 times, allowing each layer to dry before adding another.[5]
-
4Let the pinata dry. Once you have finished adding layers of paper mache, let the pinata sit until it is completely dry and has hardened. How long this will be will depend on many factors, including how thick the paper mache is, and the humidity and temperature of the air. In general, plan on several days.


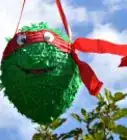
Decorating the Pinata
-
1Paint the piñata. Use a single color to smooth out the paper and to create an even surface. It does not need to be especially well-painted, just enough to cover the paper. Choose a color that matches the decorations you'll be adding on or to match the animal or character that you're turning your piñata into, as it'll probably show through.
-
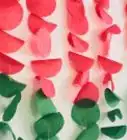
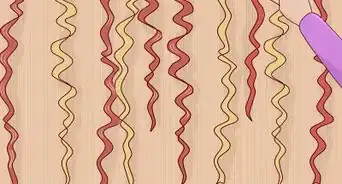
2Glue crepe paper to the pinata. This will give your pinata a more traditional look. It is also a festive and inexpensive touch. Cut or tear strips of crepe paper and glue it onto the pinata. Leave the paper in strips, or bunch it up into small tassel-like balls and glue on.[6]
-
3Add finishing touches. Once you've gotten the base of crepe paper on, add other neat details to your pinata. Colorful cupcake liners and brightly colored tissue squares can be added as fringe. If you made an animal, add googly eyes for a fun look.


Filling the Piñata
-
1Cut a hole for the candy. If the balloon has not yet popped, go ahead and pop it and remove it. Since you did not cover the knot of the balloon with your paper mache, you should have a small hole already.[7]
-
2Make the hole bigger if needed. If the candy doesn't fit, cut away at the edge of the hole until it is large enough to pass the candy through.
-
3Punch two small holes around the main hole. Tie a string or ribbon to the holes to create a loop. This will come in handy later when it comes time to hang the pinata.
-
4Put the goodies in the piñata. Start adding in candy, streamers, stickers, confetti, small toys or anything else you like.
- Avoid adding any candy that isn't wrapped.
- Toys that may break easily are also a poor choice.
-
5Cover the hole. Glue down some crepe paper on top of the hole, or use masking tape. The goal is to prevent the filling of the pinata from falling out before you've actually hit it.
-
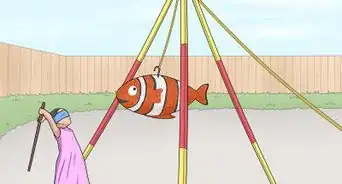
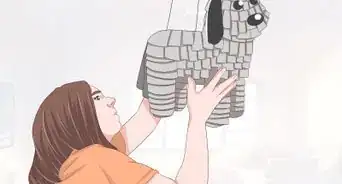
6Hang the pinata. Tie another piece of string, ribbon, or rope to the loop you've already made and use this to attach the pinata to whatever you'd like to hang it from.

Community Q&A
-
QuestionIf I'm short on time, can I dry the pinata we are making with a hair dryer?
 Community AnswerA hair dryer set on "cool" would work, but it might be easier to aim a few fans at it from different angles.
 -
QuestionCan I make a pinata with multiple layers?
 Community AnswerYes. You can stick on more paper mache layers or more layers for decoration.
 -
QuestionWhy do you need salt?Community AnswerIt stops the papier mache from getting moldy.
Things You'll Need
- Balloons
- Several newspapers
- Water, flour, and salt (to make the glue) or starch
- Scissors
- Paint
- Crepe paper (and other decorations if wanted)
- String or ribbon (to hang the piñata)
- Candy (for filling)
- Wooden baton about 18 inches/45 cm (to hit with) or a big stick or bat
References
- ↑ https://www.bbcgoodfood.com/howto/guide/how-make-paper-mache
- ↑ https://www.bbcgoodfood.com/howto/guide/how-make-paper-mache
- ↑ http://pinataboy.com/make-your-own/overview/
- ↑ http://pinataboy.com/make-your-own/overview/
- ↑ https://www.bbcgoodfood.com/howto/guide/how-make-paper-mache
- ↑ http://pinataboy.com/make-your-own/decorating-with-crepe-paper/
- ↑ http://pinataboy.com/make-your-own/cutting-the-candy-opening/
- http://www.marthastewart.com/271560/making-a-pinata
About This Article
To make a piñata, start by making a paper mache paste with flour, water, and salt. Then, cut out some paper mache strips using old newspapers. Once you have your paper mache paste and strips, inflate a balloon and cover it with the strips of paper using the paste. Let the paper mache dry completely and then glue strips of colorful crepe paper over it. When you're finished decorating your piñata, cut a hole in the top and fill it with candy. Finally, cover the hole with a piece of crepe paper and you're finished. If you want to learn how to paint your piñata before adding the crepe paper, keep reading!