X
wikiHow is a “wiki,” similar to Wikipedia, which means that many of our articles are co-written by multiple authors. To create this article, 19 people, some anonymous, worked to edit and improve it over time.
The wikiHow Video Team also followed the article's instructions and verified that they work.
This article has been viewed 159,797 times.
Learn more...
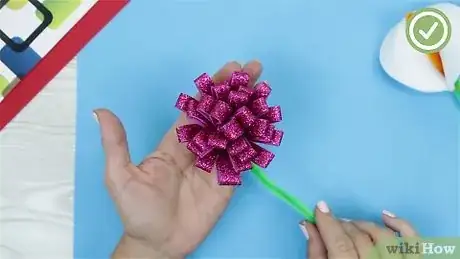
Homemade foam flowers make excellent decorations for parties. Making them is simple, so it's a great project to do with kids. Craft stores and dollar stores carry all the supplies you need to make these colorful creations. Read on to learn how to make foam calla lilies, violets and mums.
Steps
Method 1
Method 1 of 3:
Calla Lily
-
1Cut a circle out of a sheet of foam. This will become the calla lily bloom. The circumference of the circle can be as small or as large as you want.
-
2Fold the circle in half. Make sure it's folded neatly, so that the shape of the calla lily will turn out right.Advertisement
-
3Alter the circle to create a rounded heart shape. Start by placing the scissors at the bottom point of the folded foam. Cut along the edge of the circle, then dip the scissors in at the top of the circle to make a rounded edge. when you unfold the circle, it should look like a rounded heart, with two subtle humps at the top; the bottom of the heart should remain rounded.
- The classic heart shape has a sharply pointed bottom tip, but in this case you want to keep the bottom rounded with a slight point.
- Don't make the humps at the top too pronounced; they should be subtle.
-
4Make a small slit between the humps. This will make it easier to form the foam into the cylindrical shape of a calla lily bloom.
-
5Cut a yellow pipe cleaner in half, then fold it in half. Twist the two ends together. This will become the lily's stamen, which juts realistically out from the center of the bloom.
-
6Glue the pipe cleaner in the cleft between the two humps. Put a dab of hot glue just between the two humps above the slit, and lay the folded pipe cleaner on top so that the folded end sticks up toward the point of the lily boom. The twisted ends should jut out past the cleft by about 1⁄2 inch (1.3 cm).
-
7Gather the lily bloom around the pipe cleaner. Put a dab of hot glue on the front of the yellow pipe cleaner right at the cleft in the lily bloom. Take the two sides of the lily bloom (right where you made the slit) and pinch them together in front of the pipe cleaner, pressing them down so that they stick to the hot glue dab. You can add an extra dab of hot glue between the sides to help them stay in place.
-
8Make a stem out of a green pipe cleaner. Wrap the top of the pipe cleaner around the base of the yellow pipe cleaner, so that the yellow is completely obscured. Leave the tail of the green pipe cleaner straight, so it resembles a stem.
Advertisement
Method 2
Method 2 of 3:
Violet
-
1Cut a circle from a purple piece of foam. Use purple foam if you want to make a violet, but other colors are fine if you'd like to make a different type of flower.
-
2Cut slits around the circle. Cut evenly-spaced slits from the edge of the circle toward the middle, stopping about 1⁄2 inch (1.3 cm) short of the center.
-
3Cut "v" shapes out of the petals. Lift each petal and cut an inverted "v" shape by making two diagonal cuts.
-
4Cut a small circle out of white foam. This will be the center of the flower.
-
5Glue the circle to the center. Place a dab of hot glue in the center of the violet, then stick the small white circle to the glue.
-
6Scrunch the flower petals. Pinch each flower petal in half vertically, so they stand up a bit and created a 3-D effect, rather than lying flat.
-
7Glue the stem to the back of the flower. Use a green pipe cleaner as the stem, and glue the top to the back of the flower's center.
Advertisement
Method 3
Method 3 of 3:
Mum
-
1Cut a foam square in half. Choose any color you'd like, since mums come in a variety of hues.
-
2Create a loop. Put a line of hot glue across the bottom of the foam, then stick the top of the foam sheet to the glue.
-
3Cut fringe. Cut strait lines from the folded part of the loop toward the glued edges. Stop cutting before you get to the glue line. Continue until you've made fringe all the way across.
-
4Roll the foam. Begin at one short edge and roll the foam to the opposite end. When the roll is complete, dab some hot glue along the opposite end and press it down against the roll. Now start with one end of the foam and begin to roll to the opposite end.
-
5Open the flower. When the glue dries, use your fingers to open the flower by pulling out the "petals." Press each petal in the center so that it opens. Continue fluffing out the petals until the flower looks complete.
-
6Add a stem. Place a dab of glue in the center of the bottom of the mum. Lay the end of the pipe cleaner on the glue and hold it in place until the glue dries.
-
7Finished.
Advertisement
Community Q&A
-
QuestionHow do I carry flowers?Flower bouquets can be carried in any manner that is comfortable for that person. For a wedding, flowers should be held just below the waist at hip level; this makes the best look in a photo. Holding flowers above the waist creates angles at the elbows and looks stiff and awkward in a photo.
-
QuestionHow do I make a foam rose?Start with a circle of foam. Cut into the outer edge (widest) and spiral a wave pattern (petal) into the center (narrowest). Wrap the spiral from the narrowest (rose center) out to the edge. Glue as you roll the base of the rose (see Method 3, Step 4). Test this out on paper before using foam to get a feel for how it will look.
-
QuestionHow do I make foam roses?
 Chantelle HegneyCommunity AnswerTake some foam balls, then with an Exacto knife, start to cut around the balls. Then you will have some twirly scrapes. Paint them a dark shade of red followed with highlights of bright red. Do this with the twirly scrapes as well. Tape the twirly scrapes onto the balls, and stick the balls into green skewers. Add little green leaves to the stems.
Advertisement
Things You'll Need
- Sheets of foam
- Pipe cleaners
- Hot glue gun and glue sticks
- Scissors
About This Article
Advertisement
