wikiHow is a “wiki,” similar to Wikipedia, which means that many of our articles are co-written by multiple authors. To create this article, 15 people, some anonymous, worked to edit and improve it over time.
The wikiHow Video Team also followed the article's instructions and verified that they work.
This article has been viewed 331,610 times.
Learn more...
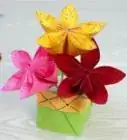
Tissue paper roses are inexpensive to make, but the result is a handmade decoration that's quite beautiful. They can be used to decorate everything from a wedding reception hall to a wrapped gift. You can make them to resemble both open and closed flowers and may add a "stem" underneath. These roses can be displayed singly or with many together in a bouquet.
Steps
Making Open Flowers
-
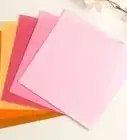
1Get your tissue paper ready. Select a color of tissue paper for your rose's petals. You may use natural rose colors, such as red, pink, white, orange, yellow, and lavender.[1] Instead, you may get creative and use other colors or even patterned paper. Black roses can look both elegant and morbid if you're decorating for a Halloween party. When making open roses, you may use multiple colors in one "flower" to make a rainbow.
-
2Cut out the petals. Using scissors, cut out eight round pieces of tissue paper roughly the same size.[2] Don't try to make the pieces perfect circles, as roses are not spheres. The pieces may be any size, just keep in mind that their diameter will be roughly half the width of the finished rose.Advertisement
-
3Curl and wrinkle the tissue paper slightly. This will make the petals look more realistic. Stack the petals on top of one another. Place the bottom end of a pen on top of the petals. Curl the pieces around the pen and move the pen up and down and side to side.[3]
-
4Create the blossom. Separate out the stack of petals. Take the first petal and twist it tightly into a cone shape. Wrap a second petal into a cone around the first petal starting roughly one centimeter below its top. Repeat this with three more petals. For the final three petals, wrap only about a quarter of each petal into the cone and leave the rest flat. These bottom petals should encircle the entire rose.
-
5Secure the paper rose petals with wire. Cut a roughly 10 centimeter piece of thin-gauge wire. Wrap the wire underneath the rose where the petals twist together. Fluff the bottom petals over the wire to disguise it.[4]

Creating Closed Flowers
-
1Select your tissue paper. Keep in mind that these flowers will be made of a single sheet each. You won't be able to make multicolored roses like you can with open flowers unless you use patterned paper. Start with whatever size tissue paper you can find. Typical craft tissue paper sizes are around 50 square centimeters.
-
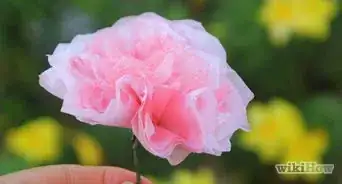
2Rumple one sheet of tissue paper. Crumple the paper into a ball. The wrinkled texture will give your rose volume. Be careful not to tear the paper.[5]
-
3Smooth the paper back out and cut it in half. If your paper is a rectangle, cut it lengthwise. Each half can make its own flower. Take one half and fold it in half again lengthwise.[6]
-
4Roll the paper into a rose. Keep the folded edge on top. Take the bottom corner and begin rolling the paper like a cinnamon roll. Move the paper lower as you go so that the center of the rose is slightly higher than the gradually sloping outer layer.[7]
-
5Secure the flower. Finish rolling the paper by twisting the last edge tightly under the bottom of the flower. Wrap either a small piece of thin-gauge wire or a green pipe cleaner around the bottom tip to hold the blossom in place. You may also gently insert a wooden dowel through the bottom to both act as support and the base of the stem.[8]

Constructing the Stem
-
1Measure and cut a roughly 84 centimeter long piece of heavy wire. Be sure not to leave jagged ends where you cut. Sharps ends can both prick you and tear the paper rose. A shorter green pipe cleaner may be used instead of heavy wire.
-
2Fold the wire into thirds to make it the right thickness for a stem. Twist the wires together for a neater look. If you have trouble doing this by hand, use a pair of pliers. Wrap green florist tape around the wire to cover it completely. If you're using pipe cleaner, skip this step.
-
3Cut out the leaves. Use green tissue paper. Cut out four ovals per flower in the shape of a leaf. The leaves should be as long as either the diameter of the petals for the open flower or the height of the quartered tissue paper for the closed rose.
-
4Roll the leaves around a pen. Bunch the leaves over the bottom end of a pen as described in Step 3 of Method 1. Curling them slightly gives them a more realistic look. Focus the curve towards one end of the leaves to mimic the main vein of a real leaf.
-
5Wrap the wire or pipe cleaner around the bottom of the flower. Coil it tightly to keep the tissue paper from peaking through. Once the bottom of the rose is covered, start to twist the stem loosely instead. Keep twisting until the stem is about three centimeters long.
-
6Add the leaves. Pinch one end of a leaf and twist the stem around it. Give the stem another few twists, and then add a second leaf. Continue this pattern for the remaining leaves. After all leaves have been added, continue making loose twists with the wire or pipe cleaner until you reach its end.

Community Q&A
-
QuestionWhat is tissue paper?
 Community AnswerThin, semi-transparent, smooth, evenly-colored paper.
 -
QuestionAre there easier ways to make tissue paper roses?
 DA_BLOBFISHHYYYCommunity AnswerThe second one is easy. You just crumple it, cut it in half, and wrap it around a pencil!
 -
QuestionCan I use actual tissue?It is possible to use actual tissue to make paper roses. The challenge is to find a tissue that will not completely shred when manipulated. It also requires a lot more care in assembling, as the tissue does not have the fiber strength of other papers.
Things You'll Need
- Tissue paper
- Scissors
- Pen
- Thin-gauge wire
- Green tissue paper
- Heavy wire
- Green pipe cleaner
- Green florist tape


References
- ↑ http://www.goodhousekeeping.com/holidays/valentines-day-ideas/g1352/rose-color-meanings
- ↑ http://theartfulcrafter.com/blog/paper-flowers-one.html
- ↑ http://theartfulcrafter.com/blog/paper-flowers-one.html
- ↑ http://theartfulcrafter.com/blog/paper-flowers-one.html
- ↑ http://www.myjuicecup.com/tissue-paper-roses
- ↑ http://www.myjuicecup.com/tissue-paper-roses
- ↑ http://www.myjuicecup.com/tissue-paper-roses
- ↑ http://www.myjuicecup.com/tissue-paper-roses
- ↑ http://dictionary.reference.com/browse/crepe-paper
About This Article
To make a tissue paper rose, start by crumpling a sheet of tissue paper into a ball. Then, smooth it out, cut the sheet in half lengthwise, and fold one of the halves lengthwise. Keeping the folded edge on top, hold the bottom corner and start rolling the paper like a cinnamon bun. Try to move the paper lower as you roll it so the center of your rose is a little higher than the gradually sloping outer layers. When you’re done, twist the last edge of paper under the bottom of the flower. You can then make a stem from a pipe cleaner or some heavy wire, and attach green tissue-paper leaves to finish your rose. To learn how to make a rose that looks like it’s fully in bloom, scroll down!