This article was co-authored by wikiHow Staff. Our trained team of editors and researchers validate articles for accuracy and comprehensiveness. wikiHow's Content Management Team carefully monitors the work from our editorial staff to ensure that each article is backed by trusted research and meets our high quality standards.
The wikiHow Video Team also followed the article's instructions and verified that they work.
This article has been viewed 35,208 times.
Learn more...
Napkin rings are a great way to add that final touch to your table, but the wrong design can quickly ruin your set up. If you can't find those perfect napkin rings, however, you can always make your own. This way, you will be able to customize them to your liking. Once you know how to make basic napkin rings, you can play around with different materials and designs!
Steps
Making Rustic Napkin Rings
-
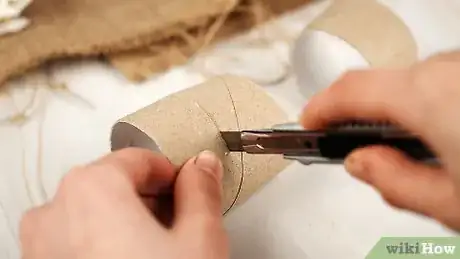
1Cut an empty toilet paper roll into thirds. You can also use a paper towel roll instead; in that case, cut the roll into rings as thin or as thick as you'd like. Many people find a serrated bread knife the easiest for this, but you can also use a pair of scissors instead; be careful not to squish the roll too much.
- Sometimes, toilet paper rolls will have little bits of paper stuck to them. Try to peel these off as best as you can.
- For sturdier napkin rings, use the cardboard tube that comes inside a container of plastic wrap or aluminum foil.
-
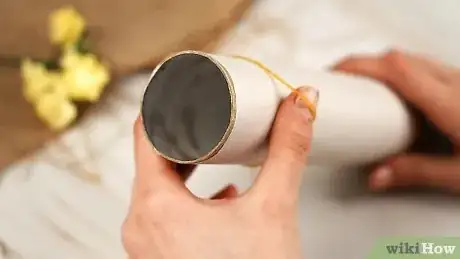
2Hot glue the end of a long piece of jute string inside the cut toilet paper roll. If you don't have any hot glue, you can also use fabric glue instead, as it dries fairly quickly.[1] As a last resort, you can also use tacky glue, but you'll need to hold the string in place using a paper clip or clothespin until the glue dries.
- You will need about 95 to 120 inches (2.413 to 3.048 meters) of jute string per napkin ring. You might find it easier to cut it in half first.[2]
Advertisement -
3Start wrapping the jute string around the cut toilet paper ring. Pull the string around the outer edge of the ring, then bring it through the center hole. Keep wrapping and winding the string, all the way around the ring. Gently push the loops of string against each other so that you don't see any gaps.[3]
-
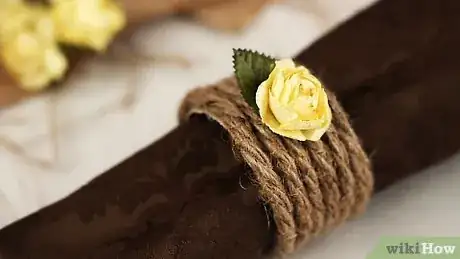
4Continue wrapping until the entire ring is covered, then glue the end of the string inside the napkin ring. If you have a lot of string left over, trim it until you have about an inch (2.54 centimeters) or so leftover, then tuck the excess inside the ring, and secure it with glue. At this point, you can also snip off any loose or fraying bits of string.[4]
- If you cut your string in half, now is the time to cover up the other side of the ring!
-
5Hot glue a rustic or natural decoration onto the top of the napkin ring. Starfish, sand dollars, and flat seashells work great for the rustic, seaside look. For a rustic, country look, try fake flowers instead.[5] Flowers that go well with this rustic theme include mini sunflowers, daisies, and poppies.
- You can also use fabric glue for this, but tacky glue is not recommended, as it will take too long to dry, and your decoration may slide off.
-
6Let the glue set before using your napkin ring. If you used hot glue, this should only take a few seconds. If you used fabric glue, this may take several minutes.
Making Burlap or Lace Napkin Rings
-
1Cover a cardboard tube with wax paper and secure it at both ends with rubber bands. You can use an empty paper towel tube or an empty toilet paper tube for this. The longer paper towel tube will allow you to make several napkin rings at one time, however.[6] The wax paper will prevent the glue from sticking to the cardboard tube, and allow you to slide your finished napkin ring off easily.
- You can also cut a piece of wax paper longer than the cardboard tube, wrap it around the tube, and then tuck the ends inside it.[7]
-
2Cut the burlap or lace ribbon. Choose some burlap or lace ribbon that is the same width as what you want the napkin rings to be. Wrap it around your cardboard tube, add ½ inch (1.27 centimeters), and cut it.
- If you absolutely cannot find burlap or lace ribbon, you can use regular or lace fabric instead. The edges will not be finished, however, and will give the napkin rings and even more rustic feel.
-
3Wrap the ribbon around the cardboard tube and secure it with two sewing pins. Overlap the two ends by ½ inch (1.27 centimeters), then stick a sewing pin straight into the cardboard tube, at the top and bottom of the seam.[8]
-
4Apply Mod Podge, or a similar decoupage glue, over the fabric until it is completely saturated. Use a foam brush to do this, and focus especially on the seam. Be sure that the Mod Podge or decoupage that you are using has a matte finish.[9]
-
5Stand the cardboard tubes upright and wait for the glue to dry. This will take about 4 to 5 hours.[10] If you are having troubles getting the tubes to stand upright, you can place them over a narrow salt or pepper shaker, the top of a long-necked bottle, or even a paper towel holder.
-
6Take the napkin rings off of the cardboard tubes. Pull off the rubber bands and remove the sewing pins. Slide the napkin rings off of the tube; don't worry if the wax paper comes with it. Carefully peel away the wax paper, if needed.
- Do not get impatient with this step. The Mod Podge must be completely dry.
-
7Let the napkin rings finish drying, if necessary. Thicker materials, such as burlap, might still be a little damp inside. If this is the case, stand the napkin rings upright, and let them finish drying.[11]
- For extra support, you might want to brush on an extra layer of Mod Podge or decoupage glue over the outside and inside seam.
-
8Decorate the napkin rings further, if desired. Once the napkin rings are completely dry, they are ready to use. You can also decorate them further, however. Here are some ideas to get you started:
- Hot glue some small, silk or felt flowers to burlap napkin rings for a rustic/fall look.[12]
- Hot glue a large jingle bell to a burlap napkin ring for a cozy cottage/winter look.
- Wrap some thin, jute string around the middle of lace napkin rings for a country-chic touch, and tie it into a bow.[13]
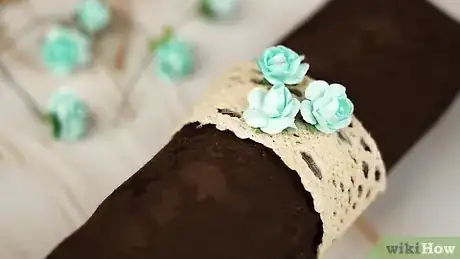
- Hot glue a pastel-colored silk rose or peony to a lace napkin ring for a vintage look. You could also add some pearl beading to the edges.
Making Flower Napkin Rings
-
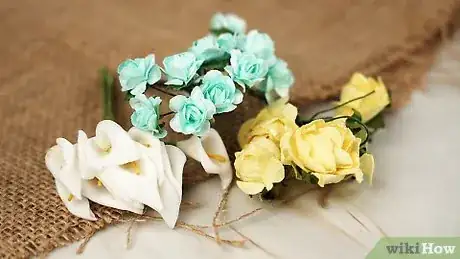
1Get some flowers. You can use fresh flowers or silk flowers for this. For the most unique and interesting looking napkin rings, choose a variety of sizes for your flowers, such as fern, baby's breath, and rosebuds.
-
2Get some rings that are close to the size you want your final napkin rings to be. You can use any type of metal or plastic ring for this—it just needs to be wide enough to hold your napkin. Curtain rings, shower curtain rings, and binder rings are all perfect for this.
-
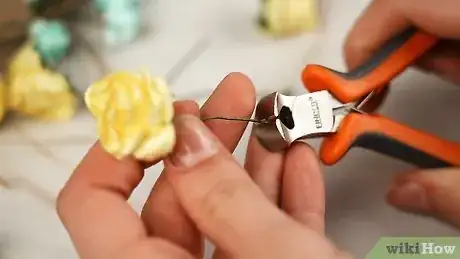
3Prepare your flowers. Pull or cut off any large leaves and trim the stems down to 2 to 3 inches (5.08 to 7.62 centimeters). If you can, cut the flower stems at an angle.[14]
- If you are using fake flowers, cut them using wire cutters. Some fake flowers have wires inside of them, which can ruin a pair of scissors.
- Consider sorting your colors by size: small, medium, and large. You should have more small flowers than large ones.
- Keep fresh flowers in a bowl of water to keep them fresh while you work.
-
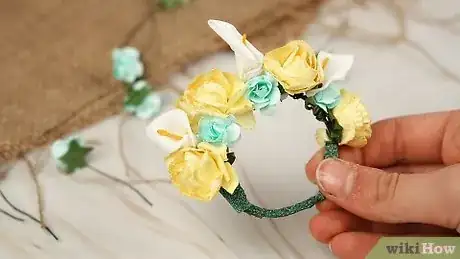
4Attach your largest flower first. Hold the stem parallel against the ring. Wrap a piece of florist's tape around the ring, extending the tape just past the end of the stem.
-
5Add your medium-sized bloom next. Position the flower so that the bloom is just next to the first one; the stem will be overlapping the first stem. Tape down this new flower in a similar fashion.
-
6Continue taping your flowers around the napkin ring. Alternate between large and medium sizes. Be sure to include some greenery (such as ferns) and tiny flowers (such as baby's breath) for the most varied effect.
-
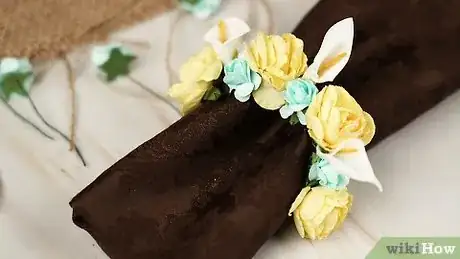
7Use your flower napkin rings. If your event is still a few hours away, and you are using fresh flowers, mist the napkin rings with water, then store them in a cold room. The flowers will stay fresh for up to 4 hours.[15]
Making Beaded Napkin Rings
-
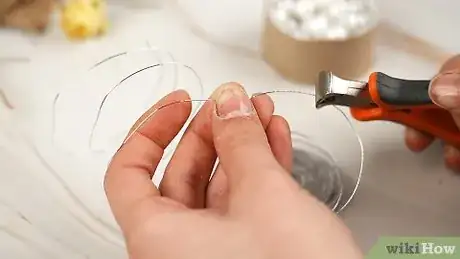
1Measure out at three loops of memory wire, then cut it with a pair of wire cutters. Make sure that you are using a pair of heavy-duty wire cutters. Memory wire is very strong, and it can damage a more delicate pair of beading or jewelry wire cutters. Do not cut the three coils apart; this will make one napkin ring.
-
2Use a pair of round-nosed pliers to bend one end of the memory wire into a small loop. Pinch the end of the memory wire with the tip of your pliers. Wrap the wire over the top of the pliers forming a loop. Make sure that you are bending the loop back towards the arch of the wire.[16]
-
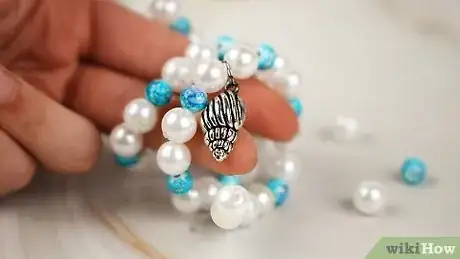
3Add your beads onto the memory wire. You can use any type of beads you'd like. You can even play around with different shapes, sizes, and colors. For a more professional look, work in odd numbers for each design. For example, you could have three seed beads, and one large, brown bead, followed by three more blue seed beads. Leave about ½ inch (1.27 centimeters) at the end of your wire bare, so that you can make the end loop.
-
4Use your round-nosed pliers to make another loop at the end of the wire. Pinch the end of the wire with your plies, and curl it in on itself to make a loop.
-
5Add some charms, if desired, using jump rings. Use a pair of pliers to open up a jump ring, then slip your desired charm onto it. Position the jump ring wherever you want it to be on the napkin ring (between two beads or at one of the end loops), then close it.
- Open your jump ring by pulling the two ends past each other, like a door. Don't pull them away from each other by pulling on them.
-
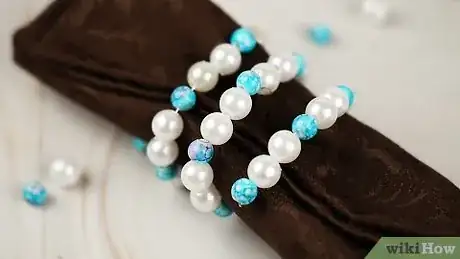
6Use the napkin ring. Roll or fold your napkin into a tube or rectangle, then wrap the napkin ring around the middle. If you'd like, you can gently fluff out each end of the napkin for a fancier look.
Printable Napkin Rings
Things You'll Need
Making Rustic Napkin Rings
- Jute string
- Empty toilet paper roll
- Starfish, flat shell, or fake flower
- Hot glue gun and hot glue sticks or fabric glue
- Scissors
Making Burlap or Lace Napkin Rings
- Cardboard tube (ie: empty toilet paper or paper towel roll)
- Wax paper
- Rubber bands
- Burlap, fabric, or lace (ribbon recommended)
- Scissors
- Sewing pin
- Foam brush
- Decoupage glue or Mod Podge
- Embellishments (optional)
- Hot glue (optional, for embellishments)
Making Flower Napkin Rings
- Scissors (wire cutters if using fake flowers)
- Curtain rings or binder rings
- Floral tape
- Fresh or fake flowers
- Bowl of water (for fresh flowers only)
Making Beaded Napkin Rings
- Memory wire
- Seed beads or crystal bicone beads
- Round-nosed pliers
- Wire cutters (heavy-duty, not beading)
References
- ↑ http://betweennapsontheporch.net/make-a-starfish-napkin-ring-a-pottery-barn-knock-off/
- ↑ http://betweennapsontheporch.net/make-a-starfish-napkin-ring-a-pottery-barn-knock-off/
- ↑ http://betweennapsontheporch.net/make-a-starfish-napkin-ring-a-pottery-barn-knock-off/
- ↑ http://betweennapsontheporch.net/make-a-starfish-napkin-ring-a-pottery-barn-knock-off/
- ↑ http://betweennapsontheporch.net/make-a-starfish-napkin-ring-a-pottery-barn-knock-off/
- ↑ http://www.polkadotbride.com/2013/02/diy-lace-napkin-rings-tutorial/
- ↑ https://jackofalltradeblog.wordpress.com/2013/11/17/burlap-napkin-rings/
- ↑ http://www.polkadotbride.com/2013/02/diy-lace-napkin-rings-tutorial/
- ↑ https://jackofalltradeblog.wordpress.com/2013/11/17/burlap-napkin-rings/
- ↑ http://www.polkadotbride.com/2013/02/diy-lace-napkin-rings-tutorial/
- ↑ https://jackofalltradeblog.wordpress.com/2013/11/17/burlap-napkin-rings/
- ↑ https://jackofalltradeblog.wordpress.com/2013/11/17/burlap-napkin-rings/
- ↑ http://www.polkadotbride.com/2013/02/diy-lace-napkin-rings-tutorial/
- ↑ http://www.weddingbee.com/fresh-flower-napkin-rings
- ↑ http://www.weddingbee.com/fresh-flower-napkin-rings
- ↑ http://www.polkadotbride.com/2011/04/beaded-napkin-rings/
