This article was co-authored by wikiHow Staff. Our trained team of editors and researchers validate articles for accuracy and comprehensiveness. wikiHow's Content Management Team carefully monitors the work from our editorial staff to ensure that each article is backed by trusted research and meets our high quality standards.
There are 8 references cited in this article, which can be found at the bottom of the page.
The wikiHow Video Team also followed the article's instructions and verified that they work.
This article has been viewed 29,703 times.
Learn more...
Jelly cube slime is a kind of clear or colorful slime mixed with firm sponge cubes. This gives the slime a crunchy, squishy texture that is fun to play with. What's more, it's easy to make and uses ingredients that you might already have. By mixing a slime base, dyeing and cutting a magic eraser into cubes, and combining the entire mixture, you can easily make your own jelly cube slime.
Steps
Creating Clear or Colorful Slime
-
1Stir the clear glue, water, and baking soda in a large bowl. Ensure that you use a bowl that will hold at least 3 cups (720 mL) of liquid. Add 1 cup (240 mL) of clear glue, 1 cup (240 mL) of warm water, and 1 tsp (1 g) of baking soda to the bowl. Stir to combine the ingredients.[1]
- You can use a fork or a spoon to stir the liquid. Make sure there are no clumps of baking soda after you finish stirring.
-
2Add a few drops of food coloring if desired. You can keep your slime clear, or add a few drops of the food coloring of your choice to dye it. Stir to combine the food coloring with the glue, water, and baking soda. Try adding just 2 to 3 drops for lightly tinted slime, or add 7 to 8 drops for a darker, more saturated color.[2]
- For example, you could add 2 drops of green food coloring for slime that is tinted green and still easy to see through, or go with 8 drops for dark green slime that is only slightly transparent.
- Make sure to consider the color you want to dye your cubes. Choose colors that match or complement each other, such as yellow slime with yellow cubes or pink slime with purple cubes.
Advertisement -
3Mix in 1 tbsp (15 mL) of contact lens solution. Contact lens solution contains borax, which activates the other ingredients and turns them into slime. Add the contact lens solution and then stir the ingredients together. Keep stirring until the slime starts to come away from the sides of the bowl.[3]
Tip: Do not add more than the recommended amount of contact lens solution or the slime may be too rubbery. You can always add a little more if needed, but you cannot take it back out.
-
4Knead to finish mixing the slime. Once the slime starts to take shape, continue mixing it with your hands. Grasp the slime with your hands and knead it until you are happy with the consistency.[4]
- If the slime feels a bit sticky, add another 1/2 tsp (2.5 mL) of contact lens solution to the slime and knead it in. This will help to reduce the stickiness.

Cutting and Dyeing the Cubes
-
1Cut a magic eraser into 1 in (2.5 cm) or smaller cubes. A magic eraser is a special type of sponge that has a stiff, crunchy texture to it. These sponge cubes are what give jelly cube slime its signature crunchy, squishy texture. Use a sharp pair of scissors or a sharp, non-serrated knife to cut the sponge into cubes.[5]
- If you’re using a knife to cut the sponge, do it on a cutting board rather than over your counter or a plate.
- You can try using a regular sponge if you prefer, but the slime will end up with a different texture since regular sponges are not stiff and crunchy like magic eraser sponges.
Warning: Be careful when cutting the sponge into cubes! Ask someone to help you with this part if needed.
-
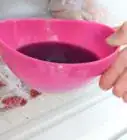
2Add a few drops of food coloring to 2 cups (480 mL) of warm water. After your cubes are cut, pour the water into a large bowl and stir in 3 to 4 drops of food coloring. Use a bowl that can hold at least 3 cups (720 mL) of liquid to make sure there will be enough room for the cubes.[6]
- You can use any color you like to dye the cubes! Try making blue cubes with blue food coloring, or mix 2 colors together, such as 2 red and 2 yellow to make orange cubes.
-
3Place the cubes into the dye and stir to coat them. Use a spoon to stir the cubes around in the dye and sure that they are all submerged. If needed, add another 1/2 cup (120 mL) of water to the bowl to raise the liquid level, then stir the cubes around in the dye.[7]
- You can add another drop or 2 of dye as well, just try not to add it directly to any of the cubes or you might end up with a couple that look different from the rest.
-
4Leave the cubes to soak for 30 minutes or longer. It will take about 30 minutes to dye the cubes well, but you may leave them in for longer if desired. The longer you leave them in, the better the dye will set in. You can even leave them in the dye overnight if desired.[8]
- If you only want your cubes to be lightly dyed, take them out sooner, such as after 15 minutes.


Drying the Cubes and Finishing the Slime
-
1Drain the excess water from the cubes. After you soak the cubes in the dye for the desired amount of time, pour them into a colander over a sink. Hold them over the sink for a few minutes to drain the excess liquid. Shake the colander gently over the sink to get as much liquid out of the cubes as possible.[9]
- Be careful not to shake the colander too much or the cubes may fall out.
-
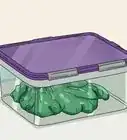
2Squeeze the excess water out and let the cubes dry for 1 hour. Grasp a handful of the cubes and squeeze them over the sink to get even more water out of them. Then, place the cubes onto a dry paper towel after you squeeze them. Repeat this for all of the cubes. Let them sit and dry out for 1 hour.[10]
- The cubes should feel dry to the touch when time is up.
Tip: You might want to wear gloves to squeeze out the cubes. Otherwise, you will end up with dye on your hands.
-
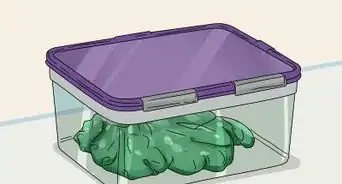
3Knead the cubes into the slime. After the slime is ready and the cubes are dry, dump the cubes into the bowl of slime and knead them in. Squish and fold the slime with your hands to distribute the cubes evenly.[11]
- Your jelly cube slime is now ready! Have fun playing with it!
Community Q&A
-
QuestionCan I use something other than the magic eraser sponges?
 Sofia GonzalesCommunity AnswerYes, you can use any home sponge. However, I recommend magic erasers because of the texture.
 -
QuestionDo I have to use dye or can I use food coloring instead?
 Community AnswerYou can use food coloring, they are basically the same thing.
 -
QuestionCan I use something other than glue?Community AnswerAnything that has PVA in it. Most peel-off face masks do!
Warnings
- Be aware that jelly cube slime is not edible! Do not try to eat it!⧼thumbs_response⧽
Things You’ll Need
- 1 cup (240 mL) of clear glue
- 1 cup (240 mL) of warm water
- 1 tsp (1 g) of baking soda
- Food coloring
- 1 tbsp (15 mL) of contact lens solution
- Large bowl
- Spoon
- Magic eraser sponge
- Scissors or a knife
- Small bowl
- 2 cups (240 mL) of warm water
References
- ↑ https://littlebinsforlittlehands.com/how-to-make-clear-slime-recipe/
- ↑ https://littlebinsforlittlehands.com/how-to-make-clear-slime-recipe/
- ↑ https://littlebinsforlittlehands.com/how-to-make-clear-slime-recipe/
- ↑ https://littlebinsforlittlehands.com/how-to-make-clear-slime-recipe/
- ↑ https://www.youtube.com/watch?v=hMVr3iJ1ZRc&feature=youtu.be&t=45
- ↑ https://www.youtube.com/watch?v=hMVr3iJ1ZRc&feature=youtu.be&t=100
- ↑ https://www.youtube.com/watch?v=hMVr3iJ1ZRc&feature=youtu.be&t=145
- ↑ https://www.youtube.com/watch?v=hMVr3iJ1ZRc&feature=youtu.be&t=250
- ↑ https://www.youtube.com/watch?v=hMVr3iJ1ZRc&feature=youtu.be&t=260
About This Article