This article was co-authored by wikiHow Staff. Our trained team of editors and researchers validate articles for accuracy and comprehensiveness. wikiHow's Content Management Team carefully monitors the work from our editorial staff to ensure that each article is backed by trusted research and meets our high quality standards.
There are 30 references cited in this article, which can be found at the bottom of the page.
This article has been viewed 56,432 times.
Learn more...
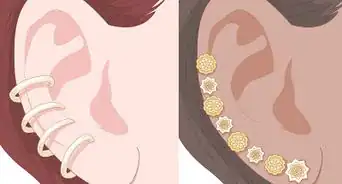
Ear cuffs are trendy and easy to make with a pair of needle nose pliers and a piece of jewelry wire. You can make a simple cuff, or one with a clover, bow, or heart shape in it. Try making an earring cuff or a couple to try out this fun DIY jewelry trend!
Steps
Choosing and Preparing the Wire
-
1Choose 22 gauge wire in the color of your choice. You can select any type of jewelry wire you like to make ear cuffs. Jewelry wire is available at craft supply stores in a variety of sizes and colors. The wire will needs to be thick enough to a hold its shape after you bend it and flexible enough to tighten and loosen it when you take the cuff off and on. A 22-guage wire works well. You can find wire that is finished with different colors, such as copper, red, blue, green, etc., or you can go with a plain silver colored wire.[1]
- You will only need a few inches of wire to create an ear cuff, but wire is usually sold in spool that is a few feet long.
-
2Measure the part of your ear where you want to wear the cuff. Take a 2 in (5.1 cm) piece of string in both hands and hold it up to your ear. Wrap it around the part of your ear where you want to put your cuff. Use your fingers to pinch off the string at the locations where you want the cuff to begin and end. Then, hold the string next to a ruler to figure out how long your wire will need to be.[2]Advertisement
-
3Cut about 20 centimetres (7.9 in) of wire. Cut your first length of wire using a pair of sharp scissors or wire cutters. Cut straight across the wire to avoid creating a pointed edge.[3]
- When in doubt, give yourself a little longer piece of wire to work with—you can always cut it later.
-
4Smooth out the edges of the wire. Use a metal file to smooth the ends of the wire. Move the file back and forth across 1 end of the wire until it feels smooth when you run your finger across it, and then repeat on the other end of the wire. This will help to prevent jagged edges from scratching your ear when you wear the ear cuff.[4]
Bending the Wire into a Cuff Shape
-
1Grip the end of the wire with the pliers and create a small circular hook. You should use needle-nose pliers (they taper into a point) for the greatest control. Bend the end into a small round hook, almost like a pin head.[5]
-
2Measure your cuff length from the bottom of the circle. Take your ruler and measure down from the little bent circle of wire. If your measurement for the cuff was 1 inch (2.5 cm), then move 1 inch (2.5 cm) down the wire.[6]
-
3Bend the wire back on itself at your measurement. Turn the wire back so that it is doubled up on itself (kind of like a paper clip). You'll have a U-shaped bend with the wire extending up on one side and the hook on the other.[7]
-
4Shape the wire into a zig-zag. Bend the wire back so that it is even with your hook. Then, take the long piece of wire and bend the whole thing into a "Z" shape. Keep bending the wire back and forth like this until you've made a complete zig-zag shape. You should have 1 free piece of wire hanging off the last curve.[8]
-
5Use your pliers to create another hook right at the last bend of the wire. Right now, you have a long zig-zagging piece of wire, with a hook on 1 end and a free end of wire on the other. With the pliers, grab the wire right at the last bend before the free end of wire, then use your fingers to rotate the wire around the pliers and create another hook.[9]
-
6Cut off the excess wire so you have hooks on both ends of the wire. You'll have a little "W" when you are done, with hooks on the top of the letter. Cut the excess wire, and use your hands to mold both ends into little hooks.[10]
-
7Mold your ear cuff around a large pen or Sharpie. To get the right curve for an ear cuff, take the whole shape you have created and bend it around a pen, or another cylindrical object. A normal permanent marker is usually perfect, but smaller pens may be too thin to effectively round off the cuff.[11]
- Once you put the cuff on your ear, you can use your fingers to lightly mold it into place even more, so it will stick to your ear.
Creating Clover Ear Cuffs
-
1Measure, cut, and bend a hook into the end of your wire like normal. Use the string to measure out the width of your cuff. Then, cut about 20 centimeter (8 in) of wire off for your cuff and make the small loop with the point of the pliers around the very end of wire.[12]
-
2Bend the wire back on itself to make a figure 8. Place half of the pliers in the loop, and the other underneath. Then, bend the wire around the pliers to form a figure 8 at the bottom of the wire.[13]
-
3Create 1 more loop to make a clover. Bend the wire above the figure 8, then curve it back down so you have a little 3-leaf clover, with the wire pointing downward.[14]
-
4Create a zigzag pattern with the remaining wire. Keep doubling the wire up until you have roughly 1 free length of wire left. You should be making a sideways M or W shaped center for your cuff.[15]
-
5Repeat the process to create a clover on the other end of the wire. If desired, you can finish the other end of the wire with a clover, or you can just make a loop on the other end.[16]
-
6Bend the cuff around your pen for a perfectly shaped ear cuff. Remember that you may want to experiment with the pen size, and need to mold the final shape a bit by hand.[17]
Making Bow Ear Cuffs
-
1Bend the wire about 2 centimeter (0.8 in) from the end into a loop. Keep the extra length of wire on both sides. Use the pliers to bend a loop into the wire, turning it into a subtle L-shape. The "ends" extending off the loop should be perpendicular to the wire.[18]
-
2Measure out your cuff width from the bottom of the loop down the wire. Measure down the long end, away from your loop, then pinch this spot with the pliers.[19]
-
3Bend the wire back on itself at your measurement point. Tuck it back behind the loop, keeping it back behind the cuff.[20]
-
4Measure out your cuff width and bend it back behind the loop 1 last time. Things will look a bit like a bow at this point, or a tied up paperclip. There is the loop in front, with a small wire hanging down, and long rounded wire behind the loop. There should still be a long area of wire still available behind the loop.[21]
-
5Bend the wire back down over the front to form a second loop. Now the bow shape will start to come together. There should be 2 loops on top and the hanging bits of wire below, with a long, oval-like wire behind everything.[22]
-
6Wrap some of the remaining wire around the center of the bow. Come up and around the center of your 2 bows to hold everything in place. Use your fingers and the pliers to keep adjusting, keeping things in place and shaping the bow how you want it. Cut off any excess wire and sand any jagged edges.[23]
-
7Bend only the long oval of wire to create the cuff. Use the pen to shape the center part of the cuff, but do not bend the bow. This is your cuff, and the bow needs to stay nice and flat. Simply bend this long cuff around your pen, molding it so it fits on your ear.[24]
Forming Small Hearts
-
1Measure, cut, and sand off 2–3 centimeter (0.79–1.2 in) of wire. This small little cuff is meant to fit on your "tragus," the little, rounded flap where your ear meets your jawbone. If you have larger ears, go closer to 3 centimetres (1.2 in).[25]
-
2Bend the wire in half so the 2 sides are as close as possible. Use the pliers and your fingers to bring both sides of the wire close, so that they are basically doubled up.[26]
-
3Make 2 little spiral hooks on the both ends of the wire. These should be pointing towards each other. You'll end up with a heart-shaped set of wires. Use the pliers to try and keep the bottom nice and tight.[27]
-
4Use the pliers to keep molding your heart shape. Pinch the wire with the ends of the pliers and turn the pliers in the direction you want the heart to curve. The tips of the pliers are really good to bend small circles or loops around.[28]
-
5Bend the entire shape over a small pen. This is the curve that keeps it on your tragus. Use your fingers and/or the pliers to mold the wire so that it fits snugly on your ear.[29]
Warnings
- Cut wire can be jagged if you're not careful.⧼thumbs_response⧽
Things You'll Need
- Wire
- Pliers / Wire Cutters
- Nail File
- Ruler
- Sharpie / Pen
- String
References
- ↑ https://www.youtube.com/watch?v=pwExSq-zqzU&feature=youtu.be&t=20s
- ↑ https://www.youtube.com/watch?v=pwExSq-zqzU&feature=youtu.be&t=24s
- ↑ https://www.youtube.com/watch?v=pwExSq-zqzU&feature=youtu.be&t=36s
- ↑ https://www.youtube.com/watch?v=pwExSq-zqzU&feature=youtu.be&t=41s
- ↑ https://www.youtube.com/watch?v=pwExSq-zqzU&feature=youtu.be&t=47s
- ↑ https://www.youtube.com/watch?v=pwExSq-zqzU&feature=youtu.be&t=1m3s
- ↑ https://www.youtube.com/watch?v=pwExSq-zqzU&feature=youtu.be&t=1m17s
- ↑ https://www.youtube.com/watch?v=pwExSq-zqzU&feature=youtu.be&t=1m23s
- ↑ https://www.youtube.com/watch?v=pwExSq-zqzU&feature=youtu.be&t=1m39s
- ↑ https://www.youtube.com/watch?v=pwExSq-zqzU&feature=youtu.be&t=1m51s
- ↑ https://www.youtube.com/watch?v=pwExSq-zqzU&feature=youtu.be&t=2m9s
- ↑ https://www.youtube.com/watch?v=pwExSq-zqzU&feature=youtu.be&t=2m21s
- ↑ https://www.youtube.com/watch?v=pwExSq-zqzU&feature=youtu.be&t=2m38s
- ↑ https://www.youtube.com/watch?v=pwExSq-zqzU&feature=youtu.be&t=2m59s
- ↑ https://www.youtube.com/watch?v=pwExSq-zqzU&feature=youtu.be&t=3m15s
- ↑ https://www.youtube.com/watch?v=pwExSq-zqzU&feature=youtu.be&t=3m36s
- ↑ https://www.youtube.com/watch?v=pwExSq-zqzU&feature=youtu.be&t=3m48s
- ↑ https://www.youtube.com/watch?v=pwExSq-zqzU&feature=youtu.be&t=4m11s
- ↑ https://www.youtube.com/watch?v=pwExSq-zqzU&feature=youtu.be&t=4m25s
- ↑ https://www.youtube.com/watch?v=pwExSq-zqzU&feature=youtu.be&t=4m32s
- ↑ https://www.youtube.com/watch?v=pwExSq-zqzU&feature=youtu.be&t=4m41s
- ↑ https://www.youtube.com/watch?v=pwExSq-zqzU&feature=youtu.be&t=4m47s
- ↑ https://www.youtube.com/watch?v=pwExSq-zqzU&feature=youtu.be&t=5m1s
- ↑ https://www.youtube.com/watch?v=pwExSq-zqzU&feature=youtu.be&t=5m43s
- ↑ https://www.youtube.com/watch?v=pwExSq-zqzU&feature=youtu.be&t=6m8s
- ↑ https://www.youtube.com/watch?v=pwExSq-zqzU&feature=youtu.be&t=6m11s
- ↑ https://www.youtube.com/watch?v=pwExSq-zqzU&feature=youtu.be&t=6m18s
- ↑ https://www.youtube.com/watch?v=pwExSq-zqzU&feature=youtu.be&t=6m23s
- ↑ https://www.youtube.com/watch?v=pwExSq-zqzU&feature=youtu.be&t=6m44s
- ↑ https://www.craftsinstitute.com/making-jewellery/tips-and-techniques/wirework/basic-wire-weaving/
About This Article

To make ear cuffs, start by measuring the part of your ear that you want to wear the cuff on using a piece of string and a ruler. Then, cut an 8-inch long piece of 22-gauge wire, and use a file to smooth out the ends. Next, create a small hook at one end with a pair of pliers, and measure your desired cuff length from the hook. Once you've done that, bend the wire back on itself at that point, and repeat the process so you have a zig-zag shape. Finally, mold the cuff around a pen or marker so it fits around your ear. To learn how to make different kinds of ear cuffs, scroll down!