Are you installing a new gas range, gas fireplace, or other gas-powered appliance in your home? If so, you’ll need a new gas line to connect your appliance with your existing gas pipes. This isn’t an easy, quick, or simple task—gas lines can be very dangerous if they’re installed incorrectly, and you’re much better off hiring a registered contractor to get the job done. If you have a lot of DIY experience and feel comfortable tackling this project on your own, read on for plenty of tips and best practices to help you safely install a gas line at home.

Things You Should Know

  • Get the required permits from your local government before you start installing a gas line.
  • Calculate the gas piping size you’ll need using a chart in your plumbing code book.
  • Seal your new pipes securely with gas-grade plumber’s tape, pipe sealant, and a pipe wrench.
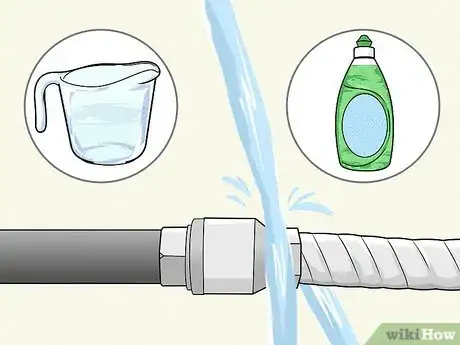
  • Pressure-test your pipes with an air compressor and spritz them with soapy water to detect any possible leaks.
1

Acquire the proper permits before you get started.

  1. Gas line installation is a major project that needs government approval. Stop by your local government’s building department and/or check your local government website to see which permits you need to apply for. In your application, explain what you’d like to install and describe the scope of the project.[1] If required, include a gas line plan/schematic that you created before.[2]
    • Depending on where you live, you might need a plumber’s permit or a mechanical permit. You’ll likely have to pay a fee to get it.
    • Be sure to download a copy of your state’s plumbing code, too, as different states have specific requirements for gas pipe sizing. The size of your gas piping depends on both the length of the piping in your system and the total energy consumption of your appliances, which is measured in British Thermal Units (BTU). Find a copy of your state code on UpCodes to have as a handy reference.[3]
  2. Advertisement
2

Verify the LMR and BTU of your gas system.

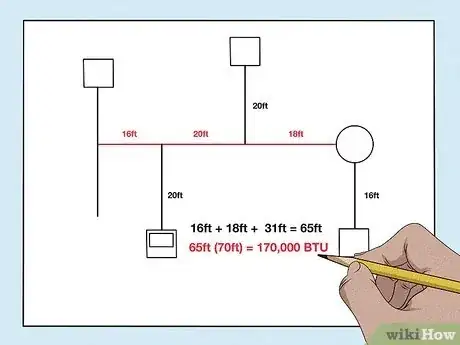
  1. The Longest Measured Run (LMR) is the longest branch of piping in your system. Take the segments of pipe that make up the longest branch in your system and add them together to get your LMR. Write this number down—you’ll need it to properly size your pipes.[4] Then, check your state’s plumbing code and look for a table labeled “Approximate Gas Input for Typical Appliances,” or something similar. Cross-reference your appliances with this table and mark down the different BTU inputs on your schematic sheet.[5]
    • Let’s say that your gas line branches out to 3 appliances—a water heater that’s closest to the gas source, a dryer that’s second-closest, and a furnace that’s furthest away. You’d measure the total distance of the furnace to the gas source to get your LMR.
    • As you study the logistics of your gas system, start creating a rough schematic for your new gas line. Sketch out all of the gas appliances that your pipes connect to, and where the gas lines exit your home. For your own reference, mark down how long each pipe section is.[6]
3

Size your pipes using the LMR and plumbing code.

  1. Compare the LMR of your pipes with the BTU of your appliances. Find the table that matches the type of piping you’ll be using, like Schedule 40 metallic pipe. Round your LMR up to the nearest 10. Then, look at an individual segment of pipe on your schematic and calculate how much BTU it needs for the appliance (or appliances) it’s connected to. Match the rounded-up LMR with the “Length” column on the far-left side of the table—then, trace along this row until you find a number that’s higher than your BTU for that pipe segment. The column this number is in indicates the pipe width you’ll need for that section of your gas line.[7] Here’s an example, using the tables in this chart as a reference:
    • Your gas line connects to 3 appliances: a water heater, range, and clothes dryer. The LMR of this system is 65 ft (20 m), which you round up to 70 ft (21 m). The combined BTU of your appliances is 170,000 (or 170, abbreviated).
    • Find the “70” row in the chart and trace your finger along the “Pipe Size” columns. A 12 in (1.3 cm) pipe only supports 60 (60,000) BTU, which isn’t enough for your system. Same with the 34 in (1.9 cm) pipe—it only supports 126 (126,000) BTU. A 1 in (2.5 cm) thick pipe supports 237 (237,000) BTU, which is enough for the pipe segment in your gas line.
    • Repeat this process with each segment in your gas line to calculate the necessary thickness.
  2. Advertisement
4

Create an official schematic of your gas line.

  1. This diagram shows the scope of your gas line when you apply for a permit. Draw out all the different branches of your gas line, including the appliances they’re attached to. Label the estimated width of each pipe, as well as the BTU of each appliance. Make sure to label where your gas meter is too, and mention if your gas line uses propane or natural gas.[8]
    • Check with your local building department to see what details need to be included in your diagram.
    • Check your latest utility bill to confirm if your home uses natural gas or propane.
5

Turn off the gas to your home.

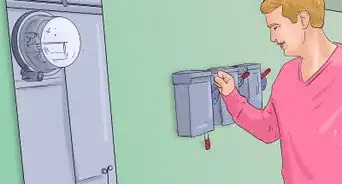
  1. Never make any changes to your gas piping while any gas is running. Head outside and find where the gas line feeds into your home. Follow this pipeline until you find a valve with a lever—this is your shutoff valve. Pull this lever so the gas is off.[9]
    • When your gas is turned on, the lever will be parallel to the gas line. When your gas is turned off, the lever will be perpendicular.
    • Most homes have 2 gas meters—one along the side of the home (the house-side shutoff), and another near the gas meter (the street-side shutoff). Whenever possible, always turned off the house-side shutoff valve, not the street-side one.
  2. Advertisement
6

Install your pipes with plumber’s tape and pipe sealant.

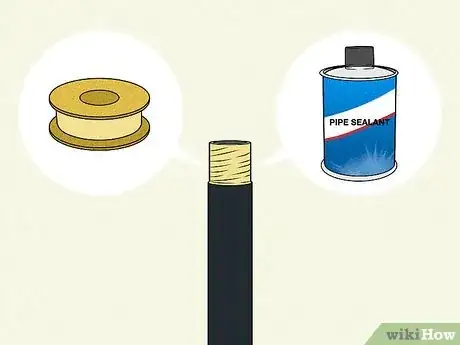
  1. A combination of plumber’s tape and pipe sealant creates a tight seal in your pipeline. Inspect the threading along the end of each pipe and see if it’s running clockwise or counterclockwise. Then, wind a section of plumber’s tape 5 times in the same direction as the threading. Once the tape is in place, apply a coat of pipe sealant overtop. Twist the elbow or coupling onto the pipe by hand, and then use a pipe wrench to tighten it into place.[10]
    • Use elbows and couplings to help angle and redirect your pipes in an efficient way through your home.
    • Depending on the layout and structure of your home, you might need to run your gas line through your home’s walls and siding. Contact a licensed contractor if you aren’t comfortable doing this yourself.
7

Connect shutoff valves to each new gas appliance.

9

Conduct a pressure test in your new piping system.

  1. Use a pressure gauge to fill the pipes with air and test for leaks. Using plumber’s tape, thread a pressure gauge attachment onto the exposed end of the gas line that’s inside your home. Then, use an air compressor to fill the pipes with 100 psi (689 kPa) of pressure. The following day, check the pressure gauge and see if anything’s changed—if it’s still at 100 psi (689 kPA), you probably don’t have any leaks.[14]
    • Chances are, your pipeline will only experience 15-20 psi (103-138 kPa) of pressure—testing with 100 psi (689 kPA) is just a precaution.
  2. Advertisement
12

Schedule an inspection of your pipeline.

  1. A plumbing inspector will make sure that your pipeline is good to go. During the inspection, the inspector will take a look at the materials you used for your gas line, as well as the route your gas pipes take through your home. They’ll also test your pipeline to make sure that everything is working properly.[16]
    • Depending on where you live, more than 1 inspection might be required.[17]
    • Use this checklist as a reference to make sure you’re ready for the inspection(s).
    • If you fail the inspection, the inspector will let you know what you need to fix.

Community Q&A

  • Question
    Is there a difference between black pipe and galvanized pipe? Can galvanized pipe be used for gas lines?
    Community Answer
    Community Answer
    Galvanized pipe has a coating which can strip off, resulting in flakes travelling through the pipe and getting stuck in orifices. Municipal or building codes will usually require that galvanized pipe can never be used for gas.
  • Question
    How deep do I have to go underground?
    Community Answer
    Community Answer
    Check with your local gas company. This is a dangerous operation, so you need the experts to help here and stay within the law.
  • Question
    Can I use copper pipe for my gas line?
    Community Answer
    Community Answer
    No. Your swing joint would not be able to move with any shifting, due to solder holding your pipes into place.
Advertisement

Warnings

  • Some gas-powered appliances, like stovetops and fireplaces, require both gas and electricity to work properly. [19] If you don’t have any experience working with gas lines or electrical systems, hire a licensed professional to do the installation for you.[20]
    ⧼thumbs_response⧽
Advertisement

Things You’ll Need


About This Article

Janice Tieperman
Co-authored by:
wikiHow Staff Writer
This article was co-authored by wikiHow staff writer, Janice Tieperman. Janice is a professional and creative writer who has worked at wikiHow since 2019. With both a B.A. and M.A. in English from East Stroudsburg University, she has a passion for writing a wide variety of content for anyone and everyone. In her free time, you can find her working on a new crochet pattern, listening to true crime podcasts, or tackling a new creative writing project. This article has been viewed 621,368 times.
5 votes - 80%
Co-authors: 16
Updated: October 25, 2022
Views: 621,368
Categories: Plumbing
If you buy through links on our site, we may earn a commission.
Advertisement