This article was co-authored by wikiHow Staff. Our trained team of editors and researchers validate articles for accuracy and comprehensiveness. wikiHow's Content Management Team carefully monitors the work from our editorial staff to ensure that each article is backed by trusted research and meets our high quality standards.
There are 12 references cited in this article, which can be found at the bottom of the page.
This article has been viewed 10,036 times.
Learn more...
Erosion control blankets are a type of artificial groundcover designed to prevent or minimize topsoil loss in agricultural and landscaping sites. Most types of blankets are made from natural biodegradable fibers, which are woven together to form a loose mesh. Installing erosion control blankets on patches of land vulnerable to wind or water erosion is as simple as rolling them out and tacking them down. When covering larger areas, such as farmland, you can save yourself valuable time and labor by using an all-terrain utility vehicle to unroll your blankets.
Steps
Protecting Gardening and Landscaping Sites
-
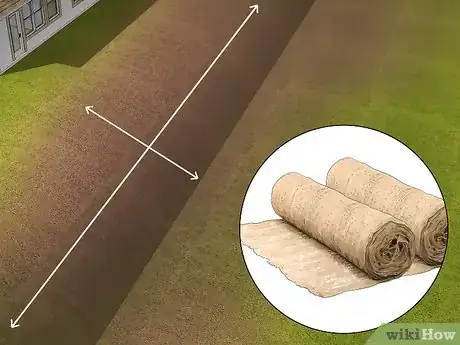
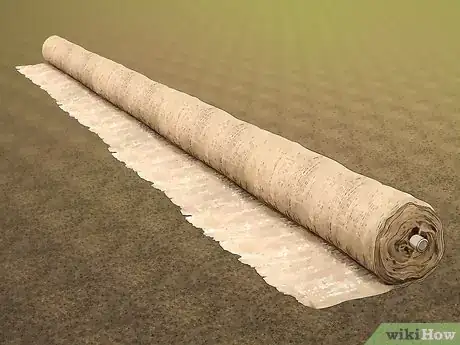
1Purchase enough blankets to manage erosion on your selected site. Erosion control blankets and other rolled erosion control products are available from specialty agricultural and landscaping suppliers. You may also be able to find them at some home improvement centers or smaller gardening shops. If you don’t have any luck at these places, you always have the option of ordering your materials online.
- A good way to determine how many blankets you need is to measure your site, then divide its total area into sections that correspond to the dimensions of the product you're looking at. Consider buying an extra blanket to account for possible miscalculations or waste.
- Blankets come in a wide range of natural and synthetic materials, including straw, jute, coconut fiber, aspen fiber, or polypropylene plastic. There are no major differences between these materials, except for polypropylene, which is not biodegradable like the rest.[1]
- Prices vary between products, but on average you can expect to pay around $40-60 for a 4 ft (1.2 m) x 100–120 ft (30–37 m) roll, and roughly $150 for a 4 ft (1.2 m) x 200–225 ft (61–69 m) roll.
-
2Clear your installation site of weeds, debris, and other potential obstacles. Before you get started, make a circuit of the area and inspect the soil closely for things like rocks, branches, roots, dirt clods, and unwanted vegetation. Gather up any such items you find and dispose of them or relocate them to another part of your property.[2]
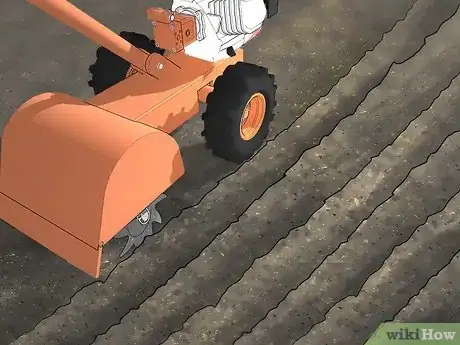
- If necessary, use a shovel, pitchfork, tiller, or aerator to gently break up compacted soil after clearing your site of possible obstructions.
- For best results, your erosion control blanket or blankets should lie directly against the surface of the topsoil.
Advertisement -
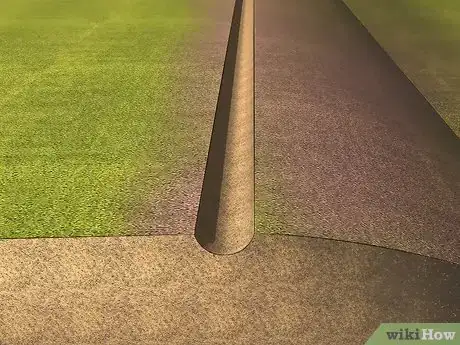
3Dig a shallow trench at the top of the slope to install a blanket on a hill. Use a shovel or spade to remove about 1⁄2 ft (0.15 m) of soil in a straight line across the upper part of the slope. This slight depression will help to anchor the blanket, preventing gravity from dragging it downwards once it’s in place.[3]
- Keep all of your loose soil together in one neat pile. That way, you’ll be able to simply push it back in when it comes time to backfill the trench.
- There’s no need to do any digging if you’re going to be using your blanket on flat ground.
-
4Line the trench with the loose end of the blanket. Work 2–3 feet (0.61–0.91 m) of material free from the roll and drape it over the depression, then smooth it down by hand. Make sure that the last 4–6 inches (10–15 cm) of the material is resting on the level terrain above the trench itself. Otherwise, it may shift, compromising the blanket’s hold.[4]
- Hold off on unrolling the rest of the blanket until you’ve properly secured the loose end.
-
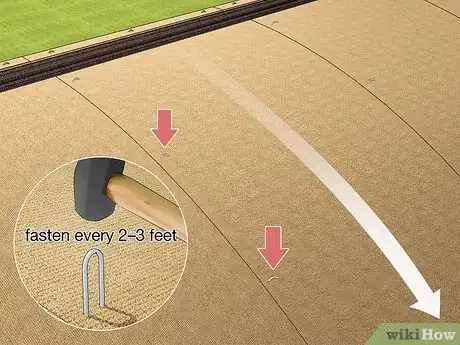
5Tack the loose end to the soil using the included fasteners. Most erosion control blankets come packaged with their own specially-designed pins or staples for ease-of-installation. Space the fasteners out along the blanket as directed, then sink them deep into the soil at the center of the trench using a hammer or rubber mallet.[5]
- If your blanket didn’t come with its own fasteners, you may need to pick up some biodegradable anchor spikes or metal landscape staples separately.
- If your blanket didn't come with detailed installation instructions, place a fastener 6–8 inches (15–20 cm) from either side of the blanket’s loose edge, then drive a third into the midpoint.
Tip: Make sure the tops of the pins or staples are flush with the surrounding earth to decrease their chances of coming loose.
-
6Overlap the edges of additional blankets by 2–5 in (5.1–12.7 cm). If you're installing more than one blanket, lay out each subsequent blanket inside the vertical edge of the blanket beside it. By creating a little overlap, you can avoid leaving the intervening soil exposed.[6]
- Most manufacturers recommend an average overlap of around 4 inches (10 cm), but you might add or subtract a couple of inches, depending on the dimensions of the blankets you're working with and the size of the area you're trying to cover.
-
7Refill the blanketed trench with soil. Return to the pile of soil you removed earlier and use your shovel or spade to push it back into the lined trench. Afterwards, smooth the soil and pat the surface lightly with the flat part of your digging tool to tamp it down. Together, the pins or staples and compacted soil will ensure that the upper end of your blanket stays put.[7]
- Come back and check your anchor trench every couple of days, if possible. It may be necessary to periodically replenish or recompact the soil if your site is affected by severe erosion.
-
8Unroll the remainder of the blanket and fasten it every 2–3 feet (0.61–0.91 m). Once you’ve secured the loose end, begin working your way towards the blanket’s opposite end, driving a pin or staple into both vertical edges of the material at regular intervals. Be sure to line up your fasteners as symmetrically as possible and sink them flush with the surface of the surrounding soil.[8]
- When installing multiple blankets, secure the outer edge as described, then drive your fasteners into the strip of material where the two blankets overlap on the inner edge.
- With certain products, the manufacturers may recommend staggering the fasteners by 18–24 inches (46–61 cm) along its vertical axis for additional security.[9]
- If your fasteners are improperly spaced, your blanket could twist, pull, or bunch, all of which will make it less effective for its intended purpose.
-
9Replace your blankets up to 4 times a year as needed. When properly installed and maintained, most small biodegradable erosion control blankets will last between 3 and 6 months. Assuming the quality of the soil at your site hasn't seen drastic improvement by the end of this timeframe, it may be necessary to prepare a new blanket or series of blankets.[10]
- Investing in long- or extended-term products can help you cut down on your number of annual re-installations. These are made from highly resilient materials that are capable of surviving the elements as long as 12-36 months.
Covering Farmland and Other Large Areas
-
1Till, fertilize, and seed planting sites prior to installation. If you’re putting down one or more erosion control blankets on land where you grow crops or flowering plants, you’ll first need to take the appropriate measures to prepare the site for installation. Depending on what you’re cultivating and how developed your land already is, this might involve tasks like tilling or aerating, fertilizing, and/or sowing or germinating new seeds.[11]
- To promote healthy germination and avoid growth complications, plan on installing your erosion control blankets within 24 hours of seeding.[12]
- Once the blankets are in place, your crops or plants will grow right up through the loosely-woven mesh.
-
2Order enough blankets to cover the area where erosion is a problem. Search for “erosion control blankets” plus the name of your town or city to find a reputable dealer near you. Blankets designed specifically for agricultural use are comprised of all-natural, biodegradable fibers, typically straw or a mixture of materials. They’re much larger than the kind of blankets used for gardening and landscaping sites, and often come in sizes as large as 16 feet (4.9 m) x 562.5 feet (171.5 m).[13]
- Measuring your site can help you figure out exactly how meet feet you'll need. For areas that are too big to measure effectively, simply distribute your blankets among the spots where erosion is the worst.
- Due to the sheer size and weight of these blankets, you’ll most likely need to have them delivered. Some manufacturers may also offer to take care of the installation process for you for an additional cost.
-
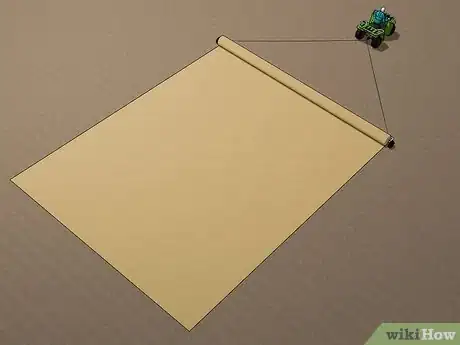
3Attach the rolled blanket to an ATV using the twin unroller units. After your blankets have been unloaded at your installation site, slide the long arms of each unroller into the open cavity on either end of the roll. Connect the dual tow lines to the eyes of the unrollers using the built-in clips. Hook the opposite end of the tow line to the back of a four-wheeler, Gator, or similar all-terrain utility vehicle.[14]
- Arrange each roll so that the indicator arrows on the outer packaging point in the direction in which you’ll be unrolling them.
- You can also use a tractor to tow and unroll your blanket. However, it’s best to use a vehicle that’s light enough to avoid compacting the soil on your installation site.[15]
-
4Move the rolled blanket into position at the far end of your installation site. Bring the roll even with the outer perimeter of the area you want to cover. Use a sharp utility knife to cut away the plastic wrap or bands holding the roll together, then pull the loose end free from the roll and smooth it flat against the ground. You’re now ready to begin unrolling.[16]
- If you’re going to be laying down multiple blankets in the same area, take a few minutes to set them all up neatly along your starting point. That way, you won’t be forced to taxi back and forth between installations.
-
5Drive slowly toward the far end of your site to unroll the blanket. Once you’re in motion, the wheels on the unroller units will turn at the same speed, causing the roll to unspool. Cruise along in a straight line at a slow, deliberate speed. This will help ensure that the blanket goes down smoothly and doesn’t drag or tear if it happens to get caught.[17]
- If necessary, have another person stand on the loose end of the blanket to hold it in place or use large rocks or landscape staples to anchor it until you can fasten it more securely.
- Don’t worry too much about getting the blankets perfectly straight. You can always go back and adjust them manually if needed.
-
6Overlap the edges of additional blankets by 2–4 in (5.1–10.2 cm). After unrolling the full length of the blanket, return to your starting point, load the next roll, and position the loose end a minimum of 2 inches (5.1 cm) inward from the outside edge of the first roll. This is a common industry standard for providing optimal coverage. Proceed to unroll every next blanket the same way you did the first.[18]
- Try not to let your blankets overlap by more than about 6 inches (15 cm), as the extra material will essentially be wasted.
-
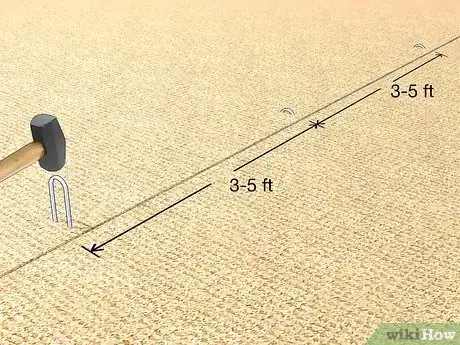
7Fasten the blanket to the soil every 3–5 feet (0.91–1.52 m). Walk the length of the blanket, driving one of the included pins or staples every few feet along its outer edges. If you installed several blankets side-by-side, be sure to place the pins or staples on the section of material where the edges overlap. Afterwards, your blankets should be secure enough to withstand wind, precipitation, and animal activity for at least 6-12 months.[19]
- Many erosion control blankets come with special applicator devices that make it easier to sink lots of fasteners in rapid succession.[20]
- Keep all of the fastener pins with you in a utility belt or apron pocket so you won’t have to stop to grab more.
Tip: If your blankets didn’t come with their own applicator, consider buying or renting a rifle staple gun. One of these tools will allow you to work quickly and efficiently while avoiding the back-breaking chore of stooping to drive your fasteners by hand.[21]
Warnings
- Don’t install your erosion control blankets in areas that require mowing. The thatched material can easily become caught in the blade of a lawnmower.⧼thumbs_response⧽
Things You’ll Need
Protecting Gardening and Landscaping Sites
- Erosion control blankets
- Pins or staples (included)
- Shovel or spade
- Tiller or aerator (optional)
- Wheelbarrow (optional)
Covering Farmland and Other Large Areas
- Erosion control blankets
- Pins or staples (included)
- Unrollers and clip-on tow lines (included)
- Compact all-terrain vehicle
- Utility knife
- Tiller or aerator (optional)
- Fertilizer (optional)
- Germinated seeds (optional)
References
- ↑ https://depts.washington.edu/propplnt/Chapters/erosioncontrolchapter%5B1%5D.pdf
- ↑ https://irp-cdn.multiscreensite.com/bd74e622/files/uploaded/ECTC_May07_InstallationwithCADDpictures.pdf
- ↑ https://depts.washington.edu/propplnt/Chapters/erosioncontrolchapter%5B1%5D.pdf
- ↑ https://depts.washington.edu/propplnt/Chapters/erosioncontrolchapter%5B1%5D.pdf
- ↑ https://www.youtube.com/watch?v=cFgL60LVJNc&feature=youtu.be&t=124
- ↑ https://irp-cdn.multiscreensite.com/bd74e622/files/uploaded/ECTC_May07_InstallationwithCADDpictures.pdf
- ↑ https://irp-cdn.multiscreensite.com/bd74e622/files/uploaded/ECTC_May07_InstallationwithCADDpictures.pdf
- ↑ https://rolanka.com/definitive-guide-erosion-control-blanket-installation/
- ↑ https://irp-cdn.multiscreensite.com/bd74e622/files/uploaded/ECTC_May07_InstallationwithCADDpictures.pdf
- ↑ https://stormwater.pca.state.mn.us/index.php/Erosion_prevention_practices_-_erosion_control_blankets_and_anchoring_devices
- ↑ https://irp-cdn.multiscreensite.com/bd74e622/files/uploaded/ECTC_May07_InstallationwithCADDpictures.pdf
- ↑ https://stormwater.pca.state.mn.us/index.php/Erosion_prevention_practices_-_erosion_control_blankets_and_anchoring_devices
- ↑ https://stormwater.pca.state.mn.us/index.php/Erosion_prevention_practices_-_erosion_control_blankets_and_anchoring_devices
- ↑ https://www.youtube.com/watch?v=ZPACLkk_oiI&feature=youtu.be&t=16
- ↑ https://extension.psu.edu/avoiding-soil-compaction
- ↑ https://www.youtube.com/watch?v=ZPACLkk_oiI&feature=youtu.be&t=43
- ↑ https://www.youtube.com/watch?v=ZPACLkk_oiI&feature=youtu.be&t=59
- ↑ https://irp-cdn.multiscreensite.com/bd74e622/files/uploaded/ECTC_May07_InstallationwithCADDpictures.pdf
- ↑ https://irp-cdn.multiscreensite.com/bd74e622/files/uploaded/ECTC_May07_InstallationwithCADDpictures.pdf
- ↑ https://www.youtube.com/watch?v=ZPACLkk_oiI&feature=youtu.be&t=63
- ↑ https://www.geo-synthetics.com/wp-content/uploads/2017/12/M-100-Rifle.pdf
- ↑ https://extension.umd.edu/hgic/topics/groundcover-list
