X
This article was co-authored by wikiHow Staff. Our trained team of editors and researchers validate articles for accuracy and comprehensiveness. wikiHow's Content Management Team carefully monitors the work from our editorial staff to ensure that each article is backed by trusted research and meets our high quality standards.
This article has been viewed 47,258 times.
Learn more...
Freezing muffins is a great way to make a big batch last. When baking or buying muffins, remember that extras don't have to go to waste. You simply need to make sure that they are protected from air and the extreme temperatures of the freezer. With a little effort you can extend the life of your muffins and enjoy them for months to come.
Steps
Part 1
Part 1 of 3:
Packaging Muffins for Freezing in Microwave
-
1Make sure the muffins are completely cooled. If you are planning on freezing homemade muffins, you need to give them ample time to cool. It’s important that they are room temperature, so take them out of the pan and put them on a cooling rack. To determine if they are cooled, feel the bottom for any warmth.
- Cooling your foods before freezing them helps them freeze faster, which keeps them fresher.[1]
- Cooling completely also reduces the chance of you elevating the temperature in your freezer, which can cause other foods in the freezer to spoil quicker.
-
2Wrap each individual muffin with foil or freezer wrap. When freezing muffins you want to keep as much air away from them as possible. One good way to do this is to wrap each one with foil or freezer wrap, such as heavy-duty plastic wrap.[2]
- Wrapping individual muffins will help keep air off the surface of the muffins. If they are put in a container without individual wrapping, there is bound to be air between the muffins, which can promote ice crystals and freezer burn.
Advertisement -
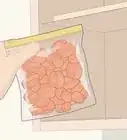
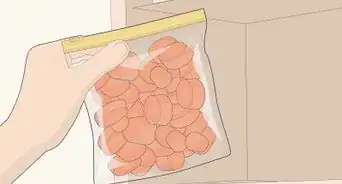
3Put the wrapped muffins in an airtight container. There are a wide variety of containers that will work, including freezer bags and plastic food containers. Just make sure that what you use is airtight and that it can handle the low temperatures in the freezer.[3]
- It's best to use containers that are marked for use in a freezer, as you know that they will provide protection for your muffins.
- If you know that you will only need a few muffins at a time, consider packaging them in small groups. This will allow you to only take out what you need when you need them.
-
4Remove as much air as possible from the container. Some airtight containers, such as plastic freezer bags, will allow you to remove the air that surrounds the muffins. Squeeze out what air you can before closing the containers, being careful not to squish the muffins in the process.[4]
- Taking out as much air as possible will help you cut down on the risk of ice crystals and freezer burn on your muffins.
-
5Label the container. Write down what kind of muffins you are freezing and the date you froze them right on the freezer container. This will allow you to keep track of when you need to use the muffins by and will allow you to identify what type of muffin is which without opening the container.[5]


Advertisement
Part 2
Part 2 of 3:
Putting Muffins in the Freezer
-
1Place the muffins in an area of the freezer that has a steady temperature. Put them in the back of your freezer, away from the temperature changes that occur near the door. If you have a deep freeze, put the muffins in it. This will keep them at a steady, low temperature, which is great for their longevity.
-
2Keep frozen muffins below 0 °F (−18 °C). It’s important to keep the temperature steady and low enough in the freezer. This will minimize the chance of repeated thawing and refreezing, which can create ice on the surface of the muffins.
-
3Remove only the number of muffins you will use right away. If you just want a muffin or 2 but you have frozen a dozen, don’t take the whole package out of the freezer. Allowing some of the muffins to thaw and then refreeze will degrade their quality and longevity.


Advertisement
Part 3
Part 3 of 3:
Using Frozen Muffins
-
1Use frozen muffins within 3 months. While the life of muffins can be extended greatly with freezing, they won’t last forever. Be sure to use the muffins within a few months, as after that they may begin to get freezer burn and their taste may begin to degrade.
- While the exact length of time a muffin will last can vary depending on the type of muffin, in most cases baked goods in general only last a few months in the freezer before getting a coat of ice and freezer burn.
-
2Defrost frozen muffins in their freezer packaging. Keep the muffins in their freezer packaging while thawing. This will help minimize the amount of moisture that forms on the surface of the muffins as they thaw.[6]
- If you don’t want to use all of the muffins, take a few out of the container they are in and put them in another bag or container while they thaw.
-
3Heat up defrosted muffins. Muffins that have been previously frozen will taste much better and will have a better texture if they are heated up. You can either put the defrosted muffins on a pan in a 275 °F (135 °C) oven for about 10 minutes or you can put the frozen muffins directly in a 350 °F (177 °C)oven for 10 to 15 minutes.[7]


Advertisement


References
- ↑ https://nchfp.uga.edu/how/freeze/package_label.html
- ↑ http://www.quakeroats.com/cooking-and-recipes/content/baking-101/muffins/storage-and-freezing-muffins.aspx
- ↑ https://food52.com/blog/10597-alice-medrich-s-guide-to-freezing-baked-goods
- ↑ http://iufost.org/iufostftp/41-Ice%20Crystals.pdf
- ↑ https://nchfp.uga.edu/how/freeze/package_label.html
- ↑ https://food52.com/blog/10597-alice-medrich-s-guide-to-freezing-baked-goods
- ↑ http://www.quakeroats.com/cooking-and-recipes/content/baking-101/muffins/storage-and-freezing-muffins.aspx
About This Article

wikiHow Staff
wikiHow Staff Writer
This article was co-authored by wikiHow Staff. Our trained team of editors and researchers validate articles for accuracy and comprehensiveness. wikiHow's Content Management Team carefully monitors the work from our editorial staff to ensure that each article is backed by trusted research and meets our high quality standards. This article has been viewed 47,258 times.
Co-authors: 7
Updated: February 20, 2022
Views: 47,258
Categories: Freezing Food | Muffins
Advertisement