This article was co-authored by Pilar Zuniga. Pilar Zuniga is a Floral Designer and the Owner of Gorgeous and Green, a floral design studio and Certified Green Business based in Oakland, California. Pilar has over ten years of experience in floral design. With a focus on being earth-friendly and supporting local growers, Gorgeous and Green has been featured in Energy Upgrade California, Molly My, Apartment Therapy, 100 Layer Cake, Design Sponge, and Trendy Bride. Her studio provides floral arrangements and gift basket, event and wedding design, and she teaches workshops on flower design and sustainability in her industry. Pilar received a BA in Anthropology from the University of California, Berkeley in 2001.
wikiHow marks an article as reader-approved once it receives enough positive feedback. In this case, 87% of readers who voted found the article helpful, earning it our reader-approved status.
This article has been viewed 791,838 times.
Roses often represent a special occasion. You may want to keep them to as a reminder of that moment, but you know that they will perish in only weeks. Drying roses from a wedding, dance, or just from your garden is a wonderful way to create a keepsake which will last for years.
Steps
Air-Drying Your Roses
-
1Choose roses with the best blooms for drying. You want a rose which has a nice bloom, but also no moisture or flaws. The moisture will cause molding and the flaws will be exaggerated in the drying process. You can use blooms which have opened a bit, but don't use a rose which is already beginning to fall apart and lose its petals.[1]
-
2Trim the rose stems. You want to trim the stems, but not too short. Leave 6 inches or more of the stem for drying. Remove the foliage from the stems. The leaves will not dry nicely and should be removed.
- Leaves also hold water and will slow the overall drying process.[2]
Advertisement -
3Tie rose stems together with a rubber band. Bundle all of the roses you will be drying and wrap a rubber band around the stems. Leave at least 2 inches of stems beyond the rubber band. Continue wrapping the rubber band around the stem until the roses are secure.[3]
- You can arrange the roses into a nice bouquet before drying so they are already prepared to be displayed.
-
4String a clothesline in a cool, dark place. Find a room which you don't use often, like a laundry room, attic or a utility closet. The space should still have good ventilation to allow the moisture to escape. Stretch a clothes line or rope between 2 points in this room and tie it securely. Make sure it is sturdy enough to hold your roses.[4]
- You want to choose a dark space. The color of your roses will darken in the drying process, but exposing them to light will increase this color change, while using a dark space will reduce the alteration in the rose color.
-
5Attach your roses to a hanger. Pull some of the rubber band used to wrap the roses together over the hook of a hanger. If you have a hanger with an extra hook under the hanging hook, you can strap the roses there. Otherwise, pull some of the rubber band over the hanging hook of the hanger.[5]
-
6Hang the roses on the line for 2-3 weeks. Hook the hanger onto the line in the dark room and leave them to until they are dry. It can take several weeks before your roses are completely dry.[6]
-
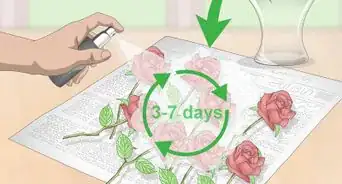
7Preserve the roses with hairspray. Once the roses are dry, they will be brittle. Remove them from the hanger and spray them with hairspray to reinforce and protect them from damage.[7]
- Use an unscented hairspray when spraying your roses.
- Spray the roses lightly to avoid saturating the roses you have just dried.
Using Desiccant to Dry Roses
-
1Choose your desiccant. Desiccant is a sandy-textured product which absorbs moisture from the rose encouraging it to dry quickly and evenly. There are several products you can choose from, including borax, cornmeal, alum, and the popular choice, silica gel.
- This method is also effective using sand.
-
2Trim your rose stem to about 2 inches. You want to be able to place your rose with the bloom facing up inside your air-tight container. Trim the stem to 2 inches, then test it in the container and make sure that it fits with room to cover the bloom with the lid.
- If the rose is too tall, trim more of the stem to fit the container.
-
3Place the rose in the desiccant. Pour 2 inches of desiccant into the container. Push the rose stem into the desiccant so that the rose stands in place with the bloom facing up.
- If you are drying more than one rose in a container, make sure there is at least one inch of space between the roses.
-
4Cover the rest of the rose with desiccant. Using a small cup, pour more desiccant over the bloom to cover the rose. Be sure that the desiccant fills between the petals. If the rose falls to the side, use a spoon to right it until it is balanced again.
-
5Leave the rose in the airtight container for 1-2 weeks. Cover the container with an airtight lid. You may also want to run some masking tape over the edges for extra security. Let the standard roses sit for 2 weeks. Mini roses should dry after 1 week.
- Write the date you sealed the container on the side of the container with a pen.
-
6Remove the rose from the container and shake off the desiccant. Gently pour the container out into an oven pan. Pick up the rose by the stem and shake off the excess desiccant until the rose is clean. Gently brush the petals off if the dust persists.
- If some residue is still stuck to the rose, pour a stream of desiccant over the trouble areas to drive the residue from the rose.
- Pouring the silica desiccant into an oven pan preps you for baking the silica for reuse.
-
7Bake silica desiccant for reuse. Silica desiccant shows signs of moisture by fading or changing in color. If it has faded, blue is turning into pink, or orange is turning green, you will want to dry it out by baking the desiccant.
- Pour the desiccant into a microwave safe bowl. Set your microwave to medium heat or defrost. Cook the desiccant for 2-3 minutes or until the color has returned to signify it is ready to use.
- Remove the bowl from the microwave using an oven mitt. Both the bowl and desiccant will be very hot. Allow it to cool on a heat-safe surface for 24 hours.
- If the desiccant is showing signs of moisture from a humid environment, you can bake it before the first use.
Expert Advice
Follow these tips when you're hanging roses to dry them:
- Stagger the heads. When you're hanging roses to dry, hang them upside-down, and stagger them so the heads aren't touching. If the air can't circulate around the flowers, it could lead to mold growth—that doesn't smell good, and it isn't good for your health.
- Place them in a dry place away from the sun. Of course, when you're drying flowers, you want to make sure the environment won't be too humid. However, don't place your flowers in sunlight, because the sun will leech the color out of the roses and will make the petals more brittle.
- Allow the roses to dry fully. Once your roses are hanging up to dry, leave them alone unless you're checking to see if they're ready. They'll be fragile, so don't move them until they've dried all the way.
Community Q&A
-
QuestionDo the roses have to be microwaved as in the picture? It doesn't say so in the directions.
 Community AnswerNo, he's talking about the silica, not the roses. The picture doesn't match the text.
 -
QuestionAfter a rose has dried, can it then be pressed?
 Community AnswerOnce the petal is dried, it is fragile and pressing it may cause it to disintegrate. Press the rose before drying, in order to get the pressed effect.
 -
QuestionCan I just leave it in the silica gel for several weeks? The other methods leave the rose discolored.
 Community AnswerYou can try, but all of the above methods will cause the rose to discolor. Roses naturally turn a much darker color after they dry.
Things You Will Need
- Roses
- Hanger
- Rubber band
- Clothesline or rope
- Hairspray (optional)
- Desiccant
- Oven-safe bowl
Warnings
- Avoid breathing in dust from the silica gel, which is not healthy for your lungs.⧼thumbs_response⧽
References
- ↑ https://www.youtube.com/watch?v=GjhjdFJgO8c&feature=youtu.be&t=31
- ↑ http://www.save-on-crafts.com/dryintecforf.html
- ↑ http://www.proflowers.com/blog/how-to-dry-flowers
- ↑ http://www.proflowers.com/blog/how-to-dry-flowers
- ↑ http://www.proflowers.com/blog/how-to-dry-flowers
- ↑ http://www.proflowers.com/blog/how-to-dry-flowers
- ↑ http://www.proflowers.com/blog/how-to-dry-flowers
About This Article
After you've selected roses with a nice blooms to dry, trim the stems so about 6 inches are left and remove all of the leaves as they don't dry well. Next, wrap a rubber band around the stems of the roses you want to dry before hooking the band over the hook of a hanger. Hang the hanger from a rope for 2-3 weeks in a dark room, because the darkness will reduce the roses' change of color as they dry. Once the roses are dry and brittle to touch, spray them with an unscented hair spray to help preserve them. To learn how to dry roses with desiccant, keep reading!


