This article was co-authored by Rosalind Lutsky, a trusted member of wikiHow's volunteer community. Rosalind Lutsky worked as a gymnastics coach at SB Gymnastics at Stanford University, coaching children from ages 5-12 years old during her time as a Stanford student. She was a competitive gymnast growing up, and competed for her local gymnastics team in Minnesota.
There are 17 references cited in this article, which can be found at the bottom of the page.
This article has been viewed 109,404 times.
Learn more...
The straddle press handstand is an advanced arm-balancing technique commonly performed by gymnasts, yogis, cheerleaders, and other acrobatic athletes. While it takes some time to master, it’s a skill that anyone can unlock, provided they have enough strength, flexibility, and coordination. To execute a straddle press handstand, it will help to first get comfortable holding handstands in both a vertical and piked position. From there, you can work on developing the strength needed to lift your body off of the floor from a seated position and pull yourself up tall, straight, and strong.
Steps
Transferring Your Weight
-
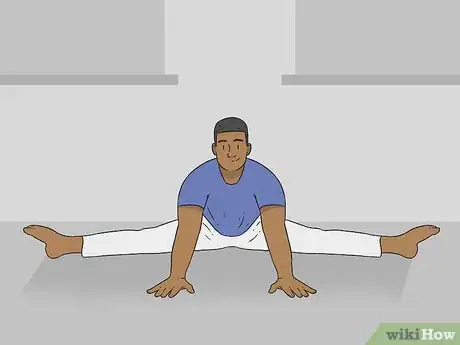
1Start in a seated straddle position. Sit down on your butt with your legs extended out to either side of your body at roughly a 45-degree angle. Engage your glutes to hold your legs straight and firm and rotate your knees in slightly, which will help you engage your core in turn. When you’re reading to begin the press, place your hands shoulder-width apart on the floor in front of you.[1]
- There’s no single best width where the straddle is concerned—a wider straddle will provide better leg clearance but requires more strength, whereas a narrower straddle will offer greater stability but will make it harder to get your legs out of the way. Do what’s most comfortable for you.
- If you prefer, you can also start in a standing position, with your feet a little wider than hip-width apart and your hands on the floor directly beneath your shoulders. This position will give you a little more leverage, which can be helpful if you don’t have the strength required to press all the way up from the floor.[2]
-
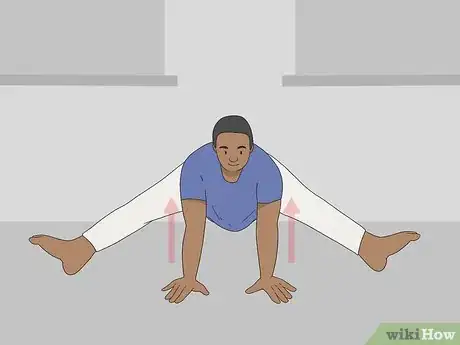
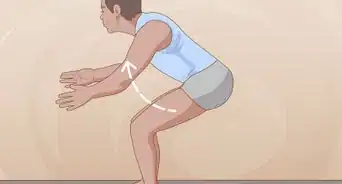
2Lean forward over your hands slowly. As your torso begins to tilt, transfer your weight from your lower body to your hands. Press your palms firmly into the floor and maintaining a small amount of bend in your elbows.[3]
- Spread your fingers out on the floor as much as you can to create a wider base and lend added stability to your handstand.[4]
Advertisement -
3Engage your core as you continue leaning to begin lifting your legs. Tense the muscles of your midsection tight. You should be able to feel an equal amount of tension in your upper and lower abs, hips, and pelvis. Imagine that your entire upper body from the crown of your head to your tailbone is one straight line.[5]
- Focus on keeping your torso as rigid as possible during the first part of the press. If you’re too loose, your own weight will be working against you, decreasing your leverage and pulling you off balance.
- Make sure your head stays well in front of your hands to serve as a counter-lever to your lower body. If you can look down between your hands, you’re not leaning out far enough.
-
4Keep your shoulders ahead of your hips until your feet clear the floor. Continue shifting more and more of your weight forward. Finding a good point of balance between your head and your hips is crucial at this stage, as most of your lower body will still be behind you. When only your toes remain on the floor, you’re ready to begin pulling upward into the handstand.[6]
- Extend your shoulders completely by pushing your straight arms down away from your head. This will distribute more of your weight among your trapezius, scapula, and core muscles, which are much stronger than the muscles of the arms themselves.[7]
- Avoid letting your knees bend, if you can help it. Just like a loose torso, relaxed legs can create an imbalance.
Pressing into the Handstand
-
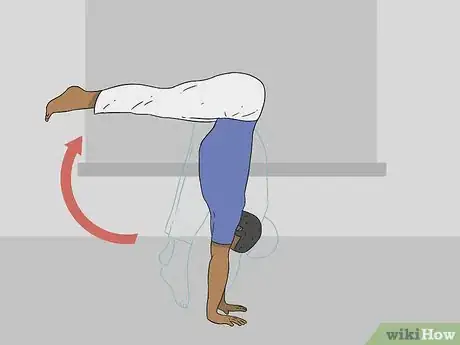
1Pick your legs up off of the floor and raise them out to the sides. Without breaking your forward lean, tighten your glutes, hamstrings, and core to prepare to lift your legs. In one controlled movement, sweep them back behind you and upwards. As they leave the floor, your upper and lower body will briefly be in the same configuration they were in in your starting position, only inverted. [8]
- Don’t rush the leg lift. Doing so could cause you to wobble or overshoot your mark and fall forward. The key to a solid straddle press is to perform each movement in a slow, controlled manner.
- Keep your awareness on your hands, arms, and shoulders as your legs come up. Otherwise, you may lose tightness and topple over prematurely.
-
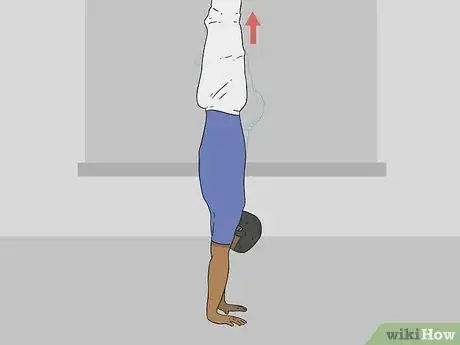
2Bring your legs together over your head to complete the handstand. As you straighten your legs, your hips will naturally move into alignment with your shoulders. At this point, you can stop leaning forward and concentrate on fine-tuning your balance through your hands. Maintain this “stacked” position to hold the handstand for as long as you can.[9]
- Dialing in your handstand may feel harder than normal, since you’ll already be fatigued. Do your best to hold the position with good form for 5-10 seconds, then gradually increase your time to build up your endurance.[10]
- If you need some assistance, practice pressing up against a wall, or have a friend spot you by holding your hips once you get inverted. The added support will help you learn how to transition between each part of the movement without having to worry about maintaining your balance.
-
3Lower yourself back down to the floor by reversing the sequence. With your core nice and tight, slowly separate your legs and begin hinging at the waist to bring them down in front of your body. Lean forward and keep your head in front of your hands like you did on the way up to maintain your balance.
- Place your feet on the floor and stand up if you started in a standing position. If you pressed up from seated position, bend your arms to bring yourself back down to a seated straddle.
- As your straddle press handstands improve, you can start performing multiple “reps,” going from straddle to handstand and back again without ever setting your full weight back down.[11]
-
4Practice your straddle press handstand frequently. The straddle press handstand is an advanced-level skill that requires a tremendous amount of strength, balance, flexibility and coordination. Make it a point to develop each part of the movement individually until it becomes easy to transition to the next stage. Not only will a slow progression help you prioritize proper form from beginning to end, it will also minimize your risk of injury.
- Try to set aside 15-30 minutes per day to practice. The more you train, the quicker you’ll get the hang of it.
- Stop practicing when you feel your form start to slip. You don’t want to get in the habit of performing the movement with poor technique.
Building the Necessary Strength and Flexibility
-
1Hold boat pose for increasingly longer durations. Sit on the floor with your legs straight out in front of you, making sure your sitting bones are firmly grounded. Press your fingertips into the floor on either side of your legs and tighten your core to raise your legs up to a 45-degree angle. With your legs fixed at around eye-level, extend your arms out parallel above the floor. Try to hold the pose for at least 10 seconds before releasing it, and work up to longer holds as you get more comfortable.[12]
- If you’re having trouble holding full boat pose with proper form, bend your knees slightly or a place a block between your thighs. You can also leave your feet on the floor until you develop enough strength to maintain the hollow body position.[13]
- Boat pose, or navasana, is a traditional yoga pose which can be used to strengthen the muscles of your core, inner thighs, hip flexors, and shoulders.
-
2Do V-ups to give your core muscles a killer workout. V-ups are a type of core exercise similar to boat pose, but slightly more difficult to perform. Start by lying flat on your back with your arms over your head and your core and the tops of your thighs engaged. Using muscular strength (not momentum), lift your legs and torso off the ground simultaneously so that your body forms a “V” shape. Lower yourself back down to the ground in a controlled manner to complete one rep.[14]
- Start with sets of 5-10 reps and gradually add more with each workout.
- Try touching your hands to your feet at the top of each rep to intensify the exercise and get more bang for your buck.
-
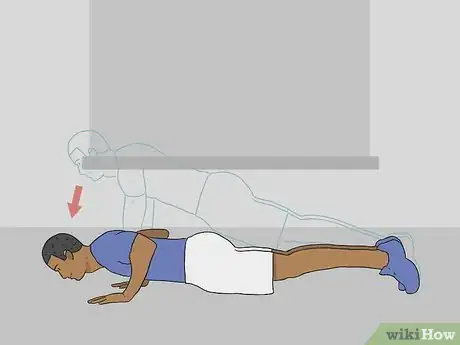
3Increase your upper body strength with push ups. Drop down into a standard planche position, with your head, torso, and legs forming a single straight line, your hands shoulder-width apart, and your shoulders positioned directly over your wrists. Bend your elbows and lower yourself until your chest is hovering just above the floor. Then, reverse the movement to yourself back up into a planche. Aim for 15-20 push ups per set, with a total of 4-5 sets per workout.[15]
- If you need to, you can do push ups from your knees until you’ve gained the strength necessary to perform a proper planche push up.
- When you get to the point where you can do 20 or more strict push ups, start introducing more challenging variations, such as diamond, clapping, spider, and one-armed push ups. Pike push ups translate especially well to the kind of shoulder strength required for a straddle press handstand.[16]
-
4Add some kettlebell swings to your workout to practice your hip hinge. Grab a kettlebell with both hands and stand with your feet slightly wider than shoulder-width apart. Keeping your back straight and your gaze fixed on the wall in front of you, bend over at the hips so that the kettlebell dangles down between your legs. Just before it touches the floor, push with your legs and extend your hips forcefully to swing it up to around chest level then bring it back down for another rep.[17]
- Be sure to keep your chest up and your arms straight throughout the entire movement. You should be relying on the explosive power of your lower back, hips, glutes, and hamstrings, not your arms.[18]
- Set a goal of 20-30 swings per set, or simply do as many as you can in 30 seconds or a minute.
-
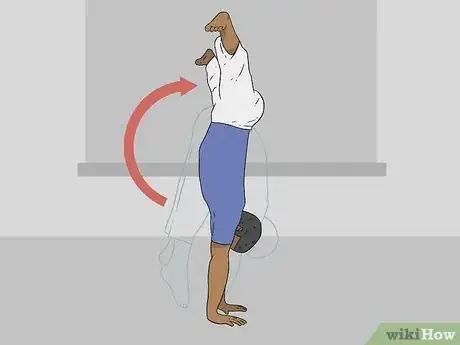
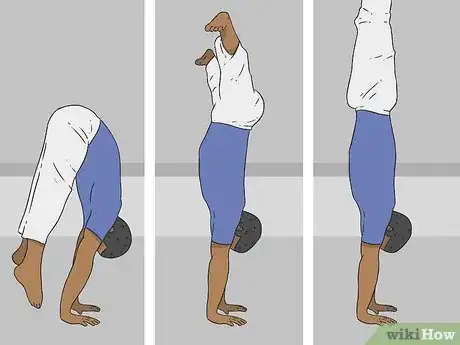
5Perfect your pike handstands. Start pushing yourself up from a seated straddle the way you would for a normal straddle press handstand, only pause when you’re about halfway up and bring your legs together in front of you. In this position, your thighs should be parallel to the floor so that your body forms a kind of elongated “7” shape.
- If you’re having trouble getting your legs off the floor, keep your knees bent or prop your feet up on a chair or exercise ball to take some of the difficulty out of the early stages of the movement.[19]
- You can also use a wall to brace yourself if you need a little assistance. Stand facing the wall in a straddle position and place your hands on the floor 6–12 inches (15–30 cm) away from the bottom. Lean forward until your shoulders are resting against the wall, then lift your legs up into a supported handstand.
- Pike handstands are actually tougher than straddle handstands for many people due to the extreme weight shift, so if you can do a strict pike handstand, you should have all the tools you need to press up from a straddle.
Expert Q&A
-
QuestionHow do I get better at handstands?
 Rosalind LutskyRosalind Lutsky worked as a gymnastics coach at SB Gymnastics at Stanford University, coaching children from ages 5-12 years old during her time as a Stanford student. She was a competitive gymnast growing up, and competed for her local gymnastics team in Minnesota.
Former Gymnastics Coach Practice and work on your core strength. That’s the main muscle you need to engage in a press handstand. It especially helps to practice this type of handstand against a wall to make sure you don’t fall forwards as you practice the skill. If you're struggling to get the form down, have somebody hold your back and waist, and help pull you up for practice.
 -
QuestionHow can I hold my handstands longer?
 Community AnswerKeep your stomach tight. If it is not tight, then you will topple over. Also, if you are falling, try pressing your fingers really hard to maintain balance. You also want to keep yourself as straight as possible.
 -
QuestionHow can I stop my legs from burning while doing this?
 Community AnswerTo some extent you can't, but they will burn less the more you practice, the more you exercise your legs in general, and the stronger you get.
References
- ↑ http://gymnasticshq.com/how-to-do-a-press-handstand/
- ↑ https://www.youtube.com/watch?v=ATuo1JLBtAA&feature=youtu.be&t=57
- ↑ https://gymnasticshq.com/how-to-do-a-press-handstand/
- ↑ https://breakingmuscle.com/fitness/4-techniques-to-instantly-improve-your-freestanding-handstand
- ↑ https://www.sportsrec.com/445163-how-to-do-a-straddle-press-handstand.html
- ↑ http://www.allthingsgym.com/press-to-handstand-tips/
- ↑ http://www.drillsandskills.com/skills/Floor/A/bfa008
- ↑ https://www.sportsrec.com/445163-how-to-do-a-straddle-press-handstand.html
- ↑ http://gymnasticshq.com/how-to-do-a-press-handstand/
- ↑ http://www.theasanaacademy.com/the-psychology-of-excellence-how-to-build-a-bulletproof-press-handstand-practice/
- ↑ https://www.youtube.com/watch?v=WKG0lXGZYEA
- ↑ https://www.yogajournal.com/poses/full-boat-pose
- ↑ https://www.powerflow-yoga.com/5-tips-rock-boat-pose-20180611
- ↑ https://gethealthyu.com/exercise/v-up/
- ↑ https://www.youtube.com/watch?v=IODxDxX7oi4&feature=youtu.be&t=26
- ↑ https://www.outsideonline.com/health/training-performance/types-of-pushups/
- ↑ https://www.coachmag.co.uk/kettlebell-exercises/1730/how-to-do-a-kettlebell-swing
- ↑ https://www.youtube.com/watch?v=oJHDE2Vc168&feature=youtu.be&t=41
- ↑ https://yogainternational.com/article/view/handstand-press
About This Article
To do a straddle press handstand, sit down with your legs in the straddle position and place your palms flat on the floor in front of you. Next, slowly lean forward onto your hands, keeping your palms down and your hands facing forward. As your torso begins to tilt, transfer your weight from your lower body to your hands and engage your core to lift your legs off the floor. Then, sweep your legs back behind you and upwards in 1 controlled movement and bring them together over your head to complete the handstand. Finally, using your abs to control your movements, reverse the sequence and slowly lower yourself back into the original straddle position. For tips from our Gymnastics co-author on how to build strength for straddle press handstands, read on!










-Step-6-Version-4.webp)


