This article was co-authored by Ndeye Anta Niang. Ndeye Anta Niang is a Hair Stylist, Master Braider, and Founder of AntaBraids, a traveling braiding service based in New York City. Ndeye has over 20 years of experience in African hair including braiding box braids, Senegalese twists, crochet braids, faux dread locs, goddess locs, kinky twists, and lakhass braids. Ndeye was the first female of her tribe in Africa to move to America and is now sharing her knowledge of African braids passed on from generation to generation.
There are 15 references cited in this article, which can be found at the bottom of the page.
This article has been viewed 251,415 times.
Braiding hair is a stylish way to keep your hair out of your face while also looking pretty. The most important braid to learn is the basic braid, as it is the foundation for many other braids. Once you get the hang of it, however, the possibilities are endless!
Steps
Doing a Basic Braid
-
1Start with brushed hair that hasn't been washed for 1 to 2 days. Unwashed hair has more grip than freshly-washed hair, so it will be easier to braid. If you just washed your hair, dry it first, then apply some dry shampoo to give it texture.[1]
- This method will work for just about any hair texture and length, but it works better on hair that falls past your shoulders.
- If you have curly or frizzy hair, consider misting it with water. This will help the strands lay smoother and make them easier to work with.
-
2Divide your hair into 3 equal-sized sections. Start by parting your hair as desired: centered or off to the side. Next, gather your hair and pull it towards the back of your head, like starting a low ponytail. Split your hair into 3 equal-sized sections.[2]
- Some people find it easier to pull their hair back into an actual low ponytail. Keep in mind that you’ll have to remove the hair tie later if you do this.
Advertisement -
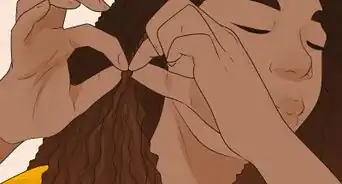
3Cross the left and right sections over the middle section. Take the left section and cross it over the middle section. Next, take the right section, and cross it over the new middle section.[3]
- If you have curly hair, smooth it down before and after each cross over. This will help give you a neater braid.
-
4Repeat the process until you reach the end of your hair. Ideally, you should keep braiding until it becomes difficult to cross the left and right sections over the middle one. This is really up to you, however.[4]
- If you have curly hair, consider braiding only a third or halfway down and leaving the rest of your hair loose. This will show off your beautiful curls.
-
5Secure the end of your braid with a hair tie. Most people like to match the hair tie to their hair color, but other people like to use a bright, vibrant color. Once you have your braid tied, you are done!
- How many times you wrap the hair tie around your braid depends on how thick it is. Expect to wrap it at least 3 times.
Trying French or Dutch Braids
-
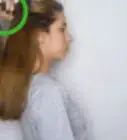
1Brush your hair back, then pull it into a half-up ponytail. Use a brush or comb to smooth your hair back so that your center part disappears. Gather your hair into a half-up ponytail at the level of your eyebrows or temples.[5]
- Consider misting your hair with water from a spray bottle. This will make it easier to work with.
- If your hair is smooth and slippery, consider applying some dry shampoo to it to give it some texture.
-
2Begin a basic braid. Split your half-up ponytail into 3 equal-sized sections. Take the left section and cross it over the middle one. Next, take the right section, and cross it over the new middle section.[6]
- For a Dutch or reverse French braid, cross the sections under the middle one.
-
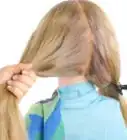
3Add some hair to the left section and cross it over the middle one. Gather a thin strand of hair from the left side of your hairline and add it to the left section. Take the now-thicker left section and cross it over the middle one.[7]
- Some people find it easier to cross the left section over first, then add the extra strand.[8]
- For a Dutch braid, cross the section under the middle one instead of over.
-
4Add some hair to the right section, then cross it over the middle one. Use the same process that you did for the left side, but in reverse. Gather a small strand of hair from the right side of your hairline and add it to the right section. Cross it over the new middle section.
- Remember to cross the section under for a Dutch braid.
-
5Repeat the process until you reach your nape. Keep gathering thin strands of hair from the left and right side of your hairline and adding them to the left and right sections. Cross the sections over the middle one for French braids, and under for cornrows.
-
6Finish with a regular braid, then secure it with a hair tie. How far down you braid is up to you. You can braid all the way down, or just part-way. Just remember: cross over for French braids, and under for Dutch braids.[9]
- Match the hair tie to the color of your hair or use a vibrant color for a stylish look.
- Add a fancy hair clip or flower to the end of your braid for a cute touch.
Creating a Fishtail Braid
-
1Start with neatly brushed hair. This method creates an intricate-looking braid, so it will work the best on straightened hair. You can still do it with curly or wavy hair, but you’ll have to smooth your hair down often.
- Consider dampening your hair with some water first. This will make it easier to braid.
-
2Pull your hair back into a low ponytail, then split it into 2 sections. You don't have to tie your ponytail off with a hair tie, although this will make things easier. Keep in mind that you will have to cut the hair tie off later, after you have completed your braid.
- Unlike other braids, fishtail braids only require 2 sections.
- You can have your hair pulled back so that there is no part whatsoever, or you can leave your part.
- A side-part would look especially cute with this style, but you can do a center-part too. Use a rat-tail comb to create the part.
-
3Take a strand from under the left section and add it to the right. Pull out a thin strand of hair from under the left section. Bring it across the left section and add it to the right. It is now a part of the right section.[10]
-
4Take a strand from under the right section and add it to the left. This is just like for the left side. Take a thin piece of hair from under the right section, cross it over the right section, and add it to the left.
-
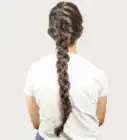
5Repeat the process until you reach the end of your hair. Once you get the hang of it, the fishtail braid is very simple. Just keep pulling strands of hair from under the left and right sections, and crossing them over to the opposite section.[11]
- How far down you braid is up to you. At some point, it will be difficult to cross those strands over; this is a good stopping point.
-
6Secure your braid with a hair tie. If you pulled your braid into a ponytail in the beginning, remove the hair tie after you’ve secured your braid. You may have to cut the ponytail’s hair tie off with scissors.
-
7Fluff the braid for a fuller effect, if desired. Starting from the bottom, gently pull on the outer loops of the braid to make it look fuller. Work your way towards the top of the braid, and don't get too carried away. Remember, your braid will loosen up throughout the day.[12]
- You can do this on other types of braids, but it is most popular for fishtail braids.
Trying Alternate Styles
-
1Wrap 2 regular braids around your head to get milkmaid braids. Part your hair down the middle first. Braid each side of your hair to get 2 braids. Wrap the braids around your head like a headband, then secure them in place with bobby pins.[13]
- If your braids can't cross past each other at the top of your head, your hair is too short. Try doing a braided halo with Dutch braids instead for a similar effect.
-
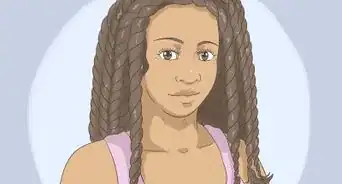
2Create box braids on natural hair by doing multiple mini braids. Wash, condition, and dry your hair, then divide it into 8 smaller sections, twisting them into buns. Working 1 section at a time, divide it into 1 in (2.5 cm) squares, then braid each square. Secure the ends of each braid with a black or clear mini elastic.[14]
- Use the handle of a rat-tail comb to make your parts nice and neat.
- Fold the ends of your braids down, then wrap the elastic around them 1 more time for a smoother finish.
- Create longer braids by adding strands of braiding extensions to the base of each braid.
- Apply a moisturizing cream to your hair as you are braiding it. Finish your hairline with some edge control cream.
-
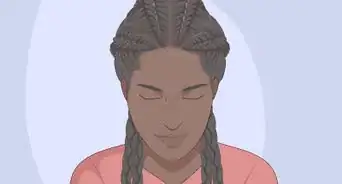
3Divide your hair into multiple mini Dutch braids to do cornrows. Wash your hair with shampoo and conditioner, then let it dry. Divide your hair into at least 3 sections, starting from your hairline and finishing at your nape.[15] Braid each section using the Dutch braiding technique, then finish with regular braids.[16]
- Fold down the ends of the braids, then wrap the elastic around them 1 more time.
- Make your braids longer by adding braiding extensions to the top part when you begin the braid.
- Remember to apply moisturizing cream to your hair, and edge control to your hairline.
-
4Wrap a pair of Dutch braids around your head for a braided crown. Part your hair down the middle first. Dutch braid each side, then finish with regular braids. Cross the braids against your nape. Pin the left braid to the right Dutch braid, and the right braid to the left Dutch braid.[17]
-
5Try an upside-down braid for a twist. Lean forward and start French braiding from your nape. When you reach the back of your crown, pull everything into a ponytail and straighten up. Secure the ponytail with a hair tie, then twist it into a bun. Secure it with another hair tie.[18]
- Use bobby pins to help tack down stray hairs.


Expert Q&A
Did you know you can get expert answers for this article?
Unlock expert answers by supporting wikiHow
-
QuestionWhat's the difference between a Dutch braid and a French braid?
 Ndeye Anta NiangNdeye Anta Niang is a Hair Stylist, Master Braider, and Founder of AntaBraids, a traveling braiding service based in New York City. Ndeye has over 20 years of experience in African hair including braiding box braids, Senegalese twists, crochet braids, faux dread locs, goddess locs, kinky twists, and lakhass braids. Ndeye was the first female of her tribe in Africa to move to America and is now sharing her knowledge of African braids passed on from generation to generation.
Hair Stylist & Master BraiderA Dutch braid involves making a line part and braiding your hair in 3 strings using alternating patterns. A French braid is the same, but instead of going over each other, the strings go on top of one another.
Support wikiHow by unlocking this expert answer.
-
QuestionWhat are two braids called?Ndeye Anta NiangNdeye Anta Niang is a Hair Stylist, Master Braider, and Founder of AntaBraids, a traveling braiding service based in New York City. Ndeye has over 20 years of experience in African hair including braiding box braids, Senegalese twists, crochet braids, faux dread locs, goddess locs, kinky twists, and lakhass braids. Ndeye was the first female of her tribe in Africa to move to America and is now sharing her knowledge of African braids passed on from generation to generation.
Hair Stylist & Master BraiderAre you thinking of pigtails? There are actually a ton of different braid styles that might involve two distinct braids, though. Bontu knots, French braids, Dutch Braids, and fishtail braids can all be styled with only two distinct braids.Support wikiHow by unlocking this expert answer.
-
QuestionWhat kind of hair do I need for box braids?Ndeye Anta NiangNdeye Anta Niang is a Hair Stylist, Master Braider, and Founder of AntaBraids, a traveling braiding service based in New York City. Ndeye has over 20 years of experience in African hair including braiding box braids, Senegalese twists, crochet braids, faux dread locs, goddess locs, kinky twists, and lakhass braids. Ndeye was the first female of her tribe in Africa to move to America and is now sharing her knowledge of African braids passed on from generation to generation.
Hair Stylist & Master BraiderFor synthetic hair, you typically use soft-pressed and kanekalon expression hair or the pre- stretched kanekalon hair. Some people like using natural hair if they have an allergy or they don't like how heavy synthetic hair can be.Support wikiHow by unlocking this expert answer.
Things You'll Need
- Brush
- Hair ties
- Spray bottle with water (optional)
References
- ↑ http://stylecaster.com/beauty/types-of-braids/#slide-2
- ↑ Ndeye Anta Niang. Professional Hair Stylist & Master Braider. Expert Interview. 10 January 2020.
- ↑ https://www.youtube.com/watch?v=_GwFGqN3PNE&feature=youtu.be&t=1m30s
- ↑ https://www.youtube.com/watch?v=_GwFGqN3PNE&feature=youtu.be&t=1m41
- ↑ https://www.youtube.com/watch?v=iF-ii0BoCuA&feature=youtu.be&t=55s
- ↑ https://www.youtube.com/watch?v=iF-ii0BoCuA&feature=youtu.be&t=2m15s
- ↑ http://stylecaster.com/beauty/types-of-braids/#slide-4
- ↑ https://www.youtube.com/watch?v=iF-ii0BoCuA&feature=youtu.be&t=2m35s
- ↑ https://www.youtube.com/watch?v=iF-ii0BoCuA&feature=youtu.be&t=5m15s
- ↑ http://stylecaster.com/beauty/types-of-braids/#slide-3
- ↑ http://stylecaster.com/beauty/types-of-braids/#slide-3
- ↑ http://stylecaster.com/beauty/types-of-braids/#slide-3
- ↑ http://stylecaster.com/beauty/types-of-braids/#slide-7
- ↑ https://www.youtube.com/watch?v=2fkhVtSxf-A
- ↑ Ndeye Anta Niang. Professional Hair Stylist & Master Braider. Expert Interview. 10 January 2020.
- ↑ https://www.youtube.com/watch?v=tw4Gy0AkJRI
- ↑ http://stylecaster.com/beauty/types-of-braids/#slide-6
- ↑ http://stylecaster.com/beauty/types-of-braids/#slide-5
About This Article