This article was co-authored by Katherine Tlapa. Katherine Tlapa is an interior designer, currently working as a Design Specialist for Modsy, a design service based in San Francisco. She also runs her own DIY Home Design blog, My Eclectic Grace. She received her BFA in Interior Architecture from Ohio University in 2016.
There are 13 references cited in this article, which can be found at the bottom of the page.
This article has been viewed 28,376 times.
Decorating your room can be a lot of fun. While you can always buy premade decorations, you can make ones that are just as nice, but much cheaper at home. From creating wall décor to decoupaging your dresser, there are all sorts of interesting ways that you can use paper. Cardstock and scrapbooking paper will work for most projects, but don't forget other types too, such as tissue paper, cupcake liners, and wrapping paper.
Steps
Creating Wall Décor
-
1Tape scrapbook paper together to create a quilted wall hanging. You could hang this over a large window or behind a bed. Gather 16 squares of scrapbooking paper. Overlap the papers by 1⁄2 inch (1.3 cm) to make a large square. Secure the edges of the papers with double-sided tape. Glue the quilt to a wooden slat, then hang it from your wall.[1]
- Choose 2 to 4 different patterns or colors for the paper.
- For a more realistic quilt, skip the tape and sew down the seams on your sewing machine with a straight stitch.
- Use saw-tooth hangers or ribbon to hang the slat.
-
2Create your own wall decals from paper. This is great seasonal project as you could create leaves for fall, snowflakes for winter, flowers for the spring, and suns for the summer. Use stencils or large cookie cutters to trace shapes onto colored paper. Cut these shapes out, then secure them to your wall with double-sided tape or poster putty.[2]
- Your paper can be solid-colored or patterned. You can even use magazine pages!
- Simple shapes, such as hearts and stars work well, but you can use more complex ones too. Try snowflakes, reindeer, or bats!
- Match the color of the paper to the shape. For example, make stars yellow or blue, and hearts red or pink.
- You can put up just a few decals or create a wall mural with them.
Advertisement -
3Make a sunburst wall hanging by gluing paper tubes together. Gather paper in 2 to 3 different sizes. Roll the paper into tubes, then tape tubes shut. Arrange the tubes side-by-side to create a flat disk or sunburst, then hot glue them together. Hang the sunburst from your wall with thread.[3]
- The long edges of the tubes should be touching. How much space you leave in the middle is up to you.
- Make a smaller sunburst, then glue it on top of a larger sunburst for a layered design.
- For a dramatic effect, create several small sunbursts and hang them on a single wall.
-
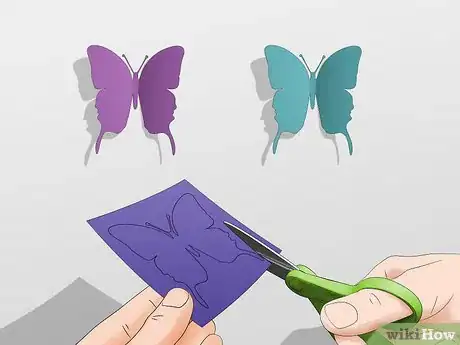
4Fold paper butterflies in half, then secure them to your wall. Use a stencil or a cookie cutter to trace butterfly shapes onto colored paper. Cut the butterflies out, then fold them in half along the body to create a crease. Secure the butterflies to your wall with poster putty or double-sided mounting tape.[4]
- Rather than folding the butterflies down the center of the body, fold the wings to either side of the body. This will give you more paper to stick to the wall.
- Make lots of butterflies in different colors and sizes, then stick them to your wall in a cluster.
- For a whimsical vibe, use glitter paint to decorate the butterflies or attaching trailing ribbons to them.
-
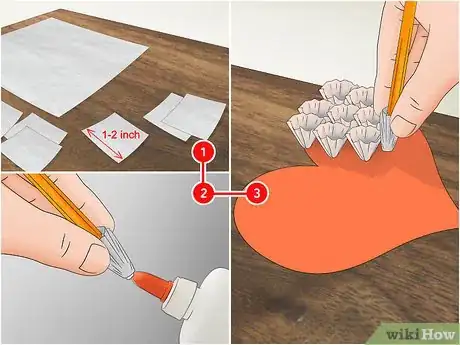
5Make some tufted tissue paper wall art. Cut a large shape out of tissue paper. Next, cut tissue paper into 1 to 2 in (2.5 to 5.1 cm) squares. Wrap each tissue paper square over the end of an unused pencil eraser, dip it in glue, then press it against your shape. Keep going until you have the entire shape filled with tufted bits of tissue paper, then hang it up with poster putty or push pins.[5]
- Keep the shape simple, such as a heart, star, or letter.
- You can use more than 1 color of tissue paper. Try 3 shades of the same color for an ombre design.
- Work in rows from 1 side of the shape to the other. Make sure that the tissue paper tufts are touching.
Making Garlands
-
1Glue folded butterflies to string to create a 3D garland. This would be a great decoration for a child’s bedroom. Cut butterfly shapes out of paper, then fold them in half to create creases. Hot glue half of the butterflies along the creases to a long piece of string. Flip the garland over, then hot glue the rest of the butterflies to the backs of the first ones so that the wings fold away from each other.[6]
- Make sure that you are gluing the folded edges of the butterflies together. This will create a 3D effect.
- Make sure that the butterflies are all the same shape. Use a stencil or a craft punch to make them. They should be 2 to 3 inches (5.1 to 7.6 cm) across.
- For a unique look, use paper in various colors.
-
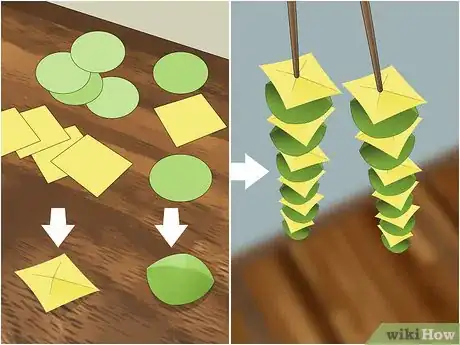
2Sew a garland using simple shapes. Use a large craft punch to cut lots of shapes from colored paper. Stack 2 shapes together, then sew down the middle on your sewing machine with a straight stitch. Stack 2 more shapes, and sew across them as well. Keep going until your garland is the length you want it.[7]
- Keep the shapes simple, such as circles or squares.
- For a 3D effect, fold each of the shapes in half, so that the papers are pointing away from each other. Do 1 side of the garland first, then the other.
- Backstitch when you start and finish sewing so that the stitching doesn't come undone.
-
3Glue paper triangles to string to make a pennant banner. Cut a large triangle from colored or patterned paper. Turn the triangle so that you can see the back, then cover the bottom straight edge with double-sided tape. Drape your string across it, then fold the edge down by 1⁄2 inch (1.3 cm). Trim off the excess corners sticking out from behind the folded edge.
- Repeat this step to fill your string up with as many triangles as you want.
- The size of the triangles does not matter, but they should all be the same.
- Hang the garland above your bed, dresser, or window.
- If you want to create a banner for the holidays, cut the triangles out of decorative wrapping paper.
-
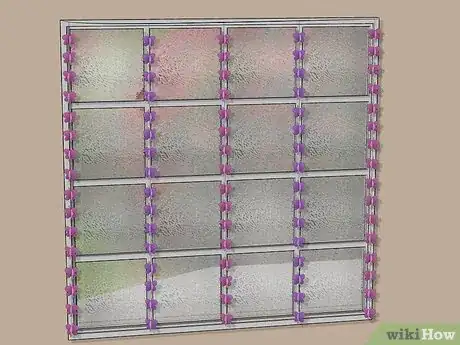
4Hang mini garlands from a piece of string to use as a curtain. Measure the height of your window, then create 5 to 7 mini garlands based on that measurement. Next, hang a piece of string across the top of your window. Tie each mini garland to that string to create a curtain-like effect.[8]
- This will only work with the butterfly and circle style garlands mentioned above. It won't work with a pennant style garland.
-
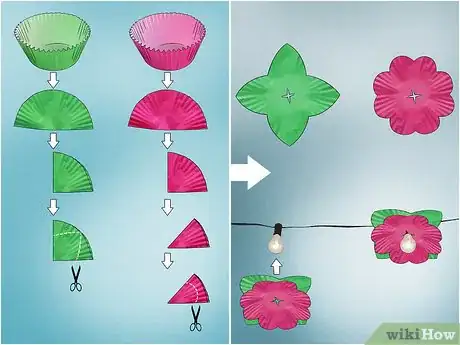
5Add cupcake liners to string lights to mimic flowers. Fold a green cupcake liner into fourths. Cut a leaf shape into it, keeping it connected at the pointed end, then unfold it to reveal a 4-leaf flower. Next, fold a colored cupcake liner into thirds. Cut an arch into the curved edge, then unfold it to reveal an 8-petal flower. Put the flower on top of the leaves, poke a hole in the center of the stack, then push it onto a bulb of string lights. Repeat this step for each of the lights on your string.[9]
- To fold into thirds: fold the cupcake liner into fourths first, then fold it over 1 more time.
- You can use string lights with a white cable or green cable. LED lights would work the best. Don't leave the lights on unattended.
Decorating Furniture
-
1Decoupage a desk or dresser. Coat the top of your desk or dresser with decoupage glue. Place a sheet of wrapping paper over it, smooth out any wrinkles, then trim off the excess. Let the glue dry, then seal it with 2 coats of decoupage glue.
- Let each layer of decoupage glue dry before you add the next coat.
- Feel free to stick with 1 kind of paper or layer different papers for an eclectic look.
-
2Glue paper semicircles in overlapping layers to a lampshade. Choose paper in a light, dark, and medium shade of the same color. Cut enough semicircles from the paper to cover your lampshade. Hot glue the circles in overlapping rows to create a scale effect. Make sure that the light bulb does not get hot enough to start the paper on fire![10]
- Start from the bottom of the lamp and work your way up. Make sure that the curved edges of the scales are pointing down.
- Mix-and-match the shades in the same row, or use 1 shade per row to create an ombre effect.
- The size of the scales does not really matter, but 2 to 3 inches (5.1 to 7.6 cm) would be good.
-
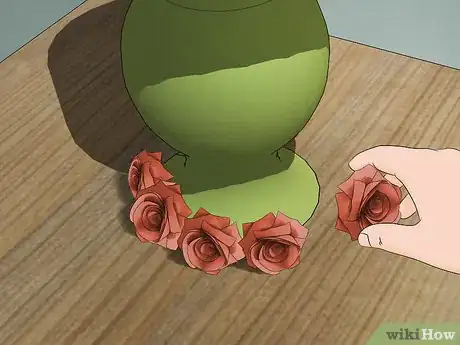
3Make paper roses, then glue them to the bottom edge of a lampshade. Cut a large circle out of paper, then cut the circle into a spiral. Starting from the outside, roll the spiral into a coil. Loosen the coil slightly, then hot glue the end to maintain the rose shape. Create enough of these to hot glue to the bottom edge of your lampshade.[11]
- Match the color of the roses to your lampshade, or use a contrasting color.
- Don't combine this with the scales. Choose 1 or the other.
-
4Line the inside of your shelves with patterned paper. Take everything out of your drawer, then measure the inside. Cut patterned paper to those dimensions, then tuck it into the drawer. Put everything back into the drawer, then close it. This is also a great option for the back of a bookshelf.[12]
- Decoupage over the paper to make it permanent.
- Use double-sided tape to secure the corners of the paper, if desired.
- Use wrapping paper for large drawers, and scrapbooking paper for small drawers.
-
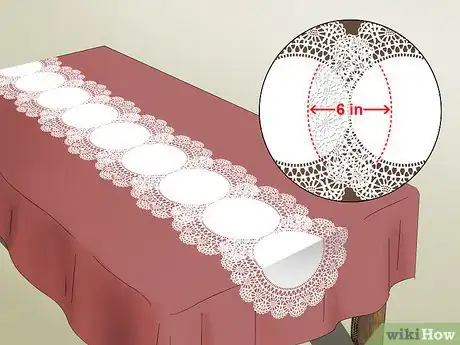
5Overlap and glue large doilies together to make a table runner. Find some large doilies measuring 12 to 24 inches (30 to 61 cm) across. Paint them with watercolors, if desired, then let them dry. Overlap them end-to-end by 4 to 6 inches (10 to 15 cm) inches, then glue them down. Keep going until you get the length you want, then set it on top of your dresser.[13]
- Make the table runner wider by gluing more doilies to the sides.
- You can find paper doilies in the baking section of a craft store.
Community Q&A
-
QuestionWhy aren't there any pictures in this article?
 Community AnswerThe author of the article is the one who decides what, if any, illustrations will be included. In this case, it looks like the author just didn't think pictures were necessary.
Things You'll Need
- Colored cardstock
- Patterned scrapbooking paper
- Tissue paper
- Cupcake liners
- Poster putty or foam mounting tape
- Glue
- String
- Scissors
References
- ↑ https://www.goodhousekeeping.com/home/decorating-ideas/a24126/bedroom-decorating-ideas-using-paper/
- ↑ https://www.bhg.com/decorating/do-it-yourself/fabric-paper-projects/low-cost-home-decorating-with-paper/?slideId=6dad16fc-19de-4b3e-930b-99ae88f2390e
- ↑ https://www.bhg.com/decorating/do-it-yourself/fabric-paper-projects/low-cost-home-decorating-with-paper/?slideId=d451edc0-c658-4bbb-b1ed-61088769213b
- ↑ https://www.youtube.com/watch?v=4nx3PZEJy_M
- ↑ https://www.youtube.com/watch?v=jrV6rIv1JHM
- ↑ https://www.youtube.com/watch?v=j26kZgSiikk
- ↑ https://www.bhg.com/decorating/do-it-yourself/fabric-paper-projects/low-cost-home-decorating-with-paper/?slideId=b92b1ef4-1d8f-4c79-920e-0b9a8a030855
- ↑ https://www.bhg.com/decorating/do-it-yourself/fabric-paper-projects/low-cost-home-decorating-with-paper/?slideId=9c82bb9f-6d01-4749-ba1c-21e431d29e16
- ↑ http://ohhappyday.com/2012/05/cupcake-flower-lights/
- ↑ https://www.bhg.com/decorating/do-it-yourself/fabric-paper-projects/low-cost-home-decorating-with-paper/?slideId=764368e9-95af-4803-a023-25e36bcf8ac5
- ↑ https://www.bhg.com/decorating/do-it-yourself/fabric-paper-projects/low-cost-home-decorating-with-paper/?slideId=add14ada-f98c-4b43-b51e-62c4f05fc3db
- ↑ https://www.bhg.com/decorating/do-it-yourself/fabric-paper-projects/low-cost-home-decorating-with-paper/?slideId=9382d231-bc0e-4330-95a4-64cafd67e3cd
- ↑ https://www.bhg.com/decorating/do-it-yourself/fabric-paper-projects/low-cost-home-decorating-with-paper/?slideId=bc028cd9-7ac1-40ba-9689-91312ff83fc0


