This article was co-authored by wikiHow staff writer, Eric McClure. Eric McClure is an editing fellow at wikiHow where he has been editing, researching, and creating content since 2019. A former educator and poet, his work has appeared in Carcinogenic Poetry, Shot Glass Journal, Prairie Margins, and The Rusty Nail. His digital chapbook, The Internet, was also published in TL;DR Magazine. He was the winner of the Paul Carroll award for outstanding achievement in creative writing in 2014, and he was a featured reader at the Poetry Foundation’s Open Door Reading Series in 2015. Eric holds a BA in English from the University of Illinois at Chicago, and an MEd in secondary education from DePaul University.
There are 10 references cited in this article, which can be found at the bottom of the page.
The wikiHow Video Team also followed the article's instructions and verified that they work.
This article has been viewed 24,172 times.
Learn more...
Jerky is phenomenal, but the store-bought brands just don’t stand up to the homemade stuff. Making your own jerky can be kind of time-consuming, but the actual cooking process is not particularly difficult. What can be tough is cutting the jerky, especially since how you cut the meat directly influences the texture and the flavor of the jerky. The major choice you will need to make when cutting the jerky is whether to go with, or against the grain of the meat. Cutting strips with the grain will result in tougher pieces that take longer to eat, while cutting your strips against the grain will result in softer jerky that are easier to chew.
Steps
Trimming the Fat
-
1Get some beef round for standard jerky or choose a different cut of meat. Go to the grocery store or pull out a cut of meat from your fridge or freezer. The most common cut of meat for jerky is beef round since it’s lean but has enough interior fat for a good flavor. You can really make jerky out of any cut of meat so long as it doesn’t have bones in it. You can also use lamb, deer, or turkey instead of beef![1]
- Beef round is often marketed as London broil at the grocery store, which is a common method of preparation for beef round.
- If you’re pulling some meat out of the freezer, thaw it before cutting your jerky strips.
-
2Grab a sharp paring or boning knife to cut the meat. You need a sharp, thin edge on your blade to efficiently cut jerky strips. This makes paring and boning knives ideal. Pull out a sharp paring or boning knife to trim the fat and cut your strips.[2]
- The sharper your knife is, the easier this will be to cut. If you need to sharpen the knife, grab a whetstone or honing rod and drag the edge of the blade over the surface at a 20- to 30-degree angle until the blade is sharp.
- You can use a chef’s knife or butcher’s knife if you prefer, but the blades are a little thick for cutting thin jerky strips.
- Do not use a serrated blade. Serrated blades will absolutely shred raw meat.
Advertisement -
3Set the meat flat on your cutting board. Place the meat in the center of your cutting board. Set it on a stable, flat edge. You’re going to cut the large chunks of fat off of the entire piece of meat, so you’ll turn it around several times on the board. It’s easier to just start with the meat in the most stable position.
-
4Identify the fat by looking for lighter, uniform chunks on the meat. Look over the surface of the meat. Look for the large pieces of off-white tissue with a uniform texture. These are the pieces of fat. Large amounts of fat will cause the jerky to spoil either while it dries, or after you’ve packaged it.[3]
- Don’t worry about the thinner veins of fat that are running through the main body of the meat. These smaller fat deposits are actually good for the meat and will improve the flavor.
-
5Carve the larger pieces of fat off by carefully cutting around the meat. Use your knife to cut off the large pieces of fat surrounding the cut. Brace the cut gently with your nondominant hand while your run the blade between the meat and the fat. If there are large pieces of fat sticking to the surface of the meat, carefully trim them out by cutting into the meat at an angle and pulling the fat out.[4]
- Flip the meat over and trim the fat off of the other side as well.
- For smaller pieces of fat, you can dig the tip of your knife info the seam where the fat meets the meat and cut the meat out that way.
-
6Set the meat inside of the freezer for 30 minutes to make it easier to cut. Set the meat on top of a clean plate and wrap it loosely in aluminum foil or plastic wrap. Place the meat inside of your freezer and close the door. Wait at least 15-30 minutes to firm up the meat. This will make it much easier to cut.[5]
- This is particularly important if you’re using a cheaper cut of meat. Cheaper meat tends to be much tougher to slice through than high-end cuts.
Warning: Do not leave the meat in the freezer for more than 30 minutes. You do not want the moisture in the meat to freeze, since it will take much longer to dehydrate the jerky.


Finding the Grain
-
1Inspect the surface of the meat to see which direction the fibers run. Take your cut of meat and set it out on your cutting board. Look carefully at the surface of the meat and follow the direction of the grooves and marbling in the meat. The direction of the fibers on the surface of the meat tell you which direction the grain runs, which is key when it comes to choosing how to cut your meat.[6]
- Whether you cut with or against the grain determines whether your jerky will be soft or hard.
- If you can’t really tell, look at the lighter veins of fat that are embedded in the meat. These veins of fat typically develop in the same direction as the grain. You cannot use the pieces of fat on the exterior of the cut, though.
-
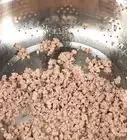
2Trim a small piece off and pull it apart if you aren’t sure. If you can’t find the grain by looking at the meat, trim a small piece of meat off of the cut. Grip the 2 ends of the meat and try to pull it apart. If the meat tears easily, you just cut across the grain. If the meat is harder to pull and stays largely intact, you just cut with the grain.[7]
- If you still can’t tell, look at the portion of the meat that you exposed by cutting it. If you can see the individual grooves running from the top of the meat through the area you cut, you just cut against the grain.
-
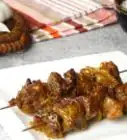
3Cut with the grain for tougher, chewier jerky. If you love beef jerky that’s tough, succulent, and keeps its shape for longer while you chew it, cut with the grain of the meat. Turn the meat so that the grain is running vertically in front of you. Your knife will cut parallel with the fibers to cut with the grain.[8]
- If you love taking jerky with you on hunting or fishing trips and throwing a piece in your mouth while you’re focusing on something else, this is the best way to make the jerky.
-
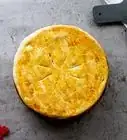
4Slice across the grain for softer jerky that’s easier to chew. For jerky that’s much easier to eat and tends to crumble like bacon when you break it apart, cut against the grain. This style of jerky will be much easier to eat and won’t take nearly as long to chew on. Turn the cut of meat on your cutting board so that the fibers run left to right in front of you. Your blade will cut perpendicular to the grain of the meat.[9]
- If you like snacking on softer jerky or hate pulling on tough chunks of meat while eating it, this is the ideal way to cut the jerky.
- If you want something in the middle, you can cut diagonally. This is generally an unpopular way to cut meat for jerky though, since most people prefer one method over the other. Most cuts of meat are also pre-trimmed so that the grain rests vertically or horizontally, so cutting diagonally will result in a lot of differently-sized strips.
Tip: There is no right or wrong way to make jerky. Whether you cut with, or against the grain of the meat is entirely a matter of personal preference.

Making Your Cuts
-
1Slice through larger chunks of meat to make them 1–2 in (2.5–5.1 cm) thick. If you have a large, asymmetrical chunk of meat or you’re using a thicker cut, thin the meat down into smaller portions. Steady the top of the meat carefully and cut horizontally through the meat. Trim larger cuts of meat down so that they’re 1–2 inches (2.5–5.1 cm) thick depending on your personal preference.[10]
- The thickness of the meat is completely up to you, but you do need the thickness to be uniform for each strip. This will ensure that all of the strips dry evenly when you make the jerky.
- Whether you cut with or against the grain for this does not matter. It isn’t the actual cutting that influences the texture of the meat, but the direction and shape of the grain contained on each strip.
-
2Orient your meat on the cutting board based on the grain. Turn the meat so that the grain is either parallel or perpendicular to the knife. If you’re cutting against the grain, the grooves in the fibers of the meat should be running to the left and right. If you’re cutting with the grain, turn the meat so that the grain is resting vertically in front of you.[11]
-
3Make straight cuts through the meat to trim it into thin slices. Hold the meat steady with your nondominant fingertips. Start on any edge of the cut. Hold the blade of the knife over the meat so that you’re trimming a thin, vertical strip. Lower the knife and slide the blade back and forth to cut the strip. Keep the thickness of the strip between 1⁄4–1⁄2 in (0.64–1.27 cm).[12]
- Thicker cuts will take slightly longer to cook than thinner cuts. The difference won’t be radical though, unless your strips are larger than 3⁄4 in (1.9 cm).
- The strips that you cut at the edge of the meat will naturally be a little less beautiful than the rest of the strips since the sides of a cut are rarely perfectly straight.
Tip: The meat will shrink a little when you dehydrate or smoke it. Keep this in mind when choosing the thickness of your strips.
-
4Continue cutting parallel strips out of the meat to cut the jerky to size. Hold your blade parallel to your first cut. Move the blade back and forth while driving the knife into your cutting board until the second 1⁄4–1⁄2 in (0.64–1.27 cm) strip is complete. Continue cutting the meat this way to keep each piece parallel. Once you’ve cut the entire piece of meat into thin, evenly-sized strips, you’re ready to begin marinating and drying the meat![13]
Things You’ll Need
- Cutting board
- Paring or boning knife
- Aluminum foil or plastic wrap


References
- ↑ https://www.self.com/story/homemade-beef-jerky
- ↑ https://youtu.be/rVUhRiBPrEg?t=37
- ↑ https://www.fsis.usda.gov/wps/portal/fsis/topics/food-safety-education/get-answers/food-safety-fact-sheets/meat-preparation/the-color-of-meat-and-poultry/the-color-of-meat-and-poultry/CT_Index
- ↑ https://youtu.be/chlllchzch0?t=58
- ↑ https://www.self.com/story/homemade-beef-jerky
- ↑ https://www.bonappetit.com/story/cutting-against-the-grain
- ↑ https://youtu.be/k0hg6grl2is?t=25
- ↑ https://youtu.be/chlllchzch0?t=324
- ↑ https://www.self.com/story/homemade-beef-jerky
About This Article