This article was co-authored by Sam Lagor, MSc. Sam Lagor is a Geologist with over eight years of experience. He specializes in engineering geology (dams, bridges, and tunnels) and mineral exploration (gold, lead/zinc, andindustrial minerals). Sam holds a BS in Geology from St. Lawrence University and an MS in Geology from The University of Vermont. He is also a member of the Geological Society of America and the American Institute of Professional Geologists.
There are 7 references cited in this article, which can be found at the bottom of the page.
This article has been viewed 38,317 times.
If you’re on the hunt for an exciting hobby, look no further than the ground beneath your feet! Rock collecting is an incredibly fun pastime that can take you all around the world while teaching you tons of new things about nature. Even better, rock collecting is incredibly easy to get into and requires little more than your time.
Steps
Choosing Places to Search
-
1Start your collection with rocks from your neighborhood. When you’re first starting out, try searching for rocks in your backyard, around your neighborhood, and in other places you frequent. Look for specimens that have interesting features and, most importantly, appeal to your personal tastes.[1]
- During this time, train yourself to spot unique rocks that you would normally overlook.
- Keep your eyes peeled for old stream beds, ditches, road cuts, and other areas with lots of exposed rocks.
-
2Visit nature sites to expand your collection. Though searching for rocks in your immediate area can lead to some wonderful discoveries, you’ll run out of new specimens pretty fast. Given this, you’ll have to visit a variety of nature sites to expand your collection further.[2]
- Some popular places to look for rocks include mountain ranges, beaches, lowland plains, natural cliffs, outcrops, and quarries.
- A map of popular collection sites.[3]
Advertisement -
3Ask before excavating rocks from private property or nature preserves. Before digging up rocks on someone’s private property or in a government-owned park or reserve, get permission from the owner or an authorized government agent. Without explicit permission, digging up rocks from these sites is illegal and can lead to theft or vandalism charges.[4]
- For some parks and monuments, such as the Grand Canyon, you need a full geological permit to excavate rock samples.
-
4Purchase or trade specimens at a rockhound club. Unlike minerals and precious gems, rocks don’t have a particularly large secondhand market. As such, the best way to purchase new specimens or make rock swaps is by visiting a rockhound club and mingling with its members.[5]
- Even if they don’t have any rocks for sale, rockhound clubs can point you in the direction of interesting excavation sites.


Finding and Excavating Rocks
-
1Search for specific types of rocks. Rocks come in 3 primary forms: igneous, metamorphic, and sedimentary. Each of these forms has unique characteristics that will appeal to different types of people. There’s no “right” way to collect rocks, so feel free to go after whichever style you like most.[6]
- Igneous rocks are firm, crystalline specimens formed out of magma. Popular variants include basalt, obsidian, and gabbro.
- Sedimentary rocks are layered specimens formed by water, ice, or wind. Popular variants include sandstone, limestone, and shale.
- Metamorphic rocks are igneous and sedimentary rocks that were transformed and flattened by extreme heat. Popular variants include slate, marble, and gneiss.
-
2Look for rocks that are unique to the area you find them in. This may mean rocks only available in specific places, such as novaculite and jadeite, or standard rocks that look unique thanks to the natural processes that formed them.
- If you’re going to a popular collecting destination like the Appalachians, search online for region-specific rock guides to see what specimens exist in the area.
-
3Excavate rocks with a geologist’s hammer if necessary. Though you may find some rocks simply lying on the ground, others will require a geologist’s hammer to excavate properly. These tools come with a blunt end, which you can use to break off new specimens, and a pick end, which you can use to chisel specimens out of a rock face.[7]
- Before using your hammer, put on safety goggles to protect your eyes from debris.
- You can purchase geologist’s hammers from most home improvement stores.
-
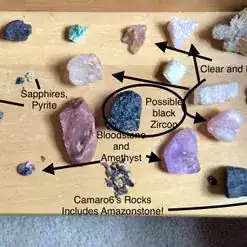
4Label each rock as soon as you excavate it. Whenever you pick up a new specimen, write down the area you found it in on an adhesive label and attach it to the rock. Then, store the rock in an area where it won’t get mixed up with other specimens. Doing this will help you catalog your rocks once you get home.[8]
- If you can, take a picture of the exact spot you get each rock from. That way, if you have trouble identifying a rock later on, you can look at its photo for further clues.


Storing Your Collection
-
1Catalog your rocks. So you can keep track of all the different rocks you have, create a simple catalog listing out each of your specimens. For every specimen, include what type of rock it is, where you found it, when you picked it up, and any additional notes you feel are relevant.[9]
- If you don’t know what type of rock you have, consult the Mineralogical Society of America’s Rock Identification Key at http://www.minsocam.org/msa/collectors_corner/id/rock_key.htm.[10]
-
2Cut your rocks down to a common specimen size. To save space, most rock collectors cut their specimens down to a size that’s just large enough to show off the rock’s features. Though measurements will vary by rock, the most common specimen sizes are 3 by 4 by 2 in (7.6 by 10.2 by 5.1 cm) and 2 by 3 by 1 in (5.1 by 7.6 by 2.5 cm).[11]
- You can cut your rocks using the pick end of a geologist’s hammer, a slab saw, or a trim saw.
-
3Keep your rocks in a loose box. Unlike many other types of collectibles, rocks are incredibly durable and have no special storage requirements. As such, you can keep them in any loose container such as a shoe box or egg carton. If you want to display your collection, consider purchasing a wall case from a craft or picture frame supply store.[12]
- To keep your rocks from getting mixed up, try sorting them by type or location.
-
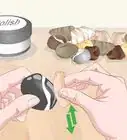
4Clean your rocks with a toothbrush when necessary. If your rocks get dirt or grime on them, rinse them in cold water with a small amount of dish soap or laundry detergent. Then, gently scrub your specimens clean with a toothbrush.[13]


References
- ↑ https://boyslife.org/hobbies-projects/funstuff/144171/how-to-start-a-rock-collection/
- ↑ https://pubs.usgs.gov/gip/collect1/collectgip.html
- ↑ https://www.google.com/maps/d/u/0/viewer?msa=0&hl=en&ie=UTF8&t=h&ll=36.56168614811542%2C-95.33554399999997&spn=10.228323%2C44.065546&source=embed&mid=13UCq5sTH4HB3SHXLZ-p8P7II6Nc&z=5
- ↑ https://boyslife.org/hobbies-projects/funstuff/144171/how-to-start-a-rock-collection/
- ↑ https://www.weirdunsocializedhomeschoolers.com/rock-collecting/
- ↑ https://www.geolsoc.org.uk/ks3/gsl/education/resources/rockcycle/page3445.html
- ↑ https://boyslife.org/hobbies-projects/funstuff/144171/how-to-start-a-rock-collection/
- ↑ https://pubs.usgs.gov/gip/collect1/collectgip.html
- ↑ https://pubs.usgs.gov/gip/collect1/collectgip.html
About This Article