This article was co-authored by wikiHow Staff. Our trained team of editors and researchers validate articles for accuracy and comprehensiveness. wikiHow's Content Management Team carefully monitors the work from our editorial staff to ensure that each article is backed by trusted research and meets our high quality standards.
There are 7 references cited in this article, which can be found at the bottom of the page.
This article has been viewed 96,818 times.
Learn more...
A manifold absolute pressure (MAP) sensor is a sensor used in the electronic control system of an internal combustion engine. It's necessary for performing calculations that influence combustion and ignition timing. Over time, it can get dirty and increase fuel consumption, cause a jerking during acceleration, and even stall your vehicle after ignition. If you think you need to clean your MAP sensor, you need to remove it and then give it a spray and scrub.
Steps
Removing the MAP Sensor
-
1Park your car on a flat surface and let the engine cool. Before working on your car, you need to disconnect the battery while the engine is off. Find a flat surface to park your car and let the engine cool for about 5 minutes. Afterward, open the hood to your car.
- Avoid parking on an incline just to be safe.
- Lightly touch the engine after letting it cool. If it's still warm, wait another 5 minutes or until it cools.
-
2Disconnect the car battery for safety. Locate the negative terminal on top of the car battery. Typically, it is covered with a black cap. If not, there should be a "-" sign near it or on top of the connector. Locate the wrench socket size that is appropriate for the nut on the negative terminal. Attach this socket to your wrench and remove the nut by turning it counterclockwise. Afterward, disconnect the negative battery cable.[1]
- Repeat the above procedure with the positive terminal. Typically, it is covered in a red cap or marked with a "+" sign.
Advertisement -
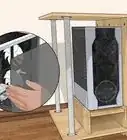
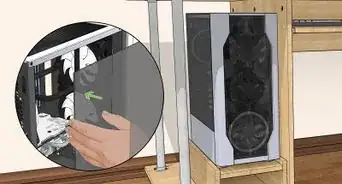
3Locate the MAP sensor near the intake manifold. In most cars, the MAP sensor is right next to the intake manifold. It should be attached to an electrical connector that is fastened to a group of wires. There will also be a rubber vacuum hose running to it. If you're having trouble finding it, lift the engine's wiring harness slightly to give yourself a better view.[2]
- Loosen the wiring harness by pulling out the plastic ends attached to its wires. Only remove the ones that make it easier for you to access the MAP sensor.
-
4Remove the vacuum line from the MAP sensor. To remove the vacuum line, you must remove the retaining rings. Place a pair of straight retaining ring pliers into the 2 holes on the ring. Squeeze the pliers together to expand the ring and remove it from the vacuum. Continue until all of the rings are removed and unhook the vacuum line from the MAP sensor.[3]
- Purchase retaining ring pliers at hardware or big-box stores.
-
5Unscrew all the bolts holding the sensor to your vehicle. There are usually 2 to 3 bolts holding the sensor to the vehicle. Use a socket wrench to turn them counterclockwise and remove them from the vehicle. Afterward, your sensor should come loose.[4]
- Keep the bolts in a small plastic container so they don't get lost.
-
6Unhook the electrical connector from the MAP sensor. The electrical sensor is usually attached to the MAP sensor via a clip. Typically, the clip will unhook by sliding it upward or downward. Afterward, hold down the locking tab and remove the connector from the sensor.
- If there is no clip, detach the electrical connector by pressing on the locking tab and pulling it from the MAP sensor.


Spraying and Scrubbing the MAP Sensor
-
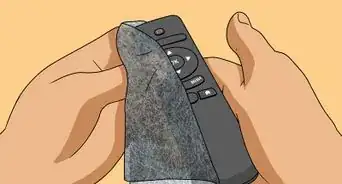
1Hold the MAP sensor over a flat surface. Place your thumb on one side of the sensor and the rest of your fingers on the opposite side. Hold the unit with the sensor facing down. The sensor is the long protruding part that contains two metallic probes encased in a plastic cage.[5]
-
2Spray 2 to 3 bursts of sensor cleaner onto the MAP sensor. Continue holding the sensor over a flat surface. Press down on the nozzle of a sensor cleaner product to spray the sensor with 1 quick burst of the cleaner. Rotate the MAP sensor 1 to 2 more times and repeat this process until it has been cleaned from all angles.[6]
- Buy sensor cleaning product from department stores or big-box suppliers. These products are specifically designed for sensor surfaces.
-
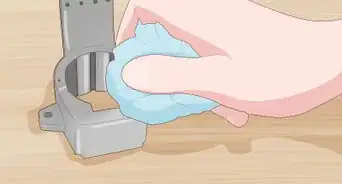
3Clean the outer surface of the MAP sensor using electric parts cleaner. Place the MAP sensor on a flat surface with the sensor facing upward. Spray a dry rag with electrical parts cleaner. Gently scrub the rest of the sensor with the rag, taking care not to scrub the sensor itself.[7]
- Lightly spray cleaning product into regions that you can't reach with the rag. However, avoid doing this if possible, as you won't be able to properly scrub and dry it.
-
4Reinstall the map sensor after letting it dry for 5 minutes. With proper scrubbing, it shouldn't take more than 5 minutes to dry your MAP sensor. Afterward, reconnect the electrical connector and reattach the sensor to the vehicle using its bolts. Finally, reconnect the vacuum line with the retaining rings.
- Snap the retaining rings back on the vacuum line by opening them with your retaining ring pliers and placing them around the vacuum.


Things You'll Need
- Small plastic container
- Dry rag
- Sensor cleaner
- Electric parts cleaner
- Socket wrench
- Retaining ring pliers


References
- ↑ https://youtu.be/xzG2tvp68mQ?t=37s
- ↑ https://youtu.be/KWaq8SRIj7M?t=2m10s
- ↑ https://youtu.be/wwxsMj8Jgl0?t=49s
- ↑ https://www.yourmechanic.com/article/how-to-replace-a-manifold-absolute-pressure-map-sensor-by-michael-france
- ↑ https://youtu.be/icgaLiEoohc?t=5m6s
- ↑ https://youtu.be/icgaLiEoohc?t=5m11s
- ↑ http://www.powerstrokehub.com/service/6.0-powerstroke-map-sensor.html
About This Article