This article was co-authored by wikiHow Staff. Our trained team of editors and researchers validate articles for accuracy and comprehensiveness. wikiHow's Content Management Team carefully monitors the work from our editorial staff to ensure that each article is backed by trusted research and meets our high quality standards.
There are 22 references cited in this article, which can be found at the bottom of the page.
This article has been viewed 21,578 times.
Learn more...
Fuchsia plants are beautiful perennials with bright pink, purple, white, or orange blooms. Because the blooms hang downward, they look fantastic in hanging baskets or pots. A large bush of fuchsia outside will also add a lovely pop of color to your home garden. Keeping them happy will ensure you get to enjoy those beautiful teardrop blooms throughout the late spring and summer months.
Steps
Watering and Feeding Your Plant
-
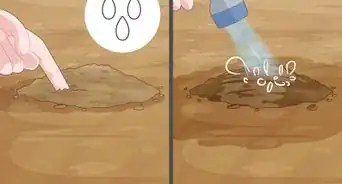
1Test the soil every day before you water the plant. Stick your finger 1 inch (2.5 cm) into the soil to feel for moisture. If it feels dry or if you rub your fingers together and see bits of dry soil flaking off, it's time for a good watering.[1]
- If it's damp, wait 12 to 24 hours before checking the soil again.
- Daily watering is especially important during hot summer months.
- Most fuchsias like to be watered every day, but under or over-watering can cause the leaves to wilt so it's wise to check the soil first.
- Hanging baskets dry out faster than standing pots, so you may need to test the soil twice a day (especially on hot or dry days).
-
2Pour water onto the soil until it drains from the bottom of the pot. Start by pouring water onto the base of the plant and then water the entire surface of the soil. Keeping pouring until you notice water dribbling out of the bottom of the pot.
- The goal is to keep the soil evenly moist but not sopping wet.
- If you don't see water coming out of the drainage holes, they may be clogged or the soil may not be draining properly (in which case, you should re-pot the plant).
Advertisement -
3Water the plant 2 to 3 times a week in the fall. Once summer is over, start watering your fuchsia plant every other day or just twice a week. Always test the soil with your finger first—if it's bone dry, go ahead and water it. If it's even the slightest bit damp, wait another day and check again.[2]
- Withholding water in the fall will prepare the plant for winter dormancy so it can reenergize and grow beautiful blooms in the spring!
-
4Limit your waterings to 8 fl oz (240 mL) every 3 to 4 weeks in the winter. Let the soil get relatively dry starting in mid-November to early March (the exact months will vary depending on where you live). A good rule of thumb is to water it with 8 fluid ounces (240 mL) of water every 3 weeks or each month, but you can also feel the soil with your finger to see if it's bone dry. If it is, go ahead and water it and wait another 3 to 4 weeks before watering it again.[3]
- The plant will be in its dormant phase during the winter and your job is to make sure the soil doesn't get dusty-dry—a little dry is okay.
-
5Fertilize the plant once a week during spring and summer months. Use a fertilizer with equal parts nitrogen, phosphorus, and potassium—a 20-20-20 or 16-16-16 blend is perfect. The amount of fertilizer you need to use depends on the size of the pot, but you should always read the instructions on the package.[4]
- For instance, if you're fertilizing a 12 in (30 cm) pot, you might use 7 drops of liquid fertilizer for each 33 fluid ounces (980 mL) of water or sprinkle 3 to 4 tsp (15 to 20 g) of granular fertilizer on top of the soil.
- If your plant is outside, stop fertilizing it 2 weeks before you bring it inside for the colder months.
- Bone meal also makes an excellent fertilizer for fuchsia. You can buy it at any garden supply store.


Choosing the Right Location
-
1Pick a spot that gets morning sunshine and afternoon shade. If you have a potted or hanging plant, put it near an east, south, or west-facing window to give it the perfect amount of light. If you want to put your fuchsia outside, place it on a shaded porch, under an awning, or beneath a tree with lots of foliage.[5]
- Fuchsias can handle direct lighting but hot afternoon sunlight may burn the leaves.
-
2Avoid putting your plant in a windy place. Fuchsias are delicate—especially the blooms—so make sure your plant is guarded from strong winds if it's outside. If it's inside, put it in a non-drafty area away from fans or vents.[6]
- Strong winds can dry out the plant too quickly. And if it’s hot enough outside, warm winds can cause heat-stress.
-
3Keep your plant in a place that's 60 to 75ºF (15 to 24ºC). Place the plant in a room with moderate temperatures. If you'd rather keep it outside, check the forecast for that day to make sure temperatures are mild and pleasant. Depending on where you live, late spring and early fall are good times to give your fuchsia some time outside.[7]
- Temperatures over 76ºF (24ºC) will stop the plant from growing their beautiful blooms.
- If your fuchsia is outside, it can tolerate overnight temperatures ranging 50 to 60ºF (10 to 15ºC).
-
4Bring outdoor fuchsias inside before the first frost of the fall. Plan to relocate the plant from outside to inside once September or October rolls around. Put it near a window but not right next to it so the leaves don’t get cold from touching the glass.[8]
- Check your city’s agricultural hardiness zone to see when you can expect the first frost.
- Any leaves touching a chilly window could get burned from the cold.


Pruning Your Plant
-
1Prune the plant in the early spring before the growth period. Wait until the last frost has passed and you see new shoots forming on the plant. Use garden shears to cut off dead or broken shoots at a 45-degree angle just above the knobby nodes.[9]
- Cutting at a 45-degree angle helps prevent disease and allows the plant to take in more moisture and nutrients.
- If your plant is potted or indoors, prune until the plant is only 4 inches (10 cm) to 8 inches (20 cm) above the soil level.
-
2Cut above the second or third nodes that have 2 leaves. Count the nodes upwards from the base of the main stem. Once you reach the second node or third node, place the blade of your shears right above it and snip.[10]
- It may seem like you're cutting a lot off, but this will allow your fuchsia to grow back healthier and more robust!
- Save and propagate any of the longer, healthier cuttings if you like.
-
3Pluck off drooping blooms and pods at the base of the bloom. Place your fingers right next to the bulbous seed pods between the blooms and the stems. Pinch the stem and twist or turn it to break off the bloom and pod.[11]
- The pods actually contain seeds. If you don't pluck them off, your plant may end up covered in pods instead of blooms.
-
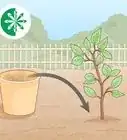
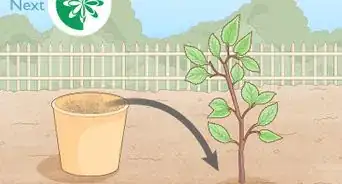
4Cut outdoor plants back by half in the late autumn. If your fuchsia plants are outside, you’ll need to prune at least half the plant away to prepare it for its dormant phase. Keep clipping the stems above the nodes and clip off any dead limbs you see until the plant is about half the size it used to be.[12]
- It may seem like overkill to cut the plant back by half, but what remains will be a solid backbone to spur new growth in the spring.
- If your outdoor plant is growing up against a wall, encourage it to grow to the sides by cutting off stems that jut outward from the wall.


Dealing with Pests and Diseases
-
1Hang tacky traps above and around the plant to get rid of whiteflies. Buy some sticky yellow sheets from any garden supply store and hang them above or around the plants to trap them. You can also find small yellow sheets on a post that you can stick into the soil around the edge of the potted fuchsia.[13]
- A pack of 3 to 5 sticky traps generally costs $4 to $6 and you can buy them online or at any garden supply store.
- Outdoor plants are more susceptible to whiteflies.
-
2Wash the underside of the leaves 1 to 2 times a week to kill aphids. If you notice the leaves are curling or turning yellow, use a hose to wash the undersides of the leaves. Direct the nozzle upward so you can get the undersides. If your plant is inside, use the nozzle on your kitchen sink to wash the leaves.[14]
- Aphids also leave behind a sticky substance on the leaves when they suck out the sap.
-
3Spray the leaves with insecticidal soap to banish thrips and mealybugs. Fill a spray bottle with 16 fluid ounces (470 mL) of water and add 1⁄2 teaspoon (2.5 mL) to 1 teaspoon (4.9 mL) of insecticidal soap (or however much is recommended on the package). Shake the bottle and spray down the leaves with the mixture.[15]
- You can also use neem oil or make your own insecticidal soap.
-
4Cut back the leaves all the way to the wood to heal fuchsia rust. If you see orange spots on the undersides of the leaves, use pruning shears to cut back all the offshoots and foliage down to the main stems. Quarantine the diseased plant so the fungal disease doesn't jump to nearby fuchsias.[16]
- Other signs of fuchsia rust include dropped or deformed leaves or circular patches of yellowing on the tops of the leaves.
- If you only notice a few leaves that show signs of fuchsia rust, pick those off right away and keep and eye on the rest of the plant for the next few days.
- You can also use a fungicide like tebuconazole or triticonazole but these can do more harm than good. If you plan to use them, spray a few leaves and wait a week to see if the plant can take a full fungicidal spray-down.[17]
-
5Repot the plant with fresh soil if you notice any fuzzy, gray spores. Inspect the leaves and stems for any fuzzy, gray masses or browning as these can be a symptom of a fungal disease called botrytis blight. Remove the plant from its current pot and replant it with well-draining soil that has more perlite and vermiculite and less peat moss.[18]
- Avoid any blends containing silt or clay because these 2 ingredients will hold onto too much moisture.


Potting Fuchsia Plants
-
1Use peat, vermiculite, or perlite-based soil to ensure good drainage. Look for a good soil blend made for flowering potted plants. Check for peat, vermiculite, and perlite on the back of the package. Don’t use garden soil for your potted fuchsia plants because it won’t drain quickly enough and may lead to root rot.[19]
- The perfect soil will maintain some moisture but allow enough aeration so the roots don’t get too wet.
- Coco fiber (AKA “coir” fiber) soil is also a great option for fuchsias because it'll help loosen the texture of more clay-like soil blends.
-
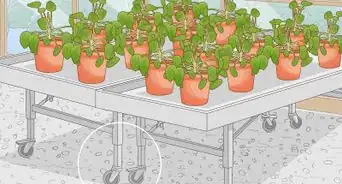
2Fill a 12 in (30 cm) pot 3/4 full. Pour the soil into the pot and pat it down. Be sure to choose a pot with large drainage holes so water can drain out efficiently.[20]
- You can plant up to 6 small plants in a 12 in (30 cm) pot—lots of plants in the same pot means less pruning and quicker blooms in the summer.[21]
-
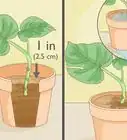
3Place each small fuchsia plant on top of the soil. If you bought small start plants, pinch the base of the small containers to remove the fuchsia with as much of the soil intact. Place up to 6 small 3 in (7.6 cm) plants side by side towards the center of the pot, making sure no plant comes within 1 inch (2.5 cm) from the rim of the pot.[22]
- If you’re repotting an existing plant, turn the pot to the side and wiggle the root system out of the soil, shaking off as much of the old soil as you can.
- If you’re propagating 2 in (5.1 cm) to 4 in (10 cm) cuttings, you’ll need to fill the pot up with soil and then stick the cuttings 2 inches (5.1 cm) down into the soil so they can stand upright by themselves.
-
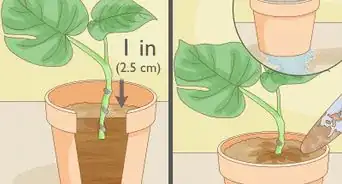
4Scoop handfuls of soil into the pot until it's 1⁄2 inch (1.3 cm) below the rim. Use your hands to scoop more soil into the pot, starting from the center and working your way outwards toward the edge of the pot. Redirect any plants that start to lean over towards the edge as you add soil. Pat it down when you're done.[23]
- Gently patting down the soil around each individual plant ensures there are no air pockets.
- Make sure the top of the soil of each smaller fuchsia comes up about 1⁄2 in (1.3 cm) from the top of the pot. This way, they'll be even when you fill up the pot with soil.
-
5Water the plant very well after you’ve repotted it. Pour water over the base of the transplanted fuchsia until water runs out of the bottom. The key is to make sure there's no dry soil in the pot so the roots can develop.[24]
- If you’ve transferred the fuchsia into a hanging basket, water it until you see water dripping from the bottom for a good 3 seconds.
- Don’t fertilize new plants for at least 6 weeks after you repot them because it can stress out the root system while it’s still trying to acclimate to its new environment.


Warnings
- Always keep insecticides and fungicides in a high cupboard or closed area where kids and pets can’t get to them.[27]⧼thumbs_response⧽


References
- ↑ https://hgic.clemson.edu/factsheet/fuchsia/
- ↑ https://hgic.clemson.edu/factsheet/fuchsia/
- ↑ https://hgic.clemson.edu/factsheet/fuchsia/
- ↑ https://www.rhs.org.uk/plants/popular/fuchsia/hardy/growing-guide
- ↑ https://youtu.be/Og0lFtZVAso?t=266
- ↑ https://youtu.be/Og0lFtZVAso?t=272
- ↑ https://hgic.clemson.edu/factsheet/fuchsia/
- ↑ https://hgic.clemson.edu/factsheet/fuchsia/
- ↑ https://youtu.be/RMfc_e250RI?t=63
- ↑ https://youtu.be/2k1z8UPYAjs?t=131
- ↑ https://youtu.be/K9xw3mJUlgI?t=199
- ↑ https://www.americanfuchsiasociety.org/articledirectory/prune-fuchsias-for-beauty/
- ↑ https://www.rhs.org.uk/advice/profile?pid=193
- ↑ https://pnwhandbooks.org/insect/hort/landscape/hosts-pests-landscape-plants/fuchsia-fuchsia-aphid
- ↑ http://ipm.ucanr.edu/PMG/GARDEN/PLANTS/fuchsia.html
- ↑ https://pnwhandbooks.org/plantdisease/host-disease/fuchsia-rust
- ↑ https://www.rhs.org.uk/advice/profile?pid=163
- ↑ https://ag.umass.edu/greenhouse-floriculture/fact-sheets/botrytis-blight-of-greenhouse-crops
- ↑ https://youtu.be/Og0lFtZVAso?t=36
- ↑ https://youtu.be/Og0lFtZVAso?t=77
- ↑ https://youtu.be/Og0lFtZVAso?t=44
- ↑ https://youtu.be/Og0lFtZVAso?t=83
- ↑ https://youtu.be/Og0lFtZVAso?t=127
- ↑ https://youtu.be/Og0lFtZVAso?t=44
- ↑ https://www.uaex.edu/yard-garden/resource-library/plant-week/fuchsia-cape-8-24-12.aspx
- ↑ https://www.aspca.org/pet-care/animal-poison-control/toxic-and-non-toxic-plants/honeysuckle-fuchsia
- ↑ https://www.austintexas.gov/sites/default/files/files/Watershed/growgreen/products.pdf
About This Article