This article was co-authored by Nicole Bolin. Nicole Bolin is a Crafting Specialist and the CEO of Stencil, a DIY Craft Studio in Phoenix, Arizona. Nicole specializes in interior design and various craft and DIY projects. Nicole holds a Certificate in Interior Design from the New York Institute of Art and Design. She opened Stencil in 2017 to teach others to create DIY projects that fit their home and lifestyle.
wikiHow marks an article as reader-approved once it receives enough positive feedback. This article has 17 testimonials from our readers, earning it our reader-approved status.
This article has been viewed 903,103 times.
Building a popsicle house is a fun and simple way to pass the time. You could build your masterpiece a million different ways, but we've looked into it and have found that the very best one is to start by building four squares with sticks glued to them for the walls. Once that's done, you can build your roof by creating two triangles with sticks glued to them, just like slats. Then comes the best part - decorate to your heart's content!
Steps
Building the Walls
-
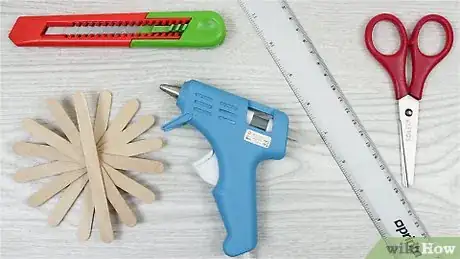
1Gather your supplies. You will need around 100 Popsicle sticks. You can buy craft sticks at a hobby store or a big-box store with a craft section. You will also need glue. A hot glue gun works best, but children should have adult supervision. Also have paper, scissors, and a utility knife.
- If you don’t want to use hot glue, a regular bottle of craft glue will work.
- Always practice caution when using a hot glue gun as it can burn you.
-
2Lay some newspaper or brown paper down. Since you will be working with glue, it’s best to cover whatever surface you are working on with newspaper, a disposable tablecloth, or something that will protect the surface.
- Hot glue can be hard to remove from surfaces so take extra precaution. Hot glue will also spill out of the gun sometimes, so always set it over the covered surface.
- You can put a silicone mat underneath the gun.[1]
Advertisement -
3Make four squares with Popsicle sticks. Lay down two Popsicle sticks parallel to each other, the same distance apart as the length of one stick. Lay two more sticks on top of the first two forming a square. Glue these at the corners. Repeat this to build three more squares.
- If you are using a glue gun, plug it in and turn it on. Let it heat up. Then squeeze the trigger to release the glue onto the sticks.[2]
- These squares will become the walls of the house.
-
4Glue Popsicle sticks covering the wall frame. With the square laying flat, glue enough sticks in a line to cover the entire square. Place a line of glue on two of the opposite sides of the square and lay the sticks in place. Repeat this to complete all four walls.
- Be sure that you place the sticks tight together so that there are no gaps in the wall.
- You may not have room for an entire stick when you get to the the end, so use the utility knife to trim a stick down to fit in the final spot.
Crafting the Roof
-
1Build the initial frame. Take three Popsicle sticks and form a triangle, overlapping the sticks at the corners. It doesn’t matter which of the sticks lays on top of which. Use a small drop of glue to connect the sticks at all three corners. Repeat the same process to make another triangle.[3]
- This basic roof uses just two triangles as the trusses, but you can make a more stable roof by making a third triangle, which would go between the two main ones in the roof.
-
2Lay Popsicle sticks to create one side of the roof. Place a dot of glue on the flat side of each end of a Popsicle stick. Attach the stick to both triangles so that it runs perpendicular. Repeat this process until you have covered the length of the triangles’ sides with sticks. Place the sticks tight together. Hold each stick in place for at least 5 seconds so the glue will hold.
- Be gentle as you lay each stick so that you don’t pull any of the previous ones apart from the triangles.
-
3Lay the second set of the roof slats. In the same way that you laid the first side of the roof, glue sticks in place for the opposite side of the roof. Continue to be careful as you handle the roof so that you don’t break any of the sticks apart from the roof.
-
4Cover the open ends of the roof. You now have a roof frame that is open on either end. As an optional addition you can close off the interior of the roof completely. Starting from the bottom of the roof, glue a stick across the frame. As you add each additional stick, you will need to cut it slightly shorter as the triangle narrows toward its apex.
- Closing the roof off completely will add realism to your Popsicle stick house as this is how real houses are constructed.
Assembling the House
-
1Cut out windows. If you want to enhance the house, you can cut one or two windows into the walls. This is easiest to do before you glue the walls together. Take the utility knife and carefully cut a 1 inch by 1 inch square in one or more of the walls.[4]
- Either center the window or you can cut it off to the side if you want to.
- To make further adornments to the house, you could use the pieces you just cut from the window to create shutters on the sides or a frame around the window.
-
2Cut out a door. You can make your Popsicle house look even more realistic by cutting out a door. The size of craft sticks you use will determine how big the door should be. Make the door size most of the height of the house and about ⅓ of the width. Cut the door out with the utility knife.
- You can glue a piece of paper the size of the door opening on the edge of the opening to act as an actual door. Bend the paper along the edge that you glue to simulate the door swinging open and closed.
-
3Glue the walls together at the corners. Take two of the walls and stand them so that the sticks are vertical. Squeeze a line of glue along the inside edge of the stick on the end of each wall. Gently press the glued edges together and hold for about 30 seconds.[5]
- Attach the remaining two walls one at a time to complete the basic structure of the house.
-
4Install the roof on top. Glue the roof in place by running a line along the entire top edge of the house. Set the roof onto the house and gently press down long enough for the glue to hold. You also have the option of not gluing the roof down and leaving it detachable so that you can place things inside the house.
-
5Decorate the house. You have nearly unlimited options for how to decorate it. Use spray paint to paint the whole house one color. Use a small paintbrush to paint the walls one color and the roof another color. Attach fabric or gift wrap to give the walls of the house a pattern. You could glue moss, flowers, or sticks to the house to give it a woodsy look.
Community Q&A
-
QuestionCan you use any other type of glue?
 Community AnswerAs long as it is stable and doesn't fall apart, yes, you may use any type of glue.
 -
QuestionWhat happens if it breaks?
 Community AnswerYou may be able to repair it with glue, or you may have to start over, it depends on how serious the damage is.
 -
QuestionCan it be a different size?
 Community AnswerYou can make it any size you want, you will just need more Popsicle sticks. Be careful, as this takes time and patience.
Warnings
- Always be careful when using knives, you can cut yourself.⧼thumbs_response⧽
- When cutting the sticks, be careful, you could get a splinter.⧼thumbs_response⧽
Things You'll Need
- Popsicle or craft sticks
- Hot glue with a gun, or other glue (such as craft glue)
- Utility knife (if you want to make a door and window)
- Paper (optional)
- Paint or other decoration options (optional)
References
- ↑ https://www.bobvila.com/articles/how-to-use-a-glue-gun/
- ↑ https://www.bobvila.com/articles/how-to-use-a-glue-gun/
- ↑ https://www.scientificamerican.com/article/popsicle-stick-trusses-what-shape-is-strongest/
- ↑ https://www.education.com/activity/article/Popsicle_Stick_Log_Cabin/
- ↑ https://www.youtube.com/watch?v=1gKxbH-lRDk&feature=youtu.be&t=3m
About This Article
To build an easy popsicle house, make 4 squares out of popsicle sticks. Cover the squares with a row of popsicle sticks to make the walls, and make 2 triangles out of popsicle sticks for the frame of the roof. With the triangles facing upright and parallel to each other, lay popsicle sticks perpendicular between them to make roof slats and cover the open ends of the triangles. Cut windows and doors into the walls, and glue the 4 walls together, situating the roof on top of the walls. If you want to learn more, like how to decorate your house once it's built, keep reading the article!
