This article was co-authored by Lana Starr, AIFD. Lana Starr is a Certified Floral Designer and the Owner of Dream Flowers, a floral design studio based in the San Francisco Bay Area. Dream Flowers specializes in events, weddings, celebrations, and corporate events. Lana has over 14 years of experience in the floral industry and her work has been featured in floral books and magazines such as International Floral Art, Fusion Flowers, Florist Review, and Nacre. Lana is a member of the American Institute of Floral Designers (AIFD) since 2016 and is a California Certified Floral Designer (CCF) since 2012.
This article has been viewed 65,186 times.
Whether you have the space for an outdoor garden or not, a potted flower arrangement can be a great way to accent a house or yard. Varying in size, color, and plant type, these arrangements can be crafted to work in any area and be changed to suit the season. They are also a simple way to bring some color or symmetry to a space where planting is difficult or impossible.
Steps
Planning Out Your Pots
-
1Decide where you want to put your pots. The first step in creating a successful arrangement is knowing where it’s going. Once you’ve chosen a spot, you’ll have a better idea of what kind of plants you need. For example, if it is a spacious area, you can put large pots with tall plants like elephant ear or agave. If you want to work with hanging plants to line a porch, try a sweet potato vine or wishbone flower.
- You also want to consider whether the area you are placing your pots in gets lots of sun or very little, as you will have to place different types of plants in those areas.
-
2Pick your colors. The colors in the area you want to place your pots are likely going to affect the color of the plants you put into your arrangement. For example, if you have a red door, maybe a pot with deep purples and whites would be complementary for that area. It will stand out against the red of the door and really bring the eye of any visitor to that space. Or, if you are placing an arrangement on your deck, which is deep brown, any bright color like yellows or oranges will appear striking against the wood.
- You can also play with the colors of your pots. Try mixing up the lighter and darker shades of some terracotta pots or mixing white and black pots for a chic and sophisticated look.
EXPERT TIPLana Starr is a Certified Floral Designer and the Owner of Dream Flowers, a floral design studio based in the San Francisco Bay Area. Dream Flowers specializes in events, weddings, celebrations, and corporate events. Lana has over 14 years of experience in the floral industry and her work has been featured in floral books and magazines such as International Floral Art, Fusion Flowers, Florist Review, and Nacre. Lana is a member of the American Institute of Floral Designers (AIFD) since 2016 and is a California Certified Floral Designer (CCF) since 2012.Certified Floral Designer & Owner, Dream Flowers Lana Starr, AIFD
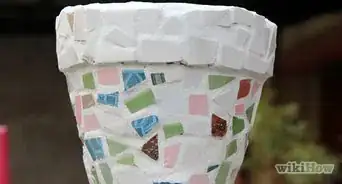
Certified Floral Designer & Owner, Dream FlowersExpert Trick: To decorate a flower pot, use natural, dry materials to create a pattern on the outside. For instance, you could use twine, elemental birch, cork, and pine cones. Just remember to keep it fairly simple so it doesn't overshadow your plant!
Advertisement -
3Plan out the shape. Once you know where you are going to place the plants, you can figure out the shape of the arrangement. This should be where you decide the size of the plants and how they’ll fit together in a pot.
- There are three basic kinds of plants - tall/upright, broad/bushy, and trailing. Tall or upright plants are going to continuously grow upwards, while broad/bushy plants are going to grow outward. Trailing plants, on the other hand, will spill out over the sides of the pot in every direction.
- Think about how often you’ll be able to prune or cut down the plants before you decide which ones you’d like to have in your pots.
-
4Look at each plant’s growing conditions. Similar to choosing the size and growing pattern of a plant, it’s important to know which plants grow well where. For example, an area that gets a lot of sun is going to need plants that are able to survive direct light. You don’t want a pot mixed with plants that need direct light along with plants that need shade, this will make keeping the plants alive and healthy very difficult. Instead, you need to match up growing conditions before placing them.[1]
- Consider how much light or shade a plant needs, as well as the amount of water, and the condition of the soil.
- Some good plants to grow in partially shaded areas are rhododendrons, hydrangeas, or bay laurel. If you are planning to place your pots in a space with direct sunlight, try rock rose, silver queen, and lavender.
- Look for plants labeled as “annuals,” or “bedding plants,” as these are the plants that will survive a whole season rather than just a few weeks.[2]


Setting Up Your Arrangements
-
1Use one type of plant. If you want a solid pop of color, try filling a pot with just one type and color of a plant. This adds a bright spot to any area while keeping a clean and uniform look. You can also try filling a pot with one single plant, like a fern, which makes a statement without being over-the-top.[3]
- Using a single type of plant is great in areas where you want to keep symmetry, like on the sides of a front door or along a fence or walkway.
-
2Try a variation of the same plant. If you want some diversity in your pot while still maintaining the same shape and texture, putting in different colors of the same plant can help add variety. Some flowers like petunias, impatiens, or zinnias will even come in multipacks which makes mixing up colors easy.
- If you want to mix up your own arrangement, try choosing complementary colors like reds and purples, or blues and yellows. You can also choose similar colors like pinks and reds for a clean look.
-
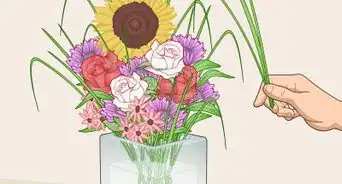
3Mix up a little bit of everything. The most striking arrangements have a variety of each type of plant. For example, a tall plant like a dracaena, a bushy plant like a begonia, and a trailing plant like a morning glory. The most common way to put together this arrangement is to place the tall plant in the middle and surround it with both trailing and bushy plants that are similar in height and width.[4]
- These arrangements usually contain one focal plant, which could include plants with striking foliage, like a coleus, or trailing plants like the ivy geranium. However, most focal plants should be the largest component in a pot and sit higher than the other plants. Once you’ve chosen your focal plant you can build the rest of the arrangement around it.
- When mixing up different kinds of plants for one pot, make sure you keep all the plants with similar watering/sunlight needs together.
-
4Play with textures. Don’t just mix up the colors, but try to use a variety of foliage as well. Every plant has different leaves with an assortment of textures. Putting together plants with smooth leaves, rough leaves, or even the near artificial look and texture of a rubber plant adds a lot of exciting variation to an arrangement.
- You can also mix up the sizes of the leaves and the colors.


Potting Your Plants
-
1Make sure your pot has holes for draining. To prevent overwatering your plants, make sure to get a pot with holes or a detachable bottom that will allow water to filter through. This will help keep your plants hydrated as well as prevent root rot.
- You can also try placing a layer of gravel along the bottom, or broken terracotta or Styrofoam packing peanuts to promote drainage.[5]
-
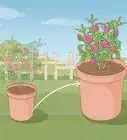
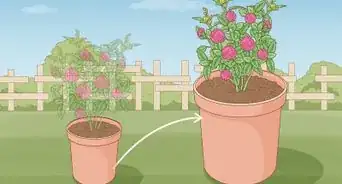
2Plant the focal plant or biggest plant first. As this plant is likely to take up the most space, it’s best to put this into the pot first. You can either put your focal plant in the middle of the pot and place the other plants around it. Or you can place this plant in the back with other larger plants and put smaller ones up front.
-
3Fill in the rest of the pot with the other plants. Once you’ve planted the focal plant you can fill in the pot with your other plants. How you want to place them is up to you, however, it’s best to keep those of a similar size placed together. You should also keep trailing plants closer to the edge of the pot as they are going to grow over everything else if they’re in the middle.
-
4Fill in the rest of the container with potting mix. You can do this by pouring the soil around the plants and arranging it using a garden trowel. When you’re finished, the surface of the soil should be 1” to 2” below the lip of the pot. Be careful not to pack the soil too tightly, though, as it will make it difficult for the plant's roots to grow.
-
5Water the plants thoroughly. After you’ve planted everything, make sure to water the plants. You should try to water at the base rather than over the leaves. Once you see water come out the bottom, you should stop watering. Also, if the soil sinks, simply add more soil and water the plants again.


Community Q&A
-
QuestionI. have two slips of plumeria,They were cut, then placed in shady cool place. What next? In containers? In the ground? What wwater/sun requirements, fertilizer are best?
 LunaCommunity AnswerIf you want hardy in the ground outdoor plants, then put them inside and let them grow big in separate pots. Adding a little bit of fish fertilizer, that is natural and organic. Add that every two weeks following the instructions on the bottle. Wait till they over grow your pot (almost). After planting them outside, put them in your most sunniest spot and water weekly.
Warnings
- Make sure that each pot has a hole in the bottom to allow excess water to drain out. If no hole is present, then drill a hole in the bottom of the pot before placing your plants inside.⧼thumbs_response⧽
Things You'll Need
- Pots
- 2 flowers
- 1 focal plant
- Gravel
- Potting mix
- Water
- Mulch (optional)


References
- ↑ http://www.gardeners.com/how-to/create-planters-that-stand-out/5325.html
- ↑ http://www.todayshomeowner.com/flower-containers-for-beginners/
- ↑ http://www.todayshomeowner.com/flower-containers-for-beginners/
- ↑ http://balconygardenweb.com/planting-flower-pots-thriller-spiller-filler-container-gardening-ideas/
- ↑ https://www.thisoldhouse.com/how-to/how-to-plant-pots
- ↑ http://homeguides.sfgate.com/arrange-flower-pots-42318.html
About This Article
If you want to arrange your flower pots so they look nice, choose pots in a variety of sizes and heights to add visual interest to the area. Decide where you want to put your plants, then choose the color, style, and number of pots based on what will look good in that area. Consider the types of plants that will grow well in the space and lighting available as you’re making your decision. If you like symmetry, use a single plant in each pot. If you prefer a more eclectic look, mix several plants in each flower pot. For tips on potting your plants, keep reading!