This article was co-authored by wikiHow Staff. Our trained team of editors and researchers validate articles for accuracy and comprehensiveness. wikiHow's Content Management Team carefully monitors the work from our editorial staff to ensure that each article is backed by trusted research and meets our high quality standards.
The wikiHow Video Team also followed the article's instructions and verified that they work.
This article has been viewed 617,784 times.
Learn more...
Temporary tattoos are popular amongst people of all ages, and are a less risky alternative to real tattoos. They're also great fun at parties! It takes a bit of time to apply a temporary tattoo perfectly, but with a little patience, you can rock either a transfer or stenciled glitter tattoo with pride.
Steps
Applying a Transfer Tattoo
-
1Start with clean, dry skin. Temporary tattoos are made with water-based ink, which means that they’re repelled by skin’s natural oils. Carefully clean the area you want to decorate with soap and water, and pat it dry with a paper towel.[1]
- If you’re very sweaty, rubbing alcohol can help cut the grease. Pour a little onto a cotton ball, and then wipe it on the area. Don’t do this every day, though--you could dry out your skin.[2]
-
2Pick out your tattoo. Some temporary tattoos come individually packaged, which is easy. However, if the temporary tattoo you want to wear came on a sheet with several others, you’ll need to separate it. Cut around it with sharp scissors, being careful not to clip the design itself, until you’ve separated it from the “flash sheet.”[3]Advertisement
-
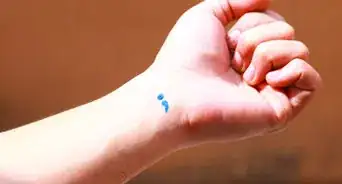
3Peel off the clear backing. At this point, your tattoo is protected by a thin layer of clear plastic. Carefully pick this off. You should be able to see the brightly-colored, mirror-image version of the tattoo you’re planning to apply to your skin.[4]
- From now on, the side with the ink, that was protected by clear plastic, will be called the face side.
-
4Place the image face side down on your skin. Confirm that you want to apply the tattoo to the spot you just cleaned, then place the face side against your skin. Don’t wiggle it around. Just hold it firmly in place while you move on to the next step.[5]
-
5Press a damp cloth or sponge over the tattoo paper. Take a piece of fabric or a sponge that is neither bone dry nor soaking wet, and push it firmly against the backing of your tattoo. Hold it in place, and don’t let it slip around, even if it wants to.[6]
-
6Hold for at least 60 seconds. To get the most complete image, you’ll need a bit of patience. Don’t even think about removing the cloth or the paper backing from your arm until a full minute has passed. While you’re sitting, try to move as little as possible.
-
7Gently peel off the paper. Start by lifting a single corner of the backing in order to peek at the tattoo. If the image looks weird, or isn't sticking to your skin, put the cloth or sponge back on and wait for another 30 seconds. If it does look good, then continue to slowly peel off the paper.
-
8Wait for the tattoo to dry. Keep being patient for around ten minutes. Resist the urge to poke your temporary tattoo. It’s best to sit reasonably still and not flex too much, to avoid wrinkling or smearing the tattoo, as well.
-
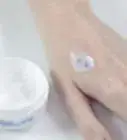
9Dab on a bit of water-based lotion. To make your tattoo last even longer, hydrate your skin by gently patting a bit of thin cream or lotion on top. Avoid thick, oil-based moisturizers, like petroleum jelly, which may smear the tattoo. If you want, you can dust baby powder over the top of the tattoo as well, to make it look more matte (and thus more realistic.)[7]


Applying a Glitter Stencil Tattoo
-
1Start with clean skin. The process for applying glitter tattoos is a bit different than transfer or paper-backed tattoos, but they still need clean skin to adhere to. Wash down the area you want to tattoo with warm, soapy water, then pat it dry with a paper towel.[8]
-
2Select a stencil. Not just any stencil will do! It’s best to get a stencil specially intended for glitter tattoos. These have an adhesive back that won’t hurt your skin too much as you peel it off. They can be found in glitter tattoo kits, or sold separately at party, big-box, or beauty supply stores.[9] Apply the stencil of your choice wherever you want the glitter tattoo to be.
- Make sure not to stick the stencil to a hairy place, or it’ll hurt to peel off.
-
3Paint over the stencil with body-safe glue. If you’ve purchased a glitter tattoo kit, it should come with a special body adhesive intended for skin; if not, you can purchase this separately. Apply a thin layer of the adhesive with a paintbrush so that it covers the skin left bare by the stencil. Then, wait for it to dry until it’s almost clear.
-
4Apply glitter with a fresh paintbrush. Now comes the fun part--getting the glitter on there! Dip a paintbrush in body-safe glitter (any cosmetic-grade glitter is fine) and dab it onto the skin inside the stencil. Have fun and experiment by blending and mixing glitters.[10]
-
5Peel off the stencil. Once you’re comfortable with the amount of glitter you’ve used, take a corner of the stencil and peel it off the skin. Go slowly, so that you don’t disturb your fresh glitter tattoo too much.
-
6Dust off extra glitter. Once you’ve peeled off the stencil, you might notice a bit of fallout from the glitter. If that’s the case, use a large fluffy brush (a blush brush is perfect) to banish any wayward glitter flecks. It’s probably best to do this in an open area, so you don’t have to pick specks out of the carpet.
Community Q&A
-
QuestionHow long does it stay on for?
 Community AnswerIt varies depending on where it is placed, how often you shower, and if it rubs against clothing. Under the best circumstances, a temporary tattoo can last around a week.
 -
QuestionHow can I make the tattoo last longer, even after washing?
 Community AnswerTry applying a waterproof, liquid bandage over it. This will protect the tattoo from coming off while you bathe. Avoid scrubbing the area too hard however.
 -
QuestionCan temporary tattoos damage my face?Community AnswerNo, generally temporary tattoos are safe to place anywhere on the body, assuming you do not have any allergies to the materials.
Things You'll Need
- Temporary Tattoo
- Damp Sponge or Cloth
- Stencil
- Small paintbrushes
- Body-safe glue
- Glitter
- Fluffy Brush


References
- ↑ https://new.safetytat.com/how-to-apply-and-remove-tattoos/
- ↑ http://www.home-ec101.com/how-to-use-rubbing-alcohol-safely/
- ↑ https://www.leaf.tv/articles/how-to-make-temporary-tattoos/
- ↑ https://temporarytattoos.com/blog/tattoo-application-2/
- ↑ https://temporarytattoos.com/blog/tattoo-application-2/
- ↑ https://www.leaf.tv/articles/how-to-make-temporary-tattoos/
- ↑ https://temporarytattoos.com/blog/tattoo-application-2/
- ↑ https://new.safetytat.com/how-to-apply-and-remove-tattoos/
- ↑ http://catchmyparty.com/blog/diy-how-to-apply-glitter-tattoos-so-much-cooler-than-regular-temporary-tattoos
About This Article

Before applying a temporary tattoo, clean the area you want to decorate with soap and water, then pat it dry, so your skin's natural oils don't prevent the water-based ink from sticking. Next, peel off the clear backing and carefully place the image face side down on your skin where you want it. Using a damp cloth or sponge, press down the backing of your tattoo firmly and make sure it doesn't slip around. For the best results, hold the cloth on the tattoo for at least 60 seconds before you peel off the backing. After you've removed the paper, give your tattoo 10 minutes to dry. Finally, dab a little water-based lotion onto your temporary tattoo, so it lasts as long as possible. For more advice, including how to apply a glitter stencil tattoo, keep reading!