This article was co-authored by wikiHow staff writer, Hunter Rising. Hunter Rising is a wikiHow Staff Writer based in Los Angeles. He has more than three years of experience writing for and working with wikiHow. Hunter holds a BFA in Entertainment Design from the University of Wisconsin - Stout and a Minor in English Writing.
There are 16 references cited in this article, which can be found at the bottom of the page.
This article has been viewed 324,956 times.
Learn more...
Are you stuck on your slide puzzle? These brain teasers are a fun challenge, and they get a lot easier to do once you crack the best strategies to figure them out. Regardless of whether the grid is 3x3, 4x4, 5x5, or even larger, the same techniques work for solving your puzzle. Keep reading, and we’ll cover how to work your way through a sliding puzzle one row and column at a time.
Things You Should Know
- First, move the tiles that belong in the top row into their correct positions.
- Slide the tiles that belong in the puzzle’s left column into their places.
- Continue alternating between solving the topmost row and the leftmost column until you have a 2 x 3 section left.
- Rotate the remaining pieces until they’re in the right order.
Steps
Solving the Top Row
-
1Draw a grid showing the right order for the tiles. To keep track of where the tiles should go when you’re finished, draw a grid on a separate sheet of paper. Mark each square of the grid with numbers reflecting the order that the tiles will be in when you have solved the puzzle. In most cases, you will need to put the tiles in numerical order, starting with no. 1 at the top-left corner, and moving down each row left-to-right.
- Many slide puzzles already have numbered tiles, which makes it easier to know the order they belong in.
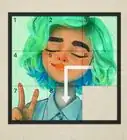
- Slide puzzles with images may not have numbers on the tiles. In this case, assign numbers to the tiles. For example, if a tile has the top-left corner of a face, make that tile number 1 on your grid and continue numbering along the top row.
-
2Move the first tile to the top-left corner. Once you have numbered your tiles, your first move will be to place tile no. 1 in its proper space. Slide the tiles into the empty space on the board to move them around. Keep moving them until the no. 1 tile is at the top-right corner. Once it is there, keep it there for the remainder of the puzzle.[1]
- When moving tiles, look ahead to how far your tile is from where you want it to be. This will help you strategize how to get to the destination in the fewest number of moves possible.
- For an easy way to get a tile to the right spot, move the empty space to where you want the tile to end up. Then, continue rotating the tiles around until the correct one is in position.
Advertisement -
3Arrange all but the 2 rightmost tiles of the top row on larger slide puzzles. If you are solving a 3x3 puzzle, you may skip this step. For any larger puzzles, continue sliding the tiles around so the top row is nearly completed in the right order.[2]
- For a 4x4 puzzle, move the no. 2 tile to the spot immediately to the right of the no. 1 tile.
- For a 5x5 puzzle, move the no. 2 and no. 3 tiles to their respective positions on the top row.
-
4Move the row’s last tile out of the top row. If the last top row tile is already somewhere in the top row, it’s more difficult to place the tile immediately to its left. If your puzzle has the correct tile in the top-right corner, temporarily move it to a new spot so it’s out of the way.
- On a 3x3 grid, the last tile is no. 3.
- On a 4x4 grid, the last tile is no. 4.
- On a 5x5 grid, the last tile is no. 5.
-
5Move the next-to-last tile of the row into the top-right corner. Slide the next-to-last tile into the top corner temporarily so it’s easier to place the last tile.[3]
- On a 3x3 grid, the next-to-last tile is no. 2.
- On a 4x4 grid, the next-to-last tile is no. 3.
- On a 5x5 grid, the next-to-last tile is no. 4.
-
6Move the last tile in the row directly below the top-right corner. This sets up the puzzle so that you can easily move the final two tiles into the top row, in order.[4]
-
7Slide the two last tiles into their positions. Move tiles around until the empty space is immediately to the left of the top-right corner. Now bring the next-to-last tile into this space. Now that the top-right corner is open, move the last tile into this corner.[5]
- Think of the tiles like a snake, where the first tile to move is the head and the second tile follows it into the correct position.
- You’ve now solved the top row! Leave it untouched for the rest of the puzzle so it stays in the right order. If you are working with a 3x3 puzzle, you can skip to finishing the puzzle.


Solving the Left Column
-
1Move the second tile of the left column directly beneath the top-left tile. Proceed the same way as you did with the top row, but now working on the vertical columns. Move the second tile of the left column into the space immediately below the top-left corner.[6]
- On a 4x4 grid, the next tile of the left column is no. 5.
- On a 5x5 grid, the next tile of the left column is no. 6.
-
2Set all but the last two tiles of the left column. Just as you did with the top row, arrange the tiles in the left column so that all but the last two pieces are in place. If the grid is 4x4, you have already accomplished this and can move on. For a 5x5 puzzle or larger, continue arranging the left column until there are only two tiles left to set.[7]
- If your grid is 5x5, these two tiles will be nos. 16 and 21.
-
3Remove the last tile of the column if it’s already there. The last tile (the one that belongs in the bottom-left corner) cannot be in this column until you’re ready to set the last two tiles together. Slide the tile out of the column for now.
-
4Move the next-to-last tile into the bottom-left corner. This tile will eventually be placed in the space immediately above the bottom-left corner.[8]
- If your grid is 4x4, the next-to-last tile is no. 9.
- If your grid is 5x5, the next-to-last tile is no. 16.
-
5Position the last tile of the column directly to the right of the bottom-left corner. This makes it easy to arrange the last two tiles of the column the same way you moved the top row into position.[9]
-
6Slide the last two tiles of the column into their positions. Let’s finish this column! Move the tiles so the empty space is just above the bottom-left corner. Slide the next-to-last tile up into the right position. Now you have an open corner for the last tile of the column. Move it into the empty bottom-left corner.[10]
- Leave the left column untouched for the remainder of the puzzle, just like the top row.


Completing the Puzzle
-
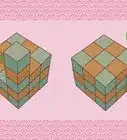
1Complete rows and columns until only a 3x2 grid remains. If you start with the top row and the left column, you can solve slide puzzles of any size by breaking them into smaller and smaller grids. Keep solving the top row and leftmost column as many times as necessary until you have a 3x2 grid, with 5 tiles left to arrange.[11]
- If your grid is 4x4, you will have a 3x3 grid to solve after taking care of the first two methods. Solve for one more row so you have a 3x2 grid.
- If your grid is 5x5, your new grid will be 4x4. Solve for one more row and one more column to have the 3x2 grid left over.
-
2Set the top-left tile in the bottom-left space. Since there are only five tiles left, there are only a limited number of ways that they can be moved. Start by setting the leftmost spaces first.[12]
- On a 3x3 grid, the top-left tile of the 3x2 grid is no. 4.
- On a 4x4 grid, the top-left tile of the 3x2 grid is no. 10.
- On a 5x5 grid, the top-left tile of the 3x2 grid is no. 18.
-
3Place the bottom-left tile to the right of its space. Rotate the remaining tiles until the bottom-left tile is just to the right of the correct position. Once you do that, you’re able to set the leftmost column of the 3x2 grid the same way you finished the rows and columns earlier.[13]
- On a 3x3 grid, the bottom-left tile of the 3x2 grid is no. 7.
- On a 4x4 grid, the bottom-left tile of the 3x2 grid is no. 14.
- On a 5x5 grid, the bottom-left tile of the 3x2 grid is no. 23.
-
4Rotate the leftmost tiles into place. Arrange the 3x2 grid so that the top-left corner is empty. Move the top-left tile up, and then move the bottom-left tile into its place. At this point, you only have a 2x2 puzzle left to organize.[14]
-
5Move the remaining pieces into their places. Since you now have 3 tiles left, it doesn’t take many moves to set them properly. Rotate them around until they are all in their proper place. Congratulations! You’ve solved a slide puzzle![15]


References
- ↑ https://youtu.be/87yoqj01s58?t=301
- ↑ https://youtu.be/EtXE08bOVZM?t=70
- ↑ https://youtu.be/vKxenJMHurM?t=32
- ↑ https://youtu.be/vKxenJMHurM?t=47
- ↑ https://youtu.be/wCJ-OOvtYu4?t=152
- ↑ https://youtu.be/wCJ-OOvtYu4?t=170
- ↑ https://youtu.be/P9Xib-dWlqU?t=489
- ↑ https://youtu.be/wCJ-OOvtYu4?t=218
- ↑ https://youtu.be/wCJ-OOvtYu4?t=200
- ↑ https://youtu.be/P9Xib-dWlqU?t=495
- ↑ https://youtu.be/wCJ-OOvtYu4?t=249
- ↑ https://youtu.be/EtXE08bOVZM?t=336
- ↑ https://youtu.be/guddzEdcaOo?t=194
- ↑ https://youtu.be/vKxenJMHurM?t=142
- ↑ https://youtu.be/wCJ-OOvtYu4?t=301
- ↑ https://www.cs.princeton.edu/courses/archive/spring21/cos226/assignments/8puzzle/specification.php
About This Article