This article was co-authored by wikiHow staff writer, Hunter Rising. Hunter Rising is a wikiHow Staff Writer based in Los Angeles. He has more than three years of experience writing for and working with wikiHow. Hunter holds a BFA in Entertainment Design from the University of Wisconsin - Stout and a Minor in English Writing.
There are 9 references cited in this article, which can be found at the bottom of the page.
This article has been viewed 135,669 times.
Learn more...
Boilers give you hot water and can help heat your home, but it can be expensive to always have them running. Luckily, many boilers have timers that you can set so they turn on during specific times throughout the day. Older boilers may have mechanical timers that you need to set by hand, while modern ones can be changed with a digital programmer. Once you have your boiler set on a timer, you’ll still stay warm and save money!
Steps
Setting a Mechanical Timer
-
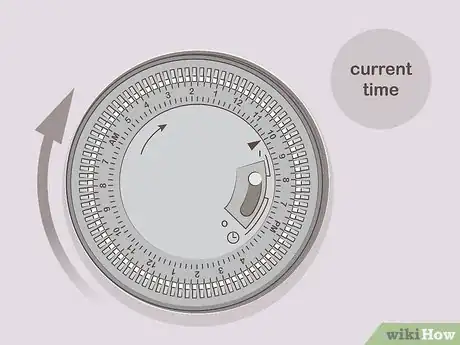
1Turn the dial to set the current time. Mechanical timers need to be set to the current time so they can run accurately on their programs. Turn the dial on your boiler clockwise until the arrow on the dial points to the correct time. If you need change the time to earlier in the day, keep spinning the dial clockwise to make a full rotation.[1]
- Many mechanical timers have a 24-hour clock. Make sure the dial is turned to the right time if it’s in the morning or afternoon.
- Some mechanical timers have a larger clock face on the front of the dial so it’s easier to see the time.
-
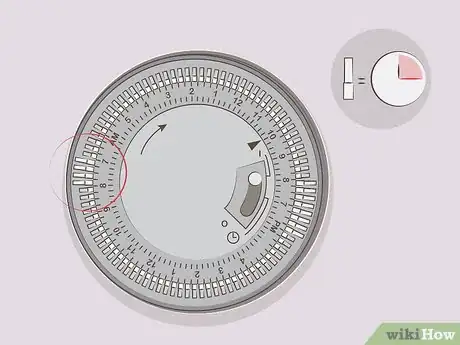
2Choose when you want your boiler on by changing the pins around the dial. The pins around the dial each turn your boiler on or off for 15 minutes at a time. Look on the dial to find the time you want your boiler to start and change the pin to the “On” position. Turn on the rest of the pins for the duration you want your boiler to run. Leave the pins alone if you don’t want the boiler on during that time.[2]
- For example, if you want your boiler to turn on from 7-8 AM, then set the 4 pins between 7 and 8 to the “On” position.
- Some programmers may have you move the pin away from the center of the dial while others will make you push the pin toward the center. Look at the owner’s manual to confirm which way to move your pins.
- You can choose to set your boiler to turn on and off multiple times throughout the day.
- Set your boiler to turn on 30 minutes earlier than when you want hot water since it usually takes that amount of time to heat up your home entirely.
Advertisement -
3Set the switch to the timer function to activate your boiler. When you have all the times selected for your boiler, find the switch that turns your boiler on or off. Look for the option on the switch that’s labeled “Timer” or has a small clock icon next to it. Change the switch to the “Timer” option so your boiler runs during the times you selected.[3]
- You can always choose to turn your boiler on or off to ignore the scheduled time.
Changing a Digital Programmer
-
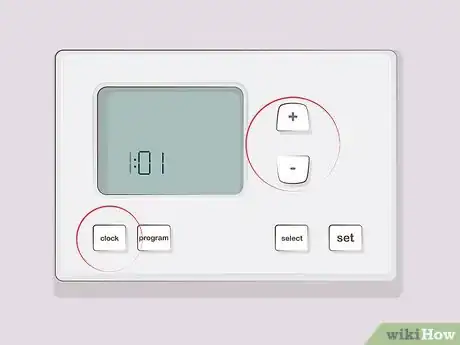
1Set the correct day and time on the programmer. Look for the option that says “Set Time” or “Set Clock” on your programmer and press the button. Use the arrow buttons on the programmer to cycle through the days of the week before pressing the “Select” button. Then use the arrows to change the hours and minutes display on the clock. When you’re finished, press the “Set Time” button again to confirm the time.[4]
- Each programmer has different settings, so consult the owner’s manual to find specific directions for your model.
- Make sure you set the time to AM or PM so your boiler activates at the right time.
-
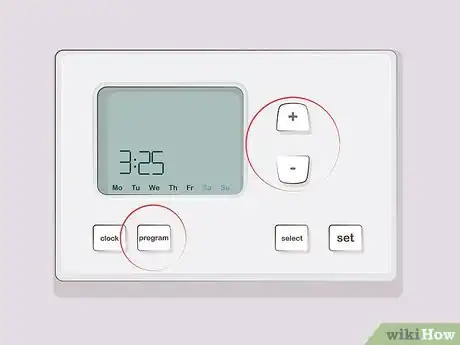
2Choose the “Set” or “Program” option to change the heating schedule. Scheduling allows you to select specific days and times for your boiler so it’s not constantly running. Once the time is set, press the “Set” or “Program” button on the programmer to activate the scheduling feature. The numbers on the screen should be flashing after you press the button.[5]
- Some programmers have a switch labeled “Set Program” instead of a button.
-
3Use the arrows to adjust the day of the week. Press one of the arrow buttons to cycle which day you want to set. Some programmers make you set each day individually while others may let you choose between setting schedules for weekdays and weekends. When the day that you want to adjust is flashing, press the “Select” button to confirm it.[6]
- Check your programmer’s manual to see what features it has.
-
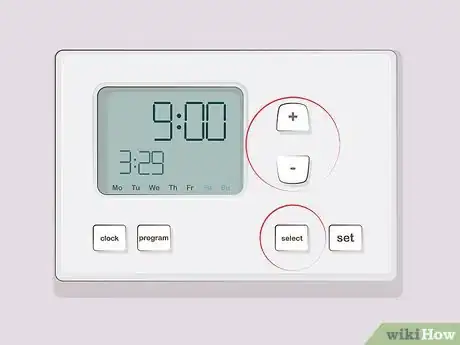
4Change the time your boiler activates with the arrow buttons. Once you select the day, press the arrows to change the hours and minutes for your boiler to turn on. Hold the button down to cycle through the time faster. When the right time is selected, press the “Select” or “Enter” button to confirm the time.[7]
- Set the time for 30 minutes ahead of when you want hot water so the boiler has time to completely heat up when you need to use it.
- You may have to press the “Select” or “Enter” button if you want to change the minutes.
-
5Adjust the time when you want your boiler to turn off. After you change the starting time, your programmer should automatically switch to when you want the boiler to turn off. Use the arrow buttons again to adjust the time and then press the “Select” button to confirm the time.[8]
- Some programmers allow you to set 2-3 different time periods per day for your boiler. Check the owner’s manual to see how many time periods you can set.
-
6Set the programmer to “Run” to confirm your changes. If your programmer has a Set button, then press it again to confirm your changes and save the schedule. If your programmer has a switch, change it to the “Run” position so it follows the schedule that you set for it to run.[9]
References
- ↑ https://youtu.be/Y_oVQZMskcw?t=33
- ↑ https://youtu.be/Y_oVQZMskcw?t=62
- ↑ https://moralfibres.co.uk/how-to-set-a-timer-on-a-boiler/
- ↑ https://youtu.be/O3ECpfj-ZWU?t=95
- ↑ https://youtu.be/VMQJmw0DMpE?t=111
- ↑ https://salus-controls.com/files/RT500BC-Boiler-Control-041.pdf
- ↑ https://youtu.be/VMQJmw0DMpE?t=152
- ↑ https://youtu.be/VMQJmw0DMpE?t=160
- ↑ https://youtu.be/VMQJmw0DMpE?t=254








-Step-34.webp)
