This article was co-authored by wikiHow Staff. Our trained team of editors and researchers validate articles for accuracy and comprehensiveness. wikiHow's Content Management Team carefully monitors the work from our editorial staff to ensure that each article is backed by trusted research and meets our high quality standards.
This article has been viewed 194,273 times.
Learn more...
If one of the power windows in your vehicle fails to function, it may be the result of a broken power window motor. If you have identified the motor as the culprit, replacing it is fairly straight forward, though it can be time consuming. It is recommended that you review a service manual specific to your vehicle when replacing the motor, as the methods used to disassemble car doors can vary from vehicle to vehicle.
Steps
Disconnecting the Window from the Motor
-
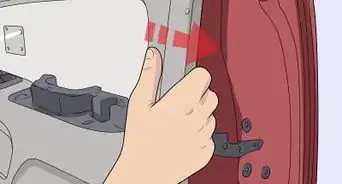
1Remove the interior door panel. Most interior door panels are held in place with plastic interior fasteners. You can remove these fasteners by pulling on them until they pop out of their holes. Interior panels may also be held on with metal or plastic screws or even bolts.[1]
- If you can’t easily identify what kind of fasteners are on your door panel, refer to the vehicle’s service manual.
- Turn screws or bolts counter clockwise to loosen them, then pull the panel backward off of the door.
-
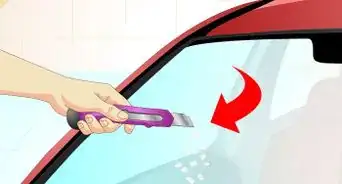
2Gently remove the plastic door cover. Beneath the door panel you will find a thin, translucent layer of plastic. This cover protects the interior of the vehicle from any water that may splash into the door from above and below. Carefully pull the door off of the sticky portions that secure it.[2]
- Try not to tear the cover as you will need to reinstall it after replacing the window motor.
- Replacement covers can be purchased at your local auto parts store.
Advertisement -
3Locate the window mounting bolts. Depending on the design of your door, there are a few different places the window mounting bolts may be, but it should be fairly apparent when looking into the door. Look for the bolts attaching the window itself to the mechanism that raises and lowers it.[3]
- You may need to use a flashlight to look into the service ports on the door.
- Different shaped doors will place the bolts in different locations.
-
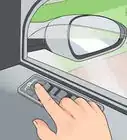
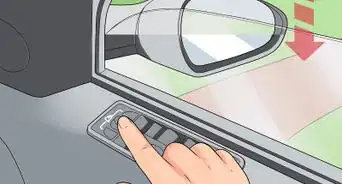
4Move the window if necessary to access the bolts. In some cases, you may need to raise or lower the window in order to access the bolts. Turn the key in the ignition of the vehicle without starting the engine to move the window if need be.[4]
- Raise or lower the window using the power window buttons if possible.
- If the motor is broken, you can force the window up or down by hand.
-
5Remove the bolts while a friend supports the window. Use the appropriate sized socket or open ended wrench to remove the window mounting bolts, but ask a friend to hold the window up as you do to prevent it from falling down once it’s disconnected.[5]
- You may be able to hold the window in place as you loosen the bolts yourself, but it’s dangerous.
- Dropping the window freely could result in the glass breaking.
-
6Raise the window up into the door frame. Have your friend raise the window up into the door frame as though you had rolled it up normally. Ask them to hold the window in place until you are able to secure it.[6]
- Pressing one palm on each side of the glass will allow your friend to hold the window up.
-
7Use masking tape to secure the window in place. With your friend holding the window up, pull off three or four strips of masking tape that are each about a foot long. Stick the strips to the window on each side over the door frame to hold the window up while you work.[7]
- Once the window is secured with the tape, you can have your friend let go.
- Be sure the tape will hold the weight of the window before your friend releases it.


Disconnecting the Motor and Regulator
-
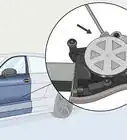
1Remove the window regulator bolts. The window regulator runs the width of the interior portion of the door and moves back and forth in order to raise and lower the window. Find the bolts that hold the regulator to the door and remove them with a socket or open ended wrench.[8]
- Set the bolts aside someplace safe, where you will easily be able to determine which bolts were for the regulator.
- Leave the regulator laying inside the door’s interior for now.
-
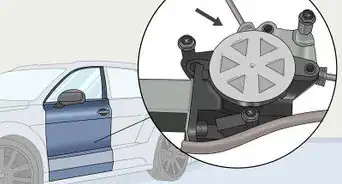
2Locate and remove the window motor mounting bolts. The power window motor is much smaller than the regulator, but should be located close by. In most applications, the bolts securing the motor to the door are the same size as the regulator mounting bolts. Remove them and set them someplace safe as well.[9]
- Even if the bolts have the same size head, they may not be the same length, so be sure to set them aside separately from the regulator mounting bolts.
-
3Disconnect the motor wiring harness connector. The power window controls attach to the motor and regulator via a wiring pigtail connector. Press the tab down to disconnect the pigtail then pull them apart to disconnect the motor.[10]
- Be careful not to break the tab that holds the wiring harness together.
- Pull the pigtail apart at the clip, not on the wires. Pulling on the wires could pull them out of the pigtail.
-
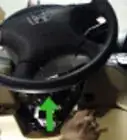
4Remove the motor and regulator through the access port. With the pigtail disconnected, the power window motor and regulator will no longer be connected to anything inside the door. Reach into the large access port and pull them each out.[11]
- The two are connected, so pulling one will remove them both.
- Be careful not to damage the regulator if you are only replacing the motor.
-
5Connect the regulator to the new motor. If you are only replacing the power window motor and not the regulator itself, you will need to disconnect it and connect it to your new power window motor. Visually inspect the two to make sure the new motor matches the old one, then swap the regulator.[12]
- Different vehicles will use different methodology to secure the regulator to the window motor.
- Refer to the service manual for your vehicle if you are unsure of how to disconnect the regulator.


Installing a New Power Window Motor
-
1Slide the new motor and regulator back into place. Insert the power window motor and regulator back into the main service port in the door in exactly the opposite order that you removed them in when disassembling the door.[13]
- Orient each component so the holes for the mounting bolts will line up with the holes in the interior of the door.
-
2Replace the mounting bolts. Hold each component in the appropriate position as you return the mounting bolts that secure both the power window motor and the regulator. Thread each bolt in by hand first, then use a wrench to tighten them.[14]
- If a bolt doesn’t thread it properly, remove it and try again to prevent cross-threading them.
- The bolts don’t have to be extremely tight, just tight enough to prevent them from vibrating loose as you drive.
-
3Reconnect the electrical connector. Once the power window motor and regulator are both mounted securely to the door, connect the wiring from the motor to the pigtail you disconnected previously. This will reconnect the power window switches and power source.[15]
- Be sure the connections fit together. If not, you don’t have the correct power window motor.
-
4Remove the masking tape and lower the window back down. Ask your friend to hold the window again. Once they are in place, remove the masking tape that is holding the window up in the door frame. Once the tape is removed, your friend can lower the window back into the mounting bracket.[16]
- Make sure your friend has a grip on the window before removing the tape that secures it.
- You can use adhesive remover like Goo Gone on the window if the tape left any residue once you are done.
-
5Insert the window mounting bolts. Have your friend hold the window in the correct place so the holes in line up with the holes for the window mounting bolts. Once the window is in place, thread the window mounting bolts in by hand, before tightening them with the wrench.[17]
- Be sure your friend holds the window in place until the mounting bolts are in place.
- Have your friend let go gradually to ensure the bolts are holding the window properly.
-
6Reinstall the plastic liner and interior panel. Once the window is mounted again, you can reattach the plastic interior cover, then reinstall the interior panel over the door. Insert the door mounting bolts or snaps to hold it in place.[18]
- Once the door is reassembled, reconnect the battery.
- Start the engine and test the window.


Community Q&A
-
QuestionIf a regulator has a helper spring on it, do I need to take the whole regulator out to secure the arms, or can I replace the motor while it is in the car?
 Community AnswerDepending on the design of the vehicle, you will likely need to remove the regulator as well as the motor when replacing it.
 -
QuestionIs the window regulator motor from a 2001 Ford Escape interchangeable with a 2002 Ford Explorer?Community AnswerThey might be. The best way to know for sure is to check the part numbers for each and see if they match. If they do not, they are not interchangeable.
-
QuestionWhere is the fuse located?
 The_general_sCommunity AnswerFuses are usually in one of three areas: the engine bay, trunk area, near steering wheel.


References
- ↑ http://www.familyhandyman.com/automotive/car-window-repair/easy-power-window-repair/view-all
- ↑ http://www.familyhandyman.com/automotive/car-window-repair/easy-power-window-repair/view-all
- ↑ http://www.familyhandyman.com/automotive/car-window-repair/easy-power-window-repair/view-all
- ↑ http://www.familyhandyman.com/automotive/car-window-repair/easy-power-window-repair/view-all
- ↑ http://www.familyhandyman.com/automotive/car-window-repair/easy-power-window-repair/view-all
- ↑ http://www.familyhandyman.com/automotive/car-window-repair/easy-power-window-repair/view-all
- ↑ https://www.2carpros.com/articles/how-to-check-and-replace-a-electric-power-window-motor
- ↑ https://www.2carpros.com/articles/how-to-check-and-replace-a-electric-power-window-motor
- ↑ https://www.2carpros.com/articles/how-to-check-and-replace-a-electric-power-window-motor
- ↑ https://www.2carpros.com/articles/how-to-check-and-replace-a-electric-power-window-motor
- ↑ https://www.2carpros.com/articles/how-to-check-and-replace-a-electric-power-window-motor
- ↑ https://www.2carpros.com/articles/how-to-check-and-replace-a-electric-power-window-motor
- ↑ http://www.ebay.com/gds/How-to-Fix-a-Power-Window-Motor-/10000000177635028/g.html
- ↑ http://www.ebay.com/gds/How-to-Fix-a-Power-Window-Motor-/10000000177635028/g.html
- ↑ http://www.ebay.com/gds/How-to-Fix-a-Power-Window-Motor-/10000000177635028/g.html
- ↑ http://www.ebay.com/gds/How-to-Fix-a-Power-Window-Motor-/10000000177635028/g.html
- ↑ http://www.ebay.com/gds/How-to-Fix-a-Power-Window-Motor-/10000000177635028/g.html
- ↑ http://www.ebay.com/gds/How-to-Fix-a-Power-Window-Motor-/10000000177635028/g.html
About This Article