This article was co-authored by wikiHow Staff. Our trained team of editors and researchers validate articles for accuracy and comprehensiveness. wikiHow's Content Management Team carefully monitors the work from our editorial staff to ensure that each article is backed by trusted research and meets our high quality standards.
The wikiHow Video Team also followed the article's instructions and verified that they work.
This article has been viewed 236,807 times.
Learn more...
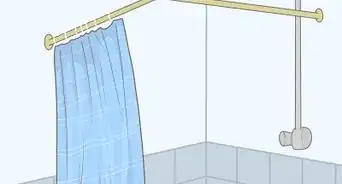
If you don't want to get your hair wet in the shower, the easiest solution is using a shower cap. However, you may have run out of shower caps or forgot to pack one. Luckily, making a DIY shower cap is very easy with just a grocery bag and bobby pins. Start by putting your hair up in a bun and tucking away any loose hair. Then put the bag over your head and twist it at the front. After securing the bag in place, you're ready to shower!
Steps
Putting Your Hair Up
-
1Put your hair in a bun if you have long hair. Brush your hair back and pull it into a bun. Then secure the bun with a hair tie or bobby pins. Make sure the bun is tight so it doesn’t come out while you shower.
-
2Tuck your hair behind your ears if you have short hair. If your hair is short, you might not be able to put it in a bun. Just push your hair behind your ears so it stays in place. Then use bobby pins or a clip to secure any longer pieces so they don't hang below your hairline.[1]Advertisement
-
3Use bobby pins to secure any loose hair. After making your bun or tucking your hair, you'll probably have some pieces hanging out. Tuck it back so it doesn't poke out from under your shower cap. Pin it back with bobby pins if necessary. Then clip up any remaining hair so it doesn't poke out from under the plastic bag.[2]
- Remember to pin up your bangs too, if you have them.

Securing the Bag
-
1Find a clean grocery bag with no holes in it. A medium-sized grocery bag will work well for this. Check the bag and make sure it’s dry and clean. Ensure there are no holes in the bag so your hair doesn’t get wet.[3]
- As a test for holes, blow into the bag and then squeeze the top closed, making a balloon. Push the bag a bit and see if you hear any air seeping out. If not, then this bag should have no holes in it.
-
2Place the plastic bag on your head with the handles facing your ears. Take the bag with a handle in each hand. Place it over your head so it comes about halfway down your forehead. Adjust it so the handles are on your sides, by your ears.
- Don’t cover your face with the bag. Keep it away from your nose and mouth.
- Make sure the bag covers your hair and ears. Tuck any straggling hairs under the bag if you have to.
-
3Pull the handles towards your forehead. Hold the bag by the handles and pull them toward your forehead. The bag will tighten against the back of your head. Gather the handles and any excess in both hands, in front of your forehead.
- Keep the bag height correct while you’re pulling it. Make sure it stays halfway up your forehead and covering your ears.
- If you prefer, you can also pull the bag backward and secure it behind your head. If you’re more comfortable doing this, then pull it backward and follow the same steps.
-
4Twist the bag up in front of your forehead. Hold the handles in both hands and twist them so the bag tightens against your head. Make a tight twist in the front so the bag stays sealed while you shower. Stop twisting when the bag feels tight against your head.
- Make sure the holes on the handles are twisted up. If you leave holes, water will get under the bag while you shower.
- Don’t twist too hard or the bag may rip. Then your hair will get wet in the shower.
- Adjust the height if you need to. The bag might ride up a bit while you’re twisting.
-
5Tuck the twisted section inside the bag. Imagine you’re flipping the twisted section inside out. Fold it down and tuck it inside the bag. Make sure it stays tight before you get into the shower.
- You can also use a bobby pin or waterproof tape to secure the bag at the front instead of tucking it in.
-
6Confirm that no hair is sticking out from under the bag. Once you’ve made the shower cap, double-check to make sure your head and ears are covered. Tuck any remaining hair underneath the bag and do a final height adjustment if the bag moved. Then you’re ready to shower.[4]
- Lightly shake your head a few times to test the bag. If it stays in place, then it should last through your shower.
- If any spots seem loose, secure them with bobby pins.

Community Q&A
-
QuestionWhy do you advise to throw the bag away within two weeks of use?
 Community AnswerPlastic can grow mold, and the dirt and oil from your hair will accumulate over time as well.
 -
QuestionIs a shower cap made out of the same stuff as a plastic bag and will it damage my hair?
 Community AnswerYes, your shower cap is made up of plastic but it will not damage your hair if you throw it out after two weeks of use.
 -
QuestionDo I have to pin up my hair?
 Community AnswerNo, but the cap will be a lot easier to put on if you do.
Things You'll Need
- Plastic bag
- Bobby pins


-Step-16.webp)
-Step-13.webp)
-Step-14.webp)

References
About This Article