X
This article was co-authored by wikiHow Staff. Our trained team of editors and researchers validate articles for accuracy and comprehensiveness. wikiHow's Content Management Team carefully monitors the work from our editorial staff to ensure that each article is backed by trusted research and meets our high quality standards.
This article has been viewed 245,846 times.
Learn more...
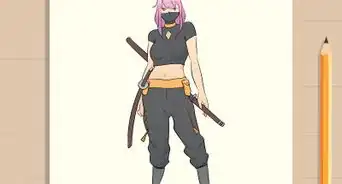
Maybe you want to create a Halloween costume, get into the cosplay fun, or express your inner ninja. You can easily do so by making your own Shinobi headband resembling one from the popular anime Naruto, and you only need a few simple items to do so.
Steps
Part 1
Part 1 of 3:
Making Your Headband
-
1Find or buy fabric the color of your character's headband. (If you want to be a Naruto character in general, use blue fabric.) You can purchase your fabric from your local fabric store. If you don’t have a fabric store near you, you can order it online.
- Fabric stores usually have a discount section. If you’re on a budget, check there first.
- You will need about one yard (36 inches) of fabric so that you have plenty of material to wrap around your head and tie in the back.
- You can use any type of fabric, such as cotton, linen, or rayon. However, these fabrics will fray on the edges. Other fabrics, such as jersey knit, faux leather, or vinyl will not fray. Of these, knit fabric will likely be the easiest to find in the color you need (and less expensive than the others).
-
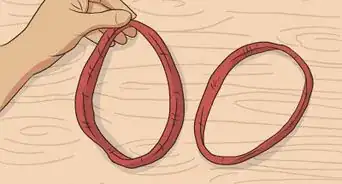
2Cut your fabric. Be sure that the strip of fabric you cut is about 3 inches (7.6 cm) wide and however long you need to wrap around your head. Leave enough extra to tie off behind your head.
- It would be a good idea to measure around your head first and determine the length you would like your headband to be.
- Be sure to cut your edges straight. Lay out your fabric on a flat surface and use a measuring stick and chalk to create an outline for your headband.
Advertisement -
3Treat your fabric. If you have opted for a fabric that frays around the edges after being cut (such as cotton), you can apply an anti-fray aerosol spray to the edges to make your headband last longer and prevent wear and tear.


Advertisement
Part 2
Part 2 of 3:
Creating Your Emblem
-
1Prepare the plate for your headband emblem. You can use cardboard, poster board, or an aluminum can for a more authentic look.
- If you are using cardboard or poster board, grab a measuring stick and trace an approximately 2 inch (height) by 6 inch (length) rectangle. Round each of the four corners.
- If you are using a recycled aluminum can, wash and dry the can first. Take some scissors and create a slit lengthwise down the center of the can (from top to bottom). Carefully cut around the top and bottom of the can and discard those pieces. Take the aluminum from the middle of the can and bend it back and forth to smooth it out.[1] Measure and cut your aluminum (approximately 2 inches by 6 inches with rounded corners).
-
2Spray paint or hand paint your cardboard or poster board. (Skip this step if you have used aluminum.) Choose a silver paint with a metallic finish, and but be sure to allow plenty of time for it to dry. Paint only on the side that will be visible once it is applied to your fabric.
-
3Add your emblem. Use a marker to draw the emblem of your choice in the center of your cardboard or aluminum piece.
- If you are worried about making a mistake, trace the image with a pencil first. Don’t press down too hard, though, because the indentations will still show in your cardboard or aluminum.
-
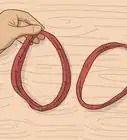
4Cut or draw three holes on each side. If you don’t want your fabric to show through your emblem, use a permanent marker to draw the circles instead of cutting them.
- Alternately, you could cut the backs off of six round, silver thumb tacks and glue them to the sides of your emblem plate.


Advertisement
Part 3
Part 3 of 3:
Finishing the Details
-
1Glue your emblem to your fabric. When you are satisfied with the plate, apply super glue to the back of the plate. Press the plate firmly into the center of the middle of your fabric headband.[2] Adding a phone book or other large book as a weight will improve bonding.
-
2Wait for the glue to dry. The instructions on your glue will tell you how long to wait. When the glue has dried, your headband is complete.
-
3Rock your headband. Wear your headband with pride as you represent your village.


Advertisement
Community Q&A
-
QuestionWhat about using aluminum from cans?
 Dead X SpiritzCommunity AnswerIt's not good for your health because aluminum is a reactive metal and it might cause itching on your forehead (unless you chose to put it on your arms like Shikamaru).
 -
QuestionCan I do the coloring with water colors instead of spray paint?
 WikiHowUser20171109012036Community AnswerYes, but it might not look as good since spray paint is more opaque.
 -
QuestionWould wood glue work?
 Community AnswerYes it would, as would any other type of glue.
Advertisement
Things You'll Need
- Blue fabric
- Blue fabric dye (if your fabric is not blue)
- Scissors
- A piece of cardboard, poster board, or an aluminum can
- A pencil
- A marker
- Metallic paint
- Super Glue

-Step-12.webp)


References
About This Article

wikiHow Staff
wikiHow Staff Writer
This article was co-authored by wikiHow Staff. Our trained team of editors and researchers validate articles for accuracy and comprehensiveness. wikiHow's Content Management Team carefully monitors the work from our editorial staff to ensure that each article is backed by trusted research and meets our high quality standards. This article has been viewed 245,846 times.
Co-authors: 82
Updated: February 12, 2022
Views: 245,846
Categories: Anime
Advertisement


-Step-12.webp)