wikiHow is a “wiki,” similar to Wikipedia, which means that many of our articles are co-written by multiple authors. To create this article, 12 people, some anonymous, worked to edit and improve it over time.
The wikiHow Culinary Team also followed the article's instructions and verified that they work.
This article has been viewed 40,290 times.
Learn more...
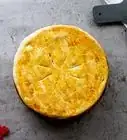
Lard is a popular cooking fat that is rich in vitamin D, monounsaturated fatty acids, and beneficial saturated fatty acids.[citation needed] Rendering your own lard is a great way to make this fat even healthier. The process can be completed with either an oven, slow cooker, or stove.
Ingredients
Makes about 1 pint (500 ml) or more
- 1 lb (450 g) pork fat, or more
- 1/4 cup (60 ml) water
Steps
Preparing the Lard
-
1Purchase high quality pork fat. If you want to make the lard as healthy and beneficial as possible, you should purchase pork fat from a local farmer instead of a grocery store butcher.
- You can usually find a local farmer who raises pigs by asking around at your nearest farmer's market.
- You can also try small "family run" butchers or specialty markets.
-
2Select the right cut of fat. There are three main types of pork fat, and each type produces lard that is best used for different purposes.
- Back fat, also called fatback, comes from the back, shoulder, and rump of the pig and is located directly beneath the skin. It works well for sauteing and frying.
- Belly fat is rich and layered with meat. Bacon is actually cured pork belly. Rendered belly fat can also become lard used for frying, however.
- Leaf lard is fat located around the pig's kidneys. It is the cleanest fat and is the most suitable if you want to make lard used for pastries and baked goods.
Advertisement -
3Cut the fat into small cubes. Use a very sharp knife to cut the fat into 1-inch (2.5-cm) strips. Cut across the strips crosswise to produce 1-inch (2.5-cm) cubes.
- The pieces should be at least this small. The smaller they are, the easier it will be to render lard from them.
- Cut away as much meat and skin from the fat as you dice it, as well.
- Also note that it will be easiest to cut the fat if it has been chilled or partially frozen beforehand.
-
4Consider grinding the fat down further. To produce even more rendered lard, put the cubes of fat through a meat grinder and grind them down into even smaller pieces.
- Alternatively, you could put the lard cubes into a food processor and slightly pulse them into shreds. Use no more than a handful at a time, however, since you could wear the motor out if you stress it with too much.
- You could skip the cutting and grinding process completely by asking the farmer or butcher to grind the fat down before you take it home.
Rendering the Lard
Oven Method
-
1Preheat an oven to 225 degrees Fahrenheit (107 degrees Celsius). The oven needs to be set to a low temperature to prevent the fat from burning as it renders.
-
2Pour a little water into a Dutch oven. Fill the pot with about 1/4 inch (0.625 cm) of cool to warm water.
- The water prevents the fat from browning too quickly at the start of the process. As the fat continues to cook, the water will evaporate, so it should not affect the quality of your lard.
- Use a cast iron Dutch oven for best results. If you do not have one, another deep, oven-safe pot would also suffice.
-
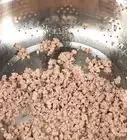
3Add the fat. Place the chopped or ground fat in the pot. Spread the pieces out evenly to ensure even rendering.
-
4Place in the hot oven for several hours. Stir the fat every 20 to 30 minutes or so. Remove the pot from the oven once the chunks stop giving off fat.
- This process will usually take at least two hours. That amount of time will increase depending on the size of your pot and the amount of fat you choose to render.
- It will likely be obvious once the fat has been rendered off. If you think the chunks look the same way they did 40 to 60 minutes earlier, you've probably gotten as much fat from them as possible.
Slow Cooker Method
-
1Add a little water to a slow cooker.[1] Pour the water directly into the bottom of the slow cooker, using 1/4 cup (60 ml) for every 4 qt (4 L) capacity or so.
- The water prevents the fat from burning as it melts down. Since it will evaporate out, the water will not damage the quality of the lard.
-
2Place the fat inside. Lay the pieces of pork fat inside the slow cooker, arranging them in even layers.
- You'll need more than one layer, but the layers should still be even so that the pork fat renders evenly.
-
3Set the slow cooker to low. Place the lid on the slow cooker and set the machine to low. Let it run for a full hour without opening it
-
4Stir and continue rendering until done. After an hour, remove the lid and stir the fat. Continue rendering the fat with the lid off until done.[2]
- After the first hour, you should check on the fat every 20 to 30 minutes to make sure that it is not burning. Stir each time you check it.
- You may wish to ladle out some of the liquid fat throughout the process. Doing so can make it easier for the rest of the solid fat to melt down.
- The fat is ready once the cracklings (crisp residue) begin sinking to the bottom of the slow cooker. These cracklings should still be soft, however, and not crispy.
- The entire process will usually take two to eight hours, depending on the size of your slow cooker and the amount of fat being rendered.
Stovetop Method
-
1Place the fat in a large stockpot. Arrange the pieces of pork fat in a large stockpot, keeping them in even layers.
- The more even your layers are, the easier it will be to render the fat at an even pace and prevent any from burning.
-
2Add a little water. Pour roughly 1/4 cup (60 ml) of water over the fat inside the stockpot.
- You only need a little water. The water can help prevent the fat from burning during the initial stages, and it will evaporate from the stockpot as the fat continues to heat up.
-
3Cover and heat over low. Cover the stockpot and place it on a stove burner set to low heat. Allow the fat to render for about 30 minutes without disturbing it.
- The fat will only begin to partially melt during this time. The solid chunks will look more translucent, and some liquid will start to come off.
-
4Heat on medium, stirring often, until done.[3] Remove the lid and give the fat a good stir. Increase the heat to medium, then continue rendering the fat for another hour or so.
- Keep a close eye on the fat to make sure that it does not burn.
- You may want to remove and strain some of the rendered fat as it melts down. Doing so can help the rest of the fat melt down quicker.
- The fat should be ready once the leftover cracklings start sinking and becoming crispy.
Storing and Using the Lard
-
1Let the lard cool. Remove the lard from the heat source and allow it to cool to a lukewarm temperature.
- It is very important that you wait until the lard has a chance to cool slightly before pouring it into glass jars. Hot lard can cause the glass to weaken, crack, or break.
-
2Remove any remaining chunks. Ladle the rendered fat through a fine-mesh sieve to remove any solid pieces, leaving you with nothing but liquid lard.
- Alternatively, pour the fat through a paper coffee filter wedged inside of a cone or funnel, or through a piece of cheesecloth draped inside a colander.
- You can pour the lard into a separate bowl or directly into your intended storage containers.
-
3Pour the lard into jars. Transfer the filtered lard into glass jars, then tightly twist a lid onto each jar.
- If the jars feel warm to the touch, let them sit out on your counter for another few hours until the sides feel cool. The idea is to make the temperature change as subtle as possible to prevent that glass from becoming damaged.
-
4Refrigerate the lard. You should store the lard in your refrigerator, keeping it there for as long as one month. In a cooled state, lard is soft but solid.
- If you want to store the lard for as long as one year, place the jar of lard in your freezer, instead.
-
5Use as you would use any other solid cooking fat. You can use lard in the same way you would use butter or shortening.
- If you want to use the lard in a recipe that usually calls for oil, you will need to melt it down into a liquid form.
Community Q&A
-
QuestionMine has stayed in liquid form after being refrigerated. Ideas as to why it did not become solid?
 Community AnswerThe only possible answer I can think of is not a high enough fat content. I'd try again this time using leaf fat from around the kidneys.
Warnings
- Rendered pork fat has a very distinctive smell. Some people find it overwhelming, so if you tend to be sensitive regarding odors, you might want to use an outdoor propane oven or a slow cooker set up in your garage.⧼thumbs_response⧽
Things You'll Need
- Sharp knife
- Meat grinder or food processor
- Dutch oven, slow cooker, or large stockpot
- Ladle
- Mixing spoon
- Glass jars with lids
- Fine mesh sieve, coffee filters, and/or cheesecloth
- Refrigerator or freezer


References
About This Article
To make lard, start by cutting pork fat into 1-inch cubes and grinding them into small pieces using a food processor. Next, fill a heavy pot or dutch oven with 1/4 inch of cool water before adding the fat. Then, cover the pot and place it in a 225° Fahrenheit oven for several hours, stirring every 30 minutes. Once the chunks of fat stop giving off liquid fat, remove the pot from the oven, let the lard cool, and strain out any remaining chunks. Finally, store the lard in a sealed container in the fridge until you want to use it. For tips on how to use lard in your cooking, read on!