This article was co-authored by Ollie George Cigliano. Ollie George Cigliano is a Private Chef, Food Educator, and Owner of Ollie George Cooks, based in Long Beach, California. With over 20 years of experience, she specializes in utilizing fresh, fun ingredients and mixing traditional and innovative cooking techniques. Ollie George holds a BA in Comparative Literature from The University of California, Berkeley, and a Nutrition and Healthy Living Certificate from eCornell University.
There are 9 references cited in this article, which can be found at the bottom of the page.
wikiHow marks an article as reader-approved once it receives enough positive feedback. In this case, 94% of readers who voted found the article helpful, earning it our reader-approved status.
This article has been viewed 980,383 times.
If you have a roast going in the oven, you can make a delectable gravy with the drippings.[1] If you don't, no problem! You can whip up a gravy with cream and stock just as easy. No time? We'll cover a quick gravy, too. With these three recipes in your arsenal, your gravy woes are gone!
Ingredients
- 2 tablespoons flour
- 2 tablespoon butter
- 1 cup broth
- 1/2 cup of butter (unsalted)
- 1/2 cup of flour
- 4 cups of chicken stock
- 1/3 cup of heavy cream (optional)
- Salt and pepper to taste
- Pan drippings
- ¼ cup flour or cornmeal
- Broth (optional)
- Butter (optional)
Steps
Making Quick Gravy
-
1Heat 1 cup of broth (stock) in a pot over medium heat. What kind of stock? Whatever you want! Chicken, beef, and vegetable are all good – it just depends on what you're pairing it with (chicken goes with chicken, etc.) and what your personal preferences are.[2]
- As this recipe only makes 2-4 servings, you won’t need a very large pot. However, you can easily double (or even triple) the recipe if need be. The more gravy you need to make, the bigger the pot you’ll need.
-
2Put 2 tablespoons each of butter and flour into a small bowl and cream together. Make sure your butter is soft, but not melting (otherwise it will be nearly impossible to cream). It will eventually turn into a smooth paste – what the French call a “beurre manié.”[3]
- If your butter is just chunking up, leave it alone to sit for a bit – it's too cold. Move your broth to low and come back in 5 or 10 minutes. Then resume as normal.
Advertisement -
3Add the butter-flour paste to the stock, whisking vigorously. It’ll start out just like the butter and flour – a bit chunky and not at all appealing to the eye. Then slowly the paste will infuse into the broth, thickening it slowly.[4]
- Keep whisking throughout the rest of this recipe. This keeps the air flowing and will result in your gravy thickening more quickly.
-
4Turn down the heat to low and wait for it to thicken. If the gravy is too hot, it will start to boil – which is not what you want, as that thins it and makes it foamy. On low, keep whisking lightly, keeping an eye on how thick it is getting. This could take up to 10 minutes. Be patient!
- Once you think it's thick enough, give it the spoon test. Dip a spoon in and then lift it out. Does it stay covered? Does it drip off like a gravy should?
-
5Season to taste. Especially with quick gravy (that doesn’t have pan drippings or cream), you may find that you prefer it with a bit of salt and pepper, or any other spice you're particularly fond of. Give it a taste test regularly to make sure you don't over-season it.
- Remember that the gravy will likely be eating in tandem with another food. If the gravy itself isn't strong, that's fine. It will be combining with other flavors anyway.

Making Gravy without Pan Drippings
-
1Start making a roux. A roux (pronounced “roo”) is where you cook flour and butter together until it’s a perfect, smooth consistency – then you’ll be adding cold stock and cooking it until it has thickened into a sumptuous gravy. Here’s how to begin:[5]
- Cut up 8 tablespoons (½ cup) of ‘’un’’salted butter into chunks (salted will make your gravy too salty). Then add the chunks to a medium-sized saucepan.
- With the pan on low heat, melt the butter until it’s foamy. If the butter starts burning, the oven is on too high.
- Add ½ cup of white flour to the pan.
-
2Whisk until well-blended – and keep whisking. At first it will look like an unappetizing, buttery, gloopy paste, and then slowly it will transform into something smooth and silky. Keep whisking while it’s on low so the air circulates and the mixture thickens.
- Eventually (6-12 minutes) it’ll start to smell like a pie is baking in the oven. It won't happen immediately. At this point, your flour has cooked and your gravy won’t taste flour-y.
-
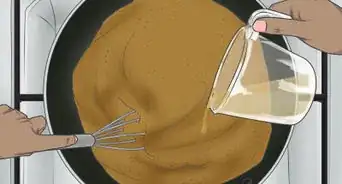
3Add 1 cup of stock to start. Chicken, beef, or vegetable stock all work. Keep whisking as you’re adding the stock, until it all gets absorbed. Once that cup is absorbed, add in another and then whisk until that one is absorbed, and another and then whisk, and another and then whisk, and eventually you will have one smooth, but thin, gravy.[6]
- Again, it will be thin – don't be alarmed if it looks more like soup at this juncture; that's totally normal. That's what it's supposed to look like.
-
4Keep it over low heat to thicken. Your gravy is done when it coats a spoon and comes off in drips – not a steady, thin stream. This could take around 10-15 minutes.
- Stir it regularly so it doesn't film over, the bottom doesn't overheat, and the air and heat circulate evenly. It will take a while, so be patient.
- It's not done yet! Don't be alarmed if it still seems like it's in the works, because it is!
-
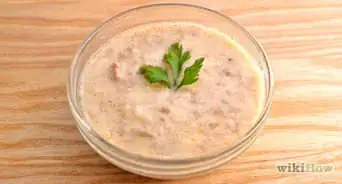
5Once thickened, add in ⅓ cup of cream. Whisk it for 2-3 minutes, giving it the spoon test once more. It should thickly coat the back of a spoon and resemble the gravy you have pictured in your mind. All done!
-
6Season to taste. Though your gravy doesn't necessarily need any more additions, salt and pepper are a favorite of many. However, you may consider a few of these more off-the-beaten-track family traditions:
- Ketchup
- Soy sauce
- Coffee
- Sugar
- Cream of mushroom soup
- Sour cream

Making Gravy with Pan Drippings
-
1Save the pan drippings from your roast. To make gravy, the first step is to save the drippings and scraps from the pan that you used to cook your meat, whether it was chicken, turkey, beef, or duck. This will give a great flavor to your gravy that can’t be replicated through a mix or broth.
- Put them into a wide-brimmed bowl. You’ll need to separate it later, so the wider the brim, the better.
-
2Skim off the fat. Let the drippings sit for a minute or two, until the fat has separated on the top. Then, use a spoon to skim the fat from the top and transfer the fat to a measuring cup. Don't be tempted to throw it away! While it may not look appetizing, it's what will give your gravy that delectable edge.
- Make sure that you keep track of how much fat you have, because you will need an equal amount of flour. You should end up with about ¼ cup (however, if you don't have that, don't worry).
- Keep the rest of the drippings, too (the non-fat part) – you will need these later as well.
-
3Add the fat and an equivalent amount of flour to the pan. Pour the fat from the measuring cup into a large pot or pan over medium to medium-high heat. Then add an equivalent amount of flour – that is, if you have 1/4 cup of fat, use 1/4 cup of flour.
- If you want to make a large serving of gravy and do not have enough fat from the drippings, you can use butter to make up the difference. Simply add the butter to the pan with whatever fat you have, and then let the butter melt before adding the flour (you’ll need more flour, too).
- Don't have flour? You can easily substitute cornmeal.
-
4Mix the fat and flour together. Stir the fat and flour with a wooden spoon until the mixture thickens and turns a medium shade of brown, like peanut butter. This should take a couple of minutes. Be careful not to let it burn![7]
- If it is scorching on the bottom, it is burning. The best way to avoid this is to stir evenly and to turn down the heat just a bit if you suspect it is too hot.
-
5Add the broth. This is where you add the rest of the drippings from the cooking of the meat. Pour the drippings into the pan and whisk them together with the fat/flour mixture. Stir until the whole mixture has the smooth, viscous consistency like gravy.[8]
- If you do not have enough drippings to make the amount of gravy that you desire, you can use canned broth. Try to use broth that matches the type of meat you are serving, i.e. beef broth with beef, chicken broth with poultry.
-
6Season to taste. With pan drippings, it's likely your gravy will already taste good on its own. However, plenty of people add a dash of salt or pepper, and some even add cream (sour or regular) or even ketchup, soy sauce, or coffee (with beef gravy, of course). What taste would you like to see in your gravy?
-
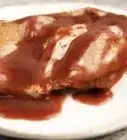
7Finished.

Expert Q&A
-
QuestionWhat is the best broth for making gravy?
 Ollie George CiglianoOllie George Cigliano is a Private Chef, Food Educator, and Owner of Ollie George Cooks, based in Long Beach, California. With over 20 years of experience, she specializes in utilizing fresh, fun ingredients and mixing traditional and innovative cooking techniques. Ollie George holds a BA in Comparative Literature from The University of California, Berkeley, and a Nutrition and Healthy Living Certificate from eCornell University.
Private Chef & Food EducatorYou can use chicken or turkey, or even mix them. If possible, use bone broth — it is rich in flavor, nutrients and collagen -
QuestionHow do you make gravy smoother?Ollie George CiglianoOllie George Cigliano is a Private Chef, Food Educator, and Owner of Ollie George Cooks, based in Long Beach, California. With over 20 years of experience, she specializes in utilizing fresh, fun ingredients and mixing traditional and innovative cooking techniques. Ollie George holds a BA in Comparative Literature from The University of California, Berkeley, and a Nutrition and Healthy Living Certificate from eCornell University.
Private Chef & Food EducatorIf you want your gravy to have a more creamy texture, whisk in ½ cup of heavy cream at the end. -
QuestionHow do you make gravy with texture?Ollie George CiglianoOllie George Cigliano is a Private Chef, Food Educator, and Owner of Ollie George Cooks, based in Long Beach, California. With over 20 years of experience, she specializes in utilizing fresh, fun ingredients and mixing traditional and innovative cooking techniques. Ollie George holds a BA in Comparative Literature from The University of California, Berkeley, and a Nutrition and Healthy Living Certificate from eCornell University.
Private Chef & Food EducatorIf your gravy is too smooth and you want to give it more texture, you can add in some cut up turkey meat. If you want even more texture, try making a giblet gravy!
Things You'll Need
- Pot
- Bowl
- Measuring cup(s)
- Wooden spoon
- Whisk
- Knife
- Seasonings (optional)


References
- ↑ Ollie George Cigliano. Private Chef & Food Educator. Expert Interview. 18 October 2021.
- ↑ https://www.crazyforcrust.com/easy-5-minute-gravy/
- ↑ https://www.saveur.com/article/Techniques/saveur-100-beurre-manie
- ↑ https://www.inspiredtaste.net/36231/easy-gravy-recipe/
- ↑ http://startcooking.com/how-to-make-gravy
- ↑ https://www.thekitchn.com/how-to-make-gravy-without-turkey-drippings-237739
- ↑ https://thestayathomechef.com/how-to-make-gravy/
- ↑ https://www.tasteofhome.com/collection/how-to-make-gravy/
- ↑ https://www.thekitchn.com/leftover-gravy-tips-from-the-kitchn-213026
About This Article

To make gravy, first melt 2 tablespoons (30 grams) of butter in a saucepan. Then, add 1/4 cup (30 grams) of flour to the saucepan, and whisk the butter and flour together until small clumps form. Next, add 2 cups (475 milliliters) of stock. You can use store-bought stock, the drippings from meat you've roasted, or a combination of both. Whisk everything together over medium-high heat for 3 minutes, or until the gravy thickens. To give your gravy even more flavor, season it with salt, pepper, and your favorite herbs before serving. If you want to learn more, like how to incorporate pan drippings into your gravy, keep reading the article!