This article was co-authored by Amy Guerrero. Amy Guerrero is an Arts and Crafts Specialist and the Owner of Sunshine Craft Co., a crafting studio based in Phoenix, Arizona. Amy specializes in macrame, DIY crafting, and teaching fiber arts. She offers monthly in-person and online workshops along with having developed a range of DIY craft kits for at-home projects. Amy holds a BS in Industrial Design from Philadelphia University. She worked as a graphic designer before starting her own business. Sunshine Craft Co. is a creative hub that offers a wide range of workshops, tools, and resources for any craft project to inspire creativity and community engagement.
This article has been viewed 325,559 times.
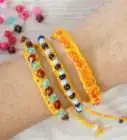
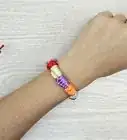
Braided bracelets are a great way to take your outfit to the next level. They are chic and trendy, and also fun and easy to make. Once you know the basics of making braided bracelets, you can experiment with using different numbers of cord or adding charms and beads.
Steps
Creating a Double-Strand Braided Bracelet
-
1Cut 6 strands of cord, 2 in each color. Choose 3 colors for your bracelet, such as pink, purple, and magenta. Cut 2 strands of each color, making sure that they are all the same length. The strands should be about 19 inches (48 cm)long.[1]
- For best results, use 1.4-milimeter Chinese knotting cord. Rattail cord will also work well.
- Embroidery thread or embroidery floss are not recommended because they are too thin.
-
2Knot the strands together, then tape them to your desk. Gather all of your strands together, making sure that the ends are aligned. Measure down 5 inches (13 cm) from the top of your gathered strands. Next, treating the strands as a single rope, tie them into an overhand knot.[2]
- An overhand knot is where you wrap the rope into a loop, then push the end through the loop.
- Make sure that the knot is below the tape. There is enough length in the tails to prevent the braid from sliding out.
- You can also secure them together with a clip or with a tie.
Advertisement -
3Separate the strands based on color. Divide the strands into 3 groups, keeping the colors together. For example, if your color scheme was pink, purple, and magenta, you'll have 2 pink strands on the left, 2 purple strands in the middle, and 2 magenta strands on the right.[3]
- You will be creating a basic 3-strand braid. Treat the 2 strands of each color as a single strand.
-
4Cross the 2 left strands over the middle strands. Treating the 2 left strands as a single strand, pick them up, and cross them over the middle strands. They are now your new middle strands. Make sure that the 2 strands are flat and not twisted.[4]
-
5Cross the 2 right strands over the new middle strands. Take the 2 strands on the right, and cross them over the new middle strands. Keep them together and make sure that they aren't twisted.[5]
- As you bring an outer string over into the middle, alternating sides, it’s best to stop every few steps to detangle any length of string to make sure the piece you are working on is not getting messed up.
-
6Tighten the strands. Gently tug on your outer strands so that the cross-over point scoots towards the knot at the top of your braid. Make sure that the tension is distributed evenly between the strands. You don't want 1 strand to be tight and have another so loose that it sticks out.[6]
-
7Repeat the process until the bracelet is the length you want it. Continue to cross the left 2 strands and the right 2 strands over the middle ones. After each set of cross-overs, gently tug on the strands to tighten them. Keep braiding until the braid is long enough to wrap loosely around your wrist.[7]
- Remember to treat the 2 strands of each color as a single strand.
-
8Knot the end of the bracelet, then cut the rest off. Treating all strands as a single rope, wrap them into a loop, then pull the tail through the loop. Slide the knot towards the end of the braid while tightening it. Cut the tails until they are 5 inches (13 cm) long.
- Skip this step if you'd like to make an adjustable closure. Click here instead.
-
9Remove the tape, then tie the ends together. Peel the tape off of the desk first. Wrap the bracelet around your wrist, then ask someone to tie the 2 5 in (13 cm) tails together. Trim off the excess tails, if desired.
Creating a 5-Strand Braid
-
1Cut 5 pieces of cord that are all the same length. It would be easier if you used 5 different colors, or 5 different shades of the same color. If you are an experienced braider, however, you can use fewer colors. The strands need to be 2 to 3 times your wrist circumference.[8]
- If you want a wider bracelet, cut 2 strands of each color. Treat the pairs as a single strand for the rest of the tutorial.
- 1.4-milimeter Chinese knotting cord will work the best, but rattail cord may also work.
- Alternatively, you can use embroidery thread instead. It is not the same thing as embroidery floss. Instead of being made up of separate strands, it is twisted like a thin rope.[9]
-
2Knot and tape the strands to your desk. Gather all of the strands together. Make sure that they are aligned, then treating them as a single rope, tie them into an overhand knot, 5 inches (13 cm) from the end. Tape the knot to your desk.[10]
- The knot needs to be below the tape. The tails are long enough to prevent the braid from sliding out.
-
3Spread the strands out, with 3 on the left and 2 on the right. Spread the strands out on the desk. Create a large gap in the middle of the strands. Make sure that you have 3 strands on the left and 2 strands on the right.
- The exact width of the gap does not matter. It needs to be wide enough to distinguish it from the spaces between the other strands.[11]
- Again, if you cut 2 strands of each color, treat them as a single strand and group them together.
-
4Weave the outermost left strand towards the gap. Take the first strand on the left. Weave it under the second strand and over the third. Stop when you reach the gap.[12]
-
5Repeat the process for the outermost right strand. Take the last strand on the right. Weave it under the second-to-last strand, and over the next one. Take a moment to straighten and tighten the strands.[13]
-
6Continue to weave the outermost strands under and over to the middle. Work your way across the braid until you get the length you want. Every so often, tug on the strands to tighten them and straighten them out. You want the tension to be even; you don't want 1 strand to be tight and another loose.
-
7Knot the end of the bracelet once you get the length you want. Continue to braid the bracelet until it is long enough to wrap loosely around your wrist. Gather all of the strands together, and wrap them into a loop. Pull the tails through the loop, then tighten the knot right above the braid.
- Skip this step if you'd like to make an adjustable closure. Click here instead.
-
8Trim the tails to 5 inches, then tie the ends together. Cut the excess string down to 5 inches (13 cm). Peel the tape off, then wrap the bracelet around your wrist. Ask someone to tie the 2 5 in (13 cm) together into a secure knot. Cut off the excess tails, if desired.
Creating a Mixed-Media Bracelet
-
1Find 3 strands of ribbon or chain. A basic braid consists of 3 strands woven together, but there are no rules as to what those strands have to be made from. Find 3 strands of ribbon, string, or chain. They can be all different, or you can have 2 be the same. Here are some ideas:[14]
- For a trendy look, use 2 suede ribbons and a thin chain.
- For a vintage look, use 1 velvet ribbon, a thin chain, and lace trim.
- For a bohemian look, cut 2 different types of fabric into1⁄4 to 1⁄2 in (0.64 to 1.27 cm) wide strips. Use a thin chain or suede ribbon for the third strand.
-
2Cut the strands until they are all the same length. Wrap a measuring tape loosely around your wrist, then triple that measurement. Cut all 3 of your strands down to that length.[15]
- Use fabric scissors for fabric strands, including ribbon and lace.
- Use sharp scissors for non-fabric strands, including pleather and suede.
- Use wire cutters for chains.
-
3Secure fold-over cord ends to fabric suede strands. You will eventually slip the ends of your strands over a jump ring. You can do this easily with a chain, thanks to the loops, but you can't do it with fabric, string, or suede strands. Buy a pack of fold-over cord ends from the beading section of a craft store, then do the following:[16]
- Slide the end of your strand into the cap of the fold-over cord end.
- Use heavy-duty pliers to clamp the cap shut.
- Don't do the other end yet. You may need to cut the strands shorter.
- Repeat the process for the other strands.
-
4Gather the ends together and tape them to your desk. Gather all 3 strands together. Make sure that the ends all match up, then tape them to your desk. Make sure that the tape is strong enough to hold the strands; a piece of masking tape will work especially well here.
-
5Braid the strands until the braid is the length you want. Cross the left and right strands over the middle strand. Tug on the strands to tighten them, then repeat the process until the braid is long enough to wrap loosely around your wrist.[17]
- Keep the strands flat for a nicer finish. This is especially important for velvet strands, which have a fuzzy and non-fuzzy side.
-
6Cut off the excess, then add the remaining fold-over cord ends. Use the same tools as before to cut off any excess ribbon, lace, or chain. Slip fold-over cord ends over ribbon, lace, fabric, or suede cords, just like before, and clamp them shut.
-
7Open up a jump ring. Pinch 1 half of a jump ring between your thumb and index finger. Pinch the other half of the jump ring with a pair of pliers. Make sure that the seam in the jump ring is facing up. Pull the pliers away from you and your fingers towards you until the seam widens.
-
8Slip the ends of the strands over the jump ring. Find the end of your chain, if you are using it, and slip it over the jump ring. Slide the ends of the fold-over clamps over the jump ring too.[18]
- Fold-over clamps have a tiny loop at 1 end.
-
9Close the jump ring using the same technique you used to open it. Pinch the jump ring between your fingers and pliers. Move the pliers towards you until the jump ring closes. If there is a gap in the seam, use the pliers to pinch it shut.
- If the jump ring is very small, you may have to hold it between 2 pliers instead of your fingers and 1 pair of pliers.
-
10Repeat the process to add a lobster claw clasp to the other end. Remove the piece of tape sticking your bracelet to the table. Open up the jump ring on the end of your lobster clasp. Slide it through the loops at the ends of your chains and fold-over ends, then close it.[19]
Creating an Adjustable Closure
-
1Complete a braided cord bracelet. This method only works for bracelets made from Chinese knotting cord, rattail cord, or embroidery thread. It will not work for mixed-media bracelets. The bracelet needs to be long enough to wrap loosely around your wrist. Do not cut or tie the bracelet off.
-
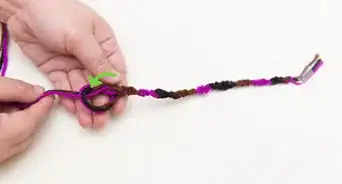
2Tie 1 of the outer strands around the rest. Find 1 of the strands on the outside edge of your bracelet. Wrap it around the other strands to create a loop, then pull it through the loop. Pull on the strand to tighten the knot.[20]
- It does not matter if you use the left or right outside edge.
-
3Use the same cord to create a second knot. Take the same cord you just used to wrap around the other cords. Wrap it around the other cords a second time to create a loop, then pull it through the loop. Tug on the strand to tighten the knot.[21]
-
4Cut the remaining strands, then seal them. Use a pair of scissors to cut the other strands as close as possible to the knot. Do not cut the strand you used to make the knot. Seal the cut ends as follows:[22]
- Chinese knotting cord or rattail cord: hold the cut ends over a flame until they melt.
- Embroidery thread: place a drop of liquid glue over the ends, and let the glue dry. Super glue will work the best, but you can use tacky or fabric glue.
-
5Repeat the process for the beginning of the braid. Remove the piece of tape first. Undo the knot, then tie 1 of the outer strands around the rest 2 times. Cut the other strands and seal them. Do not cut the strand you used to make the knot. The beginning and end of your bracelet should look the same.[23]
- Try to use a different color for the knotting cord than you did for the end of the cord. This will make the next step easier.
-
6Tie the first cord around the second cord 2 times. Take the first cord at the end of your braid. Measure 1 3⁄4 inches (4.4 cm) along it, then wrap it around the second cord. Pull the tail through the loop to tighten the knot. Make sure that the knot is 1 3⁄4 inches (4.4 cm) from the end of the braid, then create a second knot.[24]
- Make sure that the braid is not twisted for this step.
- Do not use the second cord from the beginning of the braid to make the knot. You should be able to slide the knot along the cord.
-
7Cut the cord close to the knot, then seal the end. Take the rest of the cord you just used to make the knot. Cut it as close as possible to the knot. Seal the cut end using the same method as before:[25]
- Chinese knotting cord or rattail cord: candle or lighter flame.
- Embroidery thread: liquid glue.
-
8Slide the knot towards the beginning of the braid. You should be able to slide the knot up and down along the second cord. Slide the knot towards the base of the second cord so that it bumps up against the beginning of the braid.[26]
-
9Repeat the knotting process with the second cord. Measure 1 3⁄4 inches (4.4 cm) along the second cord. Wrap the second cord around the base of the first cord, right next to the end of the braid. Tie the cord into a knot twice, using the same method as before. Cut the excess cord, and seal the knot, just like before.[27]
-
10Pull on both knots to open and close the bracelet. Slide the knots along the cords to move them. The closer you move the knots together, the wider the bracelet will become. The further you move the knots from each other, the smaller the bracelet will become.[28]
Community Q&A
-
QuestionCan this be used as a friendship bracelet?
 Community AnswerYes, absolutely. Any type of bracelet can be used as a friendship bracelet, and there are many ways to personalize braided bracelets.
 -
QuestionHow do I make a two-strand twisted bracelet?
 Community AnswerTake two strands and hold one end firmly. Twist it as much as it can go, then fold it at the middle so it doubles back on itself. This makes a nice twisted bracelet.
 -
QuestionHow can I make a 2-braided band?
 Community AnswerGet 6 strands of rope, then knot them together and sit three aside and braid the two sections separately, then at the end, knot them together.
Things You'll Need
Creating a Double-Strand Braided Bracelet
- Chinese knotting cord or rattail cord, 3 different colors
- Tape
- Measuring tape
- Scissors
Creating a 5-Strand Braid
- Chinese knotting cord, rattail cord, or embroidery thread, 5 colors
- Tape
- Measuring tape
- Scissors
Creating a Mixed-Media Bracelet
- 3 different strings (ribbon, lace, suede, chain, etc.)
- Fabric scissors (for ribbon and lace)
- Shape scissors (for suede and pleather)
- Wire cutters (for chain)
- Fold-over cord ends (for ribbon, lace, and suede)
- Heavy-duty pliers
- Needle-nose pliers
- Jump ring
- Lobster clasp
Creating an Adjustable Closure
- Completed braided bracelet
- Scissors
- Candle/lighter or liquid glue
References
- ↑ https://www.purlsoho.com/create/2013/06/27/mollys-sketchbook-braided-friendship-bracelets/
- ↑ https://www.purlsoho.com/create/2013/06/27/mollys-sketchbook-braided-friendship-bracelets/
- ↑ https://www.purlsoho.com/create/2013/06/27/mollys-sketchbook-braided-friendship-bracelets/
- ↑ https://www.purlsoho.com/create/2013/06/27/mollys-sketchbook-braided-friendship-bracelets/
- ↑ https://www.purlsoho.com/create/2013/06/27/mollys-sketchbook-braided-friendship-bracelets/
- ↑ https://www.purlsoho.com/create/2013/06/27/mollys-sketchbook-braided-friendship-bracelets/
- ↑ https://www.purlsoho.com/create/2013/06/27/mollys-sketchbook-braided-friendship-bracelets/
- ↑ https://www.purlsoho.com/create/2013/06/27/mollys-sketchbook-braided-friendship-bracelets/
- ↑ https://www.flaxandtwine.com/2012/12/five-stranded-braid-bracelet/
- ↑ https://www.purlsoho.com/create/2013/06/27/mollys-sketchbook-braided-friendship-bracelets/
- ↑ https://www.purlsoho.com/create/2013/06/27/mollys-sketchbook-braided-friendship-bracelets/
- ↑ https://www.purlsoho.com/create/2013/06/27/mollys-sketchbook-braided-friendship-bracelets/
- ↑ https://www.purlsoho.com/create/2013/06/27/mollys-sketchbook-braided-friendship-bracelets/
- ↑ https://lilluna.com/diy-braided-bracelet/
- ↑ https://lilluna.com/diy-braided-bracelet/
- ↑ https://lilluna.com/diy-braided-bracelet/
- ↑ https://lilluna.com/diy-braided-bracelet/
- ↑ https://lilluna.com/diy-braided-bracelet/
- ↑ https://lilluna.com/diy-braided-bracelet/
- ↑ https://www.purlsoho.com/create/2013/06/27/mollys-sketchbook-braided-friendship-bracelets/
- ↑ https://www.purlsoho.com/create/2013/06/27/mollys-sketchbook-braided-friendship-bracelets/
- ↑ https://www.purlsoho.com/create/2013/06/27/mollys-sketchbook-braided-friendship-bracelets/
- ↑ https://www.purlsoho.com/create/2013/06/27/mollys-sketchbook-braided-friendship-bracelets/
- ↑ https://www.purlsoho.com/create/2013/06/27/mollys-sketchbook-braided-friendship-bracelets/
- ↑ https://www.purlsoho.com/create/2013/06/27/mollys-sketchbook-braided-friendship-bracelets/
- ↑ https://www.purlsoho.com/create/2013/06/27/mollys-sketchbook-braided-friendship-bracelets/
- ↑ https://www.purlsoho.com/create/2013/06/27/mollys-sketchbook-braided-friendship-bracelets/
- ↑ https://www.purlsoho.com/create/2013/06/27/mollys-sketchbook-braided-friendship-bracelets/
- ↑ http://happyhourprojects.com/braided-bead-and-hemp-bracelets/
About This Article
To make a double-strand braided bracelet, start by cutting 6 strands of cord, 2 in each color, 19 inches long. Next, gather the strands, measure down 5 inches, and tie an overhand knot, which is where you wrap the rope into a loop and push the end through. Then, tape the strands just above the knot to your desk and separate the strands by color so you can do a basic 3-strand braid. Cross the 2 left strands over the middle strand, then cross the 2 right strands over the new middle strands, and repeat until you knot off at the end. To learn how to create a 5-strand braid, keep reading!
-Step-12.webp)
