This article was co-authored by wikiHow staff writer, Hannah Madden. Hannah Madden is a writer, editor, and artist currently living in Portland, Oregon. In 2018, she graduated from Portland State University with a B.S. in Environmental Studies. Hannah enjoys writing articles about conservation, sustainability, and eco-friendly products. When she isn’t writing, you can find Hannah working on hand embroidery projects and listening to music.
There are 14 references cited in this article, which can be found at the bottom of the page.
The wikiHow Video Team also followed the article's instructions and verified that they work.
This article has been viewed 64,864 times.
Learn more...
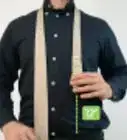
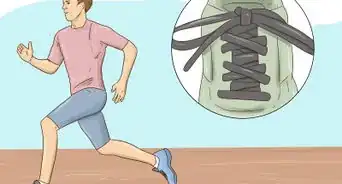
Lanyards are a fun, practical craft project that people of all ages can do. You can make them to hang on key chains, belt loops, and even water bottles. If you’ve started a lanyard and are getting close to the end, you may be wondering how to finish it off. As long as you make 1 more stitch on your lanyard, make small knots, or use a lighter, you can finish your lanyard in no time.
Steps
Ending a Box or Square Stitch
-
1Make 1 more stitch, but don’t tighten it. Using the stitch you were using to make your lanyard, create 1 more stitch but leave it loose so that you can still work with the strands.[1]
-
2Wrap a strand of 1 color around its same color on the opposite side. Take a strand of 1 color in your lanyard and wrap it around the strand on the opposite side that is the same color as it. For example, if your 2 colors are black and green, hold 1 green strand in your hand and wrap it around the other green strand that is on the opposite side.[2]
- If you are using more than 2 colors, wrap 1 strand around another that is on the opposite side of it.
Advertisement -
3Bring the strand in your hand up through the middle of the stitch. Take the strand that you are holding in your hand and push it up through the middle of your lanyard stitch. This will secure your strand in a kind of small knot.[3]
- You don’t have to pull this knot tight yet. Keep it loose so you can work with the other strands.
-
4Wrap another strand of the other color around its same color on the opposite side. Take a strand of the opposite color as the one you just used and wrap it around its same color on the other side.[4]
For example: If your 2 colors are black and green and you just worked with green, choose 1 of the black strands and wrap it around the opposite strand of black.
-
5Bring the strand in your hand up through the middle of the stitch. Take the strand that you are holding and push it up through the middle of your stitch to create another small knot. This strand might be harder to push through since there are more strands to go through now.[5]
-
6Repeat with the strands that are left hanging out. There will be more strands that are left out after you do your first 2 knots. Repeat the steps of wrapping the strands around the correlating color and pulling them through the middle of the stitch.[6]
- If you are working with more than 4 strands, your knot will be slightly bulkier.
-
7Pull all 4 strands until your knot is tight. Pull on your strands that are hanging out with gentle force until they are pulled taut and can’t be moved around easily. You may have to pull each strand 1 at a time until they are tight.[7]
- Make sure your knot is tight enough that the strands won’t fall apart, but not so tight that it makes your lanyard pucker or warp.
-
8Cut the excess strands to your desired length. Use a pair of sharp scissors to cut of any excess strands of your lanyard that you don’t want. You can leave them long or cut them down to the base of your finishing stitch, depending on how you’d like your lanyard to look.[8]

Finishing a 3 Strand Stitch
-
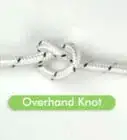
1Make 1 last stitch, but don’t tighten it. Using the same 3 strand stitch you used to make your lanyard, create 1 more stitch, but don’t pull this one tight.[9]
-
2Wrap each strand around the one closest to it. Take each strand individually and wrap it around the one next to it, going in a clockwise direction. Keep all of the wraps loose so that you can keep working with them.[10]
- Going clockwise is the easiest way to keep track of your strands and remember which ones you’ve already worked with.
-
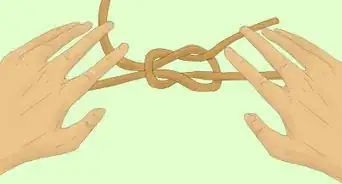
3Bring each strand up through the center 1 at a time. Grab 1 strand and bring the end up through the center of the knot. Pull it so that it comes all the way through, but it don’t tighten it all the way. Do this for each strand.[11]
-
4Pull all of the strands so that they are tight. Take all 3 of the strands in your hand and pull them until the knot is tight. You may have to pull each strand individually.[12]
Tip: Pull your knot tight enough so that it doesn’t come undone, but not so tight that it bends your lanyard.
Burning Your String Ends
-
1Trim the excess cord to the length you want it. Your lanyard might have excess strands hanging off of it if you didn’t use all of your material. Use sharp scissors to cut your lanyard down to the length that you want it in a straight line.[13]
Tip: Usually, a lanyard won’t have much extra fabric hanging off, if any at all.
-
2Hold the flame from your lighter near 1 strand of your lanyard end. Your lighter is too hot to hold the flame directly on your lanyard without burning it. Hold the flame near your lanyard end until you can see the material starting to melt.[14]
- You can use either a Bic lighter or a long-neck lighter. Bic lighters are easier to handle since they are smaller.
-
3Melt the lanyard end for about 2 seconds. The flame from your lighter will be hot enough to melt your lanyard end down within about 2 seconds. Once you see the material turn shiny and cover the frayed ends of your cut lanyard, you can take the flame off of it.[15]
- Don’t hold the lighter on your lanyard for too long, or it may catch fire. If it does, quickly run it under water to douse the flames.
- Keep your lanyard end towards the bottom of your lighter flame, where the fire isn’t as hot.
-
4Let your lanyard cool. Before touching or handling your lanyard, let it cool down for about 1 minute. Your lighter will have gotten the end very hot, so make sure it is safe to touch before you start using it.[16]
- If you accidentally burned your lanyard, you can use a permanent marker of the same color to draw over and hide the charred area with the marker color.


Things You’ll Need
Using a Stitch
- Scissors
Burning Your String Ends
- Scissors
- Lighter


References
- ↑ https://www.youtube.com/watch?v=PTL3DDTlK60&feature=youtu.be&t=5
- ↑ https://www.youtube.com/watch?v=ri-kFcXSz3c&feature=youtu.be&t=29
- ↑ https://www.youtube.com/watch?v=jWG2LikNbJI&feature=youtu.be&t=86
- ↑ https://www.youtube.com/watch?v=PTL3DDTlK60&feature=youtu.be&t=47
- ↑ https://www.youtube.com/watch?v=ri-kFcXSz3c&feature=youtu.be&t=30
- ↑ https://www.youtube.com/watch?v=jWG2LikNbJI&feature=youtu.be&t=110
- ↑ https://www.youtube.com/watch?v=PTL3DDTlK60&feature=youtu.be&t=82
- ↑ https://www.youtube.com/watch?v=PTL3DDTlK60&feature=youtu.be&t=114
- ↑ https://www.youtube.com/watch?v=_BMSlytShfA&feature=youtu.be&t=2
- ↑ https://www.youtube.com/watch?v=_BMSlytShfA&feature=youtu.be&t=43
- ↑ https://www.youtube.com/watch?v=_BMSlytShfA&feature=youtu.be&t=140
- ↑ https://www.youtube.com/watch?v=6Cavd18Cmeg&feature=youtu.be&t=1240
- ↑ https://www.paracordplanet.com/blog/how-to-finish-paracord-ends/
- ↑ https://www.paracordplanet.com/blog/how-to-finish-paracord-ends/
- ↑ https://www.youtube.com/watch?v=aj0o9KH2hno&feature=youtu.be&t=77
- ↑ https://www.paracordplanet.com/blog/how-to-finish-paracord-ends/
About This Article