This article was co-authored by wikiHow staff writer, Kyle Hall. Kyle Hall works on the content team at wikiHow. He helps manage our team of editors and creates content for a variety of wikiHow projects. Kyle continually looks for new ways to improve the content at wikiHow and make it more helpful and enjoyable for readers. He graduated from Eckerd College in 2015, where he majored in Political Science.
There are 13 references cited in this article, which can be found at the bottom of the page.
This article has been viewed 844,191 times.
Learn more...
Dogs are human’s best friend, and there are over 300 different breeds—from chihuahuas to German shepherds to Labrador retrievers. Learning how to draw dogs is fun and a great way to practice drawing animals. Whether you want to draw a realistic dog, like a hound or a Doberman pinscher, or a cartoon dog, the process is fairly simple once you know where to start.
Steps
Hound
-
1Draw a small circle. This will be the outline for the dog’s head.[1]
-
2Draw a quadrilateral extending off of the circle. This will be the beginning of the dog’s snout.[2]Advertisement
-
3Add 2 triangles on the top of the circle. These will be the dog’s ears.[3]
-
4Draw 2 straight lines coming off of the bottom of the circle. This will be the outline of the dog’s neck.[4]
-
5Draw a large, vertical oval under the neck. The oval will make up the upper portion of the dog’s body.[5]
-
6Draw a smaller vertical oval overlapping with the bottom of the bigger one. This will be the dog’s lower body, including its stomach.[6]
-
7Add an even smaller oval overlapping with the previous oval you drew. This oval will be the dog’s lower back.[7]
-
8Join the biggest oval and the smallest oval with a straight line. This line will form the dog’s back.[8]
-
9Draw straight lines extending down off the big oval. These lines will make up the front legs. Connect the lines at the bottom to close off the legs.[9]
-
10Draw rectangles extending off the front legs and smaller ovals. These will be the dog’s paws.[10]
-
11Draw an upward curving line coming off the smallest oval. This line will be the beginning of the dog’s tail.[11]
-
12Add a small, horizontal oval at the top of the front leg. This will be the dog’s leg bone and muscle area.
-
13Draw a rough outline of the dog using the shapes you’ve drawn so far. Start filling in the details, like the dog’s eyes, nose, mouth, nails, and ears.[12]
-
14Erase all of the guidelines you drew. When you’re finished erasing the guidelines, you should be left with the just the detailed outline of the dog you drew.
-
15Color in the dog to finish your drawing. You can color in your dog however you’d like, but if you’re going for a realistic-looking dog, stick with shades of brown.


Doberman Pinscher
-
1Draw 2 horizontal ovals side by side. Make one oval slightly larger than the other. Make sure they're not too far apart.[13]
-
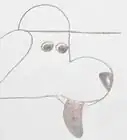
2Draw a light outline of the dog around the 2 ovals. First, draw a line that goes down and over the ovals you drew. Then, draw a line underneath it that does the same thing. For the bottom line, have it bend in a little bit in between the ovals. Next, draw the beginnings of legs. Finally, outline the head by drawing a circle with an oval that’s partially overlapping it.[14]
-
3Add additional details to the outline. Draw the ears, snout, paws, and tail.[15]
-
4Erase the guidelines in your drawing and add more detail. Once you’ve erased the guidelines, you can draw the outlines of the fur. You can also smudge your pencil lead lightly to create shadows on the dog.[16]
-
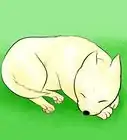
5Color in your drawing. For a Doberman pinscher, you’ll want to use black with shades of brown to color it in.[17]


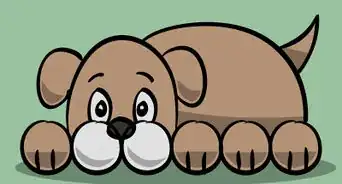
Cartoon Puppy
-
1Draw a circle. This will be the outline of the head for your cartoon puppy.
-
2Draw a horizontal oval under the circle so they overlap. This will be the outline of the puppy’s snout.
-
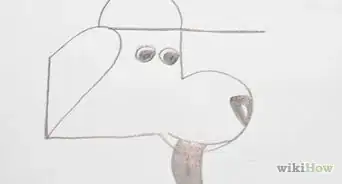
3Draw 4 small ovals inside the circle. These ovals will be the puppy’s eyes. Start by drawing 2 small ovals inside the circle. Then, draw a smaller oval inside each one.
-
4Add a small circle inside the big, horizontal oval. This will become the puppy’s nose.
-
5Draw curved lines under the nose for the mouth. First, draw 2 upward curving lines that meet to form a “w” shape. Then, draw a third upward curving line underneath them.
-
6Use curved lines to draw one of the puppy’s ears. Draw the ear so it’s coming out of the top of the puppy’s head, off to one side.
-
7Draw the second ear on the other side of the head. Use curved lines as you did for the first ear.
-
8Add a horizontal rectangle below the large oval. Have the rectangle and oval overlap slightly.
-
9Draw a square with curved sides underneath the rectangle. The square and rectangle should overlap slightly. This will make up part of the outline of the puppy’s body.
-
10Add a second, slightly-bigger curved square underneath the first one. This will be the outline of the puppy’s stomach.
-
11Draw a third curved shape underneath the previous one you drew. It should overlap slightly with the previous one. This will be the puppy’s lower back.
-
12Draw a small oval at the bottom of the previous shape you drew. The small oval will be the hind leg paw.
-
13Add curved lines extending down off the upper body for the front leg. Connect the ends of the curved lines, but leave the tops disconnected.
-
14Draw an oval at the bottom of the front leg. This is the outline for the paw on the front leg.
-
15Draw 2 more lines extending down off the upper body for the other front leg. Connect these lines at the bottom like you did for the other leg.
-
16Add a small oval at the bottom of the second front leg. This will be the puppy’s other front paw.
-
17Draw a short, upward curving line coming off the lower back. This is the beginning of the puppy’s tail.
-
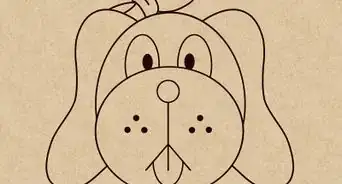
18Make a detailed outline of the puppy using the guidelines you’ve drawn so far. You should include details like the eyes, tongue, and nails.
-
19Erase all of the guidelines. When you’re finished, you should be left with a detailed outline of the puppy.
-
20Color in your drawing. You can color in the puppy using any colors you’d like! Some good options are brown, black, gray, and tan.


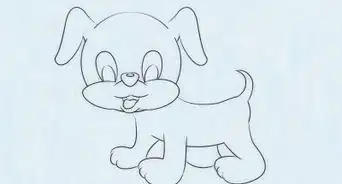
Cartoon Adult Dog
-
1Draw 2 circles and a horizontal oval. Make one of the circles bigger than the other, and have the smaller circle be above the oval and bigger circle. These shapes will make up the framework for the rest of your drawing.
-
2Draw the dog’s legs coming off of the oval and bigger circle. Divide the legs into different trapezoids, rectangles, and polygons. Have 2 legs coming off of the oval and 2 legs coming off of the bigger circle.
-
3Draw the outline of the dog’s body. Use curved lines to connect the oval to the circles. Also, add a small tail coming off the side of the bigger circle.
-
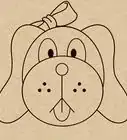
4Add the details of the dog’s head to the small circle. Refine the drawing to make distinct eyes, ears, a snout, a nose, and a mouth.
-
5Trace your drawing with a pen and erase the guidelines. Now you should be left with a detailed outline of the dog.
-
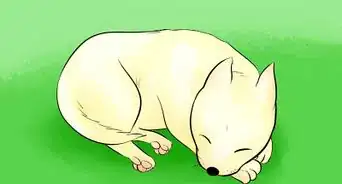
6Color your drawing in. You can use any colors you’d like. To make your dog look realistic, use colors like gray, black, and brown.


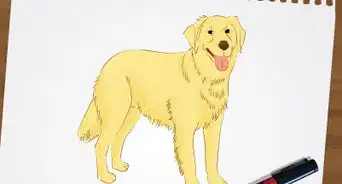
Drawing a Dog's Face and Fur
-
1Look up a reference. References are important because they help your drawings be more realistic. Try to find a picture that isn't too fuzzy or blurred. If they are too fuzzy or blurred, you can't see the fine details on the dog and therefore it won't look near as good.
-
2Blow it up. You can blow them up by copying and pasting them on a slide show, Google Docs, or Publisher. By blowing the picture up, you can see details that are small easier.
-
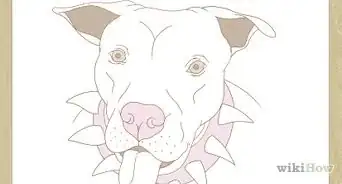
3Draw the eyes. To me, the eyes are the most important part of a drawing because if the eyes look wrong, so will the rest. Make sure your eyes aren't too small and if one eye is farther away than the other, remember to make it smaller.
-
4Add a line to show where the nose should start. Add a line between the eyes and compare it to the reference. Then make the line into a cross, facing the way your reference's head is facing. At the end of the line, draw the nose. On dog's noses, there is always a spot where the light is directly hitting the nose. This spot is typically at the top of the nose. Make sure your nose isn't completely the same color by adding highlights and shadows. Remember to draw nostrils and make them a darker color than the rest.
-
5Draw the ears. To frame out the head, draw the ears of the dog first. Make sure they are still proportional to the eyes and nose.
-
6Draw the mouth. My only tip for this is that you shouldn't make your mouth too thick. It's better too thin than thick.
-
7Frame it out. After you have drawn the ears, you frame the face by connecting the ears at the top first. Then about near the middle of the ears (if they are floppy ears) draw a line that goes a little beneath the mouth and connects it to the middle of the other ear.
-
8Check and make sure that your drawing of the head is still proportional.
-
9Draw the fundamentals of the dog's fur. The fundamentals of fur drawing are that not each hair on a dog's body goes the same direction. They're not the same length either, so make sure that you vary the length and direction even if it's only by a fraction of an inch.
-
10Do the fur in sections. Make sure your sections are small. Also, remember to check your reference. For example, if you are doing a section near the ear, check the reference in that area and keep your strokes smaller than the image on the screen unless that's how big your drawing is.
Community Q&A
-
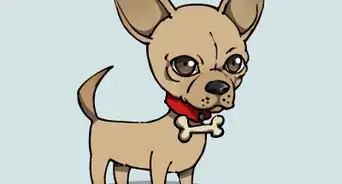
QuestionHow can I draw a German Shepherd?
 FinnjayCommunity AnswerYou can make the ears pointed by drawing triangles and make the tail a bit fluffier so it looks like a German Shepherd's. Look up pictures of German Shepherds for reference on their markings and colors.
 -
QuestionWhat color can I make my dog?
 Community AnswerDepending on the type of dog you are wanting to draw, you could stick to their natural colors like brown or black. If you are drawing a cartoon dog, or if you want to make it funny, you could color it something like purple or green.
 -
QuestionHow do I draw a collar on a dog?
 Community AnswerDraw two curved lines from one side of the neck to the other side of the neck. Decorate it as you want.


References
- ↑ https://www.youtube.com/watch?v=QNDcUArg08w&feature=youtu.be&t=23
- ↑ https://www.youtube.com/watch?v=QNDcUArg08w&feature=youtu.be&t=91
- ↑ https://www.youtube.com/watch?v=QNDcUArg08w&feature=youtu.be&t=95
- ↑ https://www.youtube.com/watch?v=QNDcUArg08w&feature=youtu.be&t=79
- ↑ https://www.youtube.com/watch?v=QNDcUArg08w&feature=youtu.be&t=30
- ↑ https://www.youtube.com/watch?v=QNDcUArg08w&feature=youtu.be&t=61
- ↑ https://www.youtube.com/watch?v=QNDcUArg08w&feature=youtu.be&t=70
- ↑ https://www.youtube.com/watch?v=QNDcUArg08w&feature=youtu.be&t=82
- ↑ https://www.youtube.com/watch?v=QNDcUArg08w&feature=youtu.be&t=122
- ↑ https://www.youtube.com/watch?v=QNDcUArg08w&feature=youtu.be&t=135
- ↑ https://www.youtube.com/watch?v=QNDcUArg08w&feature=youtu.be&t=160
- ↑ https://www.youtube.com/watch?v=QNDcUArg08w&feature=youtu.be&t=185
- ↑ http://how2drawanimals.com/8-animals/155-draw-doberman-pinscher-dog.html
- ↑ http://how2drawanimals.com/8-animals/155-draw-doberman-pinscher-dog.html
- ↑ http://how2drawanimals.com/8-animals/155-draw-doberman-pinscher-dog.html
- ↑ http://how2drawanimals.com/8-animals/155-draw-doberman-pinscher-dog.html
- ↑ http://how2drawanimals.com/8-animals/155-draw-doberman-pinscher-dog.html
About This Article

To draw a realistic dog, start by drawing 2 ovals side by side, 1 slightly larger than the other. Next, draw a line that goes on top of the ovals and another line that goes under them. For the lower line, angle it up slightly between the ovals. Then, sketch out the beginnings of the legs and add a circle for the start of a head. Include another, smaller oval for the nose that partially overlaps with the head oval. Finally, add lines that outline the head, erase the inner guide circles, and add details like eyes, a nose, and a tail!