

 ShareCompartir
Epi Info™ User Guide
Check Code: Customizing the Data Entry Process
Check Code Commands
Introduction to Check Code Commands
Check commands are structured in blocks.
Each block begins with a field, page or form name and ends with the word END.
All commands must be within a field-name block.
Commands in a block are usually activated either before or after an entry is made in the field.
For some field types, blocks can also be activated when clicking on the control (i.e. checkboxes and command buttons).
The usual case is that the commands are performed after an entry has been made and the user has pressed the < ENTER > key or when the cursor has left the field automatically.
This behavior can be altered by placing commands in blocks called BEFORE.
The format of check code blocks is usually structured as follows:
Field VARIABLENAME
After
Check Code syntax inserted here
End-After
End-Field
- The FIELD parameter establishes to which field name the check code block corresponds.
- The AFTER parameter specifies when the action will occur. The AFTER event is executed as soon as the cursor leaves that field.
- The END-AFTER parameter specifies the closing of the commands to be executed, in this example, for the AFTER event. In other words, any check code inserted between the AFTER and END-AFTER section will be executed for that field after the cursor leaves the field.
- The END-FIELD parameter simply closes the block of commands incorporated for the corresponding field.
In the example below, we have incorporated an AFTER event for a field called DOB. The block of check code will execute the assignment of a value to the field AGE using the YEARS function. The YEARS function will calculate the difference between two date fields and provide the result in Years.
Field DOB
After
ASSIGN AGE =YEARS( DOB, SYSTEMDATE)
End-After
End-Field
Basic Check Code Command Rules
- Check Commands must be placed in a block of commands corresponding to a variable/field in the database. Special sections are provided to execute commands before or after you display a form, page, or record.
- Comments preceded by two forward slashes ("//") may be placed within blocks of commands and will be ignored during execution of check code.
- Commands in a block are activated before or after you make an entry in the field. By default, commands are performed after an entry has been completed with < Enter >, < PgUp >, < PgDn >, or < Tab >, or another command causes the cursor to leave the field (e.g., GOTO). Commands can also be activated when clicking on a field or when selecting a value from a drop down list (versions 7.1.4 or higher only).
- Check commands for each field are stored in the form in a record associated with a particular field.
- Commands are inserted automatically through interaction with the dialog boxes. The syntax generated by the dialogs is then displayed in the Check Code Editor. Text can also be edited and saved in the Program Editor.
- BEFORE and AFTER commands can be inserted into fields but also into a form, page or a record.
Creating a Check Code Block
- From Choose Field Block for Action, select and expand the form, page, record, or field that will receive the commands. Expand by clicking the + sign.
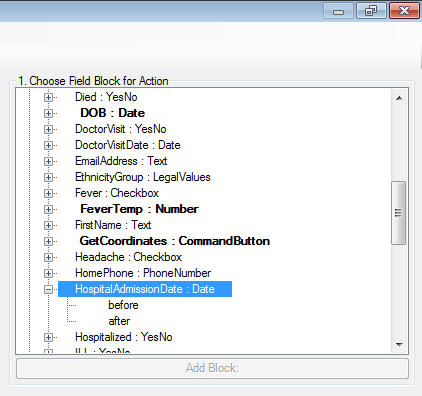
Figure 3.4: Choose Field Block for Action
- Select whether the command will be executed before or after data entry into the form, page, record, or field by clicking in the corresponding option (in this example AFTER).
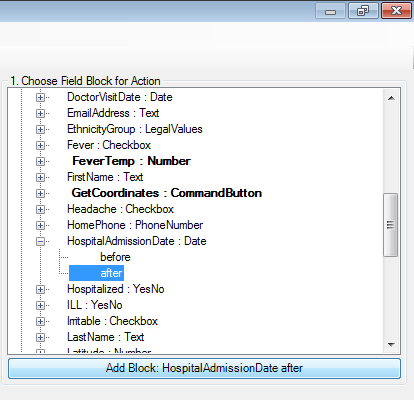
Figure 3.5: Add Block
- You can either double click on the AFTER event or click the Add Block button in order to insert the block. The Check Code Block appears in the Check Code Editor.
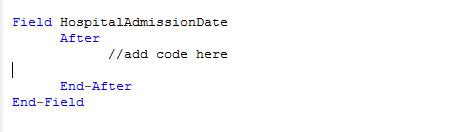
Figure 3.6: Code Block Added to Editor
After a Check Code Block has been created for a form, page, record, or field, you can insert commands within the block using the Add Command to Field Block section.
- Page last reviewed: June 30, 2016
- Page last updated: June 30, 2016
- Content source: