Word 2000
Editing Pictures
Introduction
By the end of this lesson, learners should be able to:
- Edit pictures
Moving Clips
You can re-position a clip until it is in the appropriate location.
By default, when a picture is imported into Word, it is aligned to the left margin. However, you can change the alignment so the graphic is right-aligned or centered. You can also drag the image anywhere on the page.
To Move a Clip:
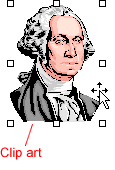
- Select the clip.
- Use your mouse to drag a selected clip to any position on the page.
- The I-beam turns into a white pointer with a little box under it as you move the picture. OR
- Use the Alignment buttons on the Formatting toolbar.
Sizing Handles
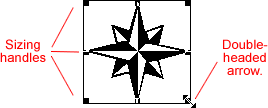
You can use sizing handles to change a picture's size.
When the mouse pointer is placed on one of the sizing handles, the pointer changes to a double-headed arrow. You may then change the size or shape of the image by dragging the sizing handle.
When any of the four corner handles are dragged, the size of the entire image becomes smaller or larger, and the picture retains its proportions.
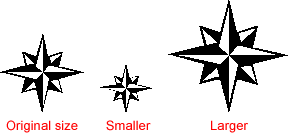
When any of the middle handles are dragged, only the height and width changes, thus changing the proportion, or scale, of the picture.

![]() Be careful; using the sizing handle can make your pictures blurry and distorted.
Be careful; using the sizing handle can make your pictures blurry and distorted.
WordArt Drawing Objects
You can resize a clip until it is the appropriate size for your document.
To Resize a Clip:
- Select the clip.
- Drag the clip's sizing handle (small squares) to resize the clip.
- Hover the mouse pointer over one of the sizing handles. The pointer changes to a double-headed arrow.
![]() When
a graphic is imported, Word determines its size. However, after a graphic
is imported, you can make it smaller, larger, or stretch it any which way.
You can even delete it.
When
a graphic is imported, Word determines its size. However, after a graphic
is imported, you can make it smaller, larger, or stretch it any which way.
You can even delete it.
To Delete a Picture:
- Select the image (click on it).
- Press the delete key on your keyboard.
Changing the Appearance of your Pictures:
We already noted that using the sizing handle can distort your clip's appearance. You can try to adjust to picture using the Picture toolbar.
To use the Picture Toolbar:
- Right-click the picture.
- Choose Show Picture Toolbar from the shortcut menu.
![]() Crop, Recolor Object, and Set Transparent Color buttons are used with areas of the picture. All other buttons affect the entire picture.
Crop, Recolor Object, and Set Transparent Color buttons are used with areas of the picture. All other buttons affect the entire picture.
Name of Button: |
Use it to: |
| Insert another picture | |
| Automatic, Grayscale, Black & White, or Watermark | |
| Increase color intensity | |
| Decreast color intensity | |
| Add white to lighten all colors | |
| Add black to darken the color | |
| Cut the sides of an image | |
| Customize the border of an image | |
| Available in PowerPoint | |
| Set how text wraps around the image | |
| Use eyedropper to make areas of the picture transparent (mainly for web graphics) | |
| Return picture to original format |
Challenge!
- Open or maximize Word.
- Open a new document.
- Open the Insert menu, select Picture, and select Clip art.
- Explore the various categories.
- When you find an image you would like to insert into your Word document, select it and click on the Insert clip button.
- Word will place the image in your document where you placed your insertion point.
- To re-position the image, practice clicking and dragging, centering, right-alignment, etc. Minimize Word.