Office XP Basics
How to Save a File in Office XP
Page 1
When working on an important file, you will want to save your work.
 Step one: Choose Save or Save As
When saving a file for the first time:
- Choose File
 Save from the menu bar (Ctrl + S).
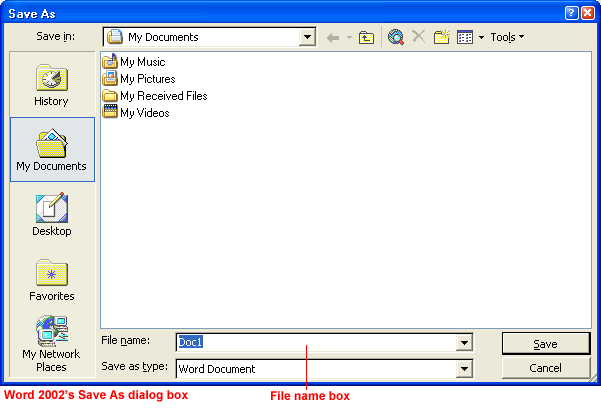
 - The Save As dialog box appears.
OR
- Click the Save button
 on the Standard toolbar.
 - The Save As dialog box appears.
OR
- Choose File
 Save As from the menu bar.
 - The Save As dialog box appears.

 Step two: Name the file
Before you click the Save button in the Save As dialog box, first name your file.
To name your file:
- Once the Save As dialog box is open, the current file name appears highlighted, ready for you to change it.
- Type a short, descriptive name in the File name box. File names can include spaces and capital letters.
- If you do not choose a file name, Office XP programs will assign a file name for you. By default, it assigns the first line of text in your document. If you save a blank document, the file will be saved as Doc1.

 Step three: Choose a file location
Choose a file location. This will keep your files orderly and easy to find. My Documents is the default file location in Office XP.
To save a file in My Documents:
- Make sure My Documents is the current file location by making sure the left column and Save in drop-down box state My Documents.
- Click the Save button.
To save a file to an alternate location:
- To save the file on your desktop, click the Desktop button on the left side of the Save As dialog box.
OR
- Click the down arrow to open the Save in drop-down list box.
- Double-click to choose another location from the list.
- Click the Save button.
 To learn more about Saving files Office XP, check out our Office XP tutorial.


