This article was co-authored by Alison Buchanan. Alison Buchanan is a Power Vinyasa Yoga Teacher based in Seattle, Washington. She completed over 300 hours of training with yoga instructor, Baron Baptiste, and is a certified Baptiste Teacher. She is a teacher with The Art of Yoga Project, a non-profit organization that brings the mindfulness of yoga to teenage girls in the California Justice System.
wikiHow marks an article as reader-approved once it receives enough positive feedback. In this case, 90% of readers who voted found the article helpful, earning it our reader-approved status.
This article has been viewed 144,337 times.
Your hips are a complex cluster of powerful muscles, tendons, and ligaments that are essential to your ability to move. Sitting in front of a computer all day prevents your hips from getting the movement and stretching they need. Activities like running, walking, and cycling build strength in your hips, but they do not flex or stretch your hips and can end making them feel tighter. Stress is also a major contributor to tight hips, as we tend to hold tension in the hip area. Banish tight hips by integrating One Leg Pigeon Pose, or Eka Pada Rajakapotasana, into your yoga or exercise practice.[1] [2]
Steps
Doing One Leg Pigeon Pose
-
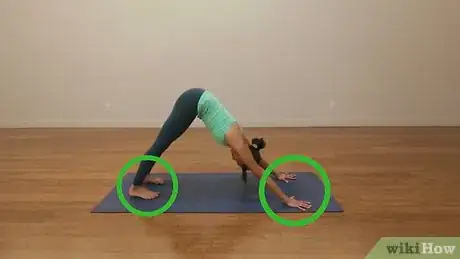
1Begin in downward dog. Your knees should be right below your hips on the mat. Your hands should be slightly ahead of your shoulders.[3]
- Once you get the basic pose down, it is usually best to learn how to flow into pigeon pose from downward-facing dog.
-
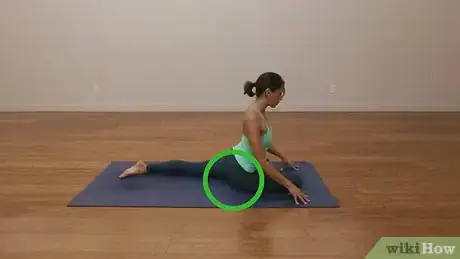
2Raise your right leg so it extends away from you. Slide it forward to the back of your right wrist. Angle your right shin under your torso and bring your right foot to the front of your left knee, behind your left hand.
- The outside of your right shin should now rest on the floor. The further forward your right heel is, the deeper and more intense the pose will be.
- Keep your right foot flexed to help protect your knee.
- If you are a yoga beginner, bend your front knee as much as you need so it feels comfortable and not tight or tense. It’s important to protect your knee in this pose to prevent irritating the joint. As you continue to practice this pose, you will be able to bring your shin more parallel with the front edge of the mat.[4]
-
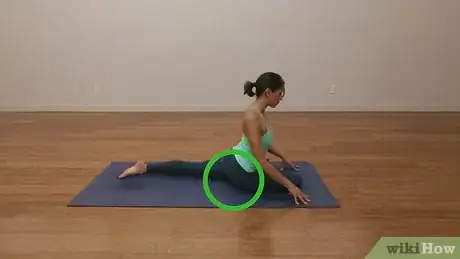
3Slide your left leg back behind you. Straighten it and let the front of your thigh sit on the floor. Look behind you to make sure your left leg is extended straight behind you, not out to one side.
- Make sure your back thigh is rotating inward. Press all five toes of your back foot onto the mat.
-
4Lower the outside of your right buttock to the floor. Position your right heel so it is in front of your left hip.
- Your body will want to avoid putting weight on your right hip, especially if it is tight. Try to maintain equal weight in both hips.
-
5Place your hands on either side of your leg. Inhale and rise up on your fingertips. Try to elongate your spine. Lengthen your lower back by pressing your tailbone down and forward.
-
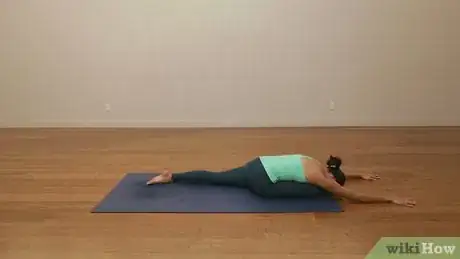
6Exhale and lay your torso down over your right leg. Don’t worry about putting your head on the mat. Only lower to a point that is comfortable for your hips but also gives them a deep stretch. Focus on placing equal weight on both hips and keeping your spine long.
- If your hips are flexible or open, stretch your arms forward and stack your hands on top of each other. Rest your head on your hands, laying your torso over your right thigh.
-
7Hold this pose for 4-5 breaths. Inhale and exhale deeply through your nose. Continue to maintain equal weight in both hips and extend your spine forward and down.
-
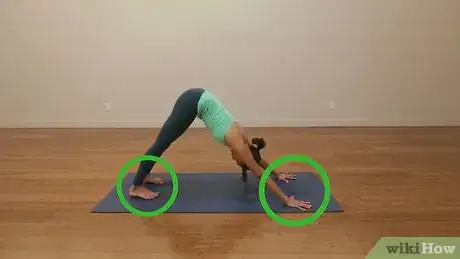
8Rise up and place your hands back on the floor. Inhale as you carefully slide your left knee forward. Exhale and lift your right leg up and back into Downward Facing Dog Pose. Keep your right leg lifted to release any tension in your right hip for 1-2 breaths.
-
9Exhale as you lower your right leg down. Drop down on your knees to all-fours. Repeat the same pose with your left leg.
- Make sure you position your left leg correctly and breathe deeply with each movement.
-
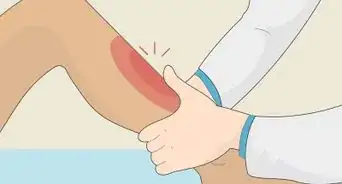
10Take your time with this pose. Pigeon Pose can cause emotional resistance for some people, especially if the hip area is tight. If your hips feel too tight or uncomfortable, take a deep breath and come out of the pose. Practice another sun salutation and then try the pose again. Go slowly and only as far as feels comfortable for your hips and your knee.[5]
- Don’t force your hips into the pose. Be patient and go slow. Over time, your flexibility will increase and your hips will respond to this opening.
-
11Modify the pose if you are a more advanced yoga practitioner. More seasoned yoga practitioners, or those with flexible hips, can deepen the pose into a backbend.[6]
- Inhale and rise up in Pigeon Pose on your right side. Bend your back (left) knee and reach your left arm back. Take hold of the outside of your left ankle. Flex your left foot and try to maintain equal weight in both hips.
- If this feels good, reach your right arm back and hold onto the inside of your left ankle. Square your shoulders to the front of the room.
- Hold this variation for 4-5 breaths. Continue to roll your shoulders back and lift your chest forward and up.
- Slowly release the variation and place your hands on either side of your right leg. Repeat this variation on the opposite side.
Pushing Yourself with Pigeon Pose
-
1Return yourself to downward facing dog, making sure your feet and palms are situated firmly on the floor. Lift your heels individually off the ground -- you should be able to freely move one leg.
-
2Pick your right leg up and extend it straight behind you. Lift your leg and straighten it back. The goal is for your leg to continue the diagonal line upward from your back, but don't worry if you're not flexible enough for this yet. Hold your leg up for one deep, controlled breath.
-
3Pull your left knee in towards your chest as you inhale. Slowly bring your knee up towards the front of your body, bending it roughly 90-degrees as it passes your chest.
-
4Lay the outside of your right thigh down on the mat so that your foot points to the left. This is the crucial move into pigeon. As your leg comes forward, work on fluidly bending it and placing it down in front of you. You should be resting on the outside of your right leg and the top of your left leg, which hasn't moved.
- Focus on exhaling as you set this leg down, as it will make it easier to stretch into the pose.
- The further forward you can get your knee, keeping it bent 90-degrees or more, the deeper the stretch.
-
5Once you have your balance, bring your hands back and set them even with your hips. Your hands are probably out in front of you from downward dog. Using your fingertips to grip the mat, place them back near your hips, 6-8" behind shoulder level or so.
-
6Straighten your back leg so that you are resting on the top of your left foot. Slowly pick up your back foot, which should be resting on your toes. Uncurl them so that you can rest on the top of your foot.
-
7Elongate the spine, control your breathing, and sink your butt to the floor. Once you've gotten yourself into pigeon pose from downward dog, the rest of the form is exactly the same. Focus on elongating your spine, lifting your chin and chest so that you feel tall and relaxed. With each exhale, try and bring your butt closer to the floor, deepening the stretch.
-
8Bend forward to deepen the stretch in your butt and hips. When ready, fold forward so that your chest rests on your knee. Your forehead should be almost on the floor, or touching. Extend your arms completely out in front of them with your palms on the floor. Again, use each exhalation to pull deeper into pigeon pose.
-
9Reach back and grab your back leg with both hands for an advanced pose. Inhale and rise up in Pigeon Pose on your right side. Bend your back (left) knee and reach your left arm back. Take hold of the outside of your left ankle. Flex your left foot and try to maintain equal weight in both hips. Continue to roll your shoulders back and lift your chest forward and up, keeping great form as you look to the ceiling.
-
10Add a second hand to the advanced pose to push yourself. If you feel confident reaching back with your left hand to grab your left foot, reach your right arm back and hold onto the inside of your left ankle. Square your shoulders to the front of the room. Having both hands back requires core control, balance, and flexibility.
- Hold this variation for 4-5 breaths, then ease your foot back to the ground.
How Do You Reduce Distractions During Yoga?
Things You'll Need
- Yoga mat
References
- ↑ http://www.yogaoutlet.com/guides/how-to-do-one-legged-king-pigeon-pose-in-yoga/
- ↑ http://www.yogajournal.com/article/beginners/proper-pigeon-pose/
- ↑ http://www.yogajournal.com/pose/one-legged-king-pigeon-pose/
- ↑ http://www.yogaoutlet.com/guides/how-to-do-one-legged-king-pigeon-pose-in-yoga/
- ↑ http://www.yogaoutlet.com/guides/how-to-do-one-legged-king-pigeon-pose-in-yoga/
- ↑ http://www.yogaoutlet.com/guides/how-to-do-one-legged-king-pigeon-pose-in-yoga/
About this article
To do the pigeon pose in yoga, start in downward dog, and then raise your right leg and bring it forward, placing it on the floor behind your left hand. Next, slide your left leg back behind you, and let your right thigh rest on the floor. Then, exhale and lay your torso down over your right leg, stretching your hands forward. Finally, hold this pose for 4-5 breaths before carefully rising back into downward dog. For more advice from our Yoga co-author, like how to do advanced pigeon poses, scroll down!
